A successful outdoor event hinges on clear, vibrant sound. This guide offers a beginner-friendly, step-by-step approach to sound system setup for outdoor events, ensuring your guests hear every word and note with ease. Get ready to amplify your next gathering!
Planning an outdoor get-together, whether it’s a backyard barbecue, a community fair, or a small music festival, brings its own unique set of challenges. One that often stumps beginners is getting the sound just right. You want everyone to hear the announcements, the music, or the speaker without straining. It can feel like a puzzle, but don’t worry! With a few simple steps, you can create an amazing audio experience for your event.
This guide will walk you through the essentials of sound system setup for outdoor events, breaking down what you need and how to put it all together. We’ll cover everything from choosing the right speakers to placing them effectively, ensuring your event sounds as good as it looks. Let’s make sure your sound is as spectacular as your celebration!
Why Outdoor Sound Setup Needs Special Attention
Outdoor environments are vastly different from indoor spaces when it comes to acoustics. You’re dealing with open air, ambient noise, and the potential for sound to dissipate quickly. Unlike a room with walls that reflect sound, the outdoors can swallow it up. This means a sound system that works perfectly inside might fall flat outside.
Think about it: background noise from traffic, wind, or even fluttering leaves can compete with your audio. People milling around, children playing, and the sheer space you need to cover all present unique challenges. Without a proper setup, your guests might miss crucial information or find the music too quiet or distorted. Getting the sound right is key to guest satisfaction and the overall success of your event.
Essential Components of an Outdoor Sound System
Setting up a sound system for an outdoor event might seem intimidating, but it boils down to a few core components. Understanding each piece and its role will make the process much clearer. Think of it like gathering your ingredients before you start cooking – you need to know what you’re working with!
1. Speakers: The Voice of Your Event
These are arguably the most critical part. For outdoor events, you’ll generally need more powerful speakers than you would for an indoor party. They need to project sound over a larger area and combat ambient noise.
- Type: Look for PA (Public Address) speakers, often referred to as “tops” or “full-range” speakers. Some events might benefit from subwoofers for low-end frequencies (like bass in music), but for general announcements and speeches, good full-range speakers are often sufficient.
- Power (Wattage): Wattage indicates how loud a speaker can get. Outdoor events need higher wattage to cover more ground. A general guideline is 100-300 watts per speaker for a small to medium gathering of up to 100 people. For larger crowds or if you want to play music at a good volume, you might need more or higher-powered speakers.
- Quantity: Often, two main speakers are sufficient for a balanced stereo sound or mono coverage for a medium-sized area.
2. Mixer: The Sound’s Control Center
The mixer is where you control the various audio sources that go into your speakers. It allows you to adjust volume levels for different microphones or music players, and sometimes even shape the tone (bass, treble).
- Inputs: Ensure the mixer has enough inputs for all your sound sources (e.g., one for a microphone, one for a music player).
- Outputs: It needs outputs that connect to your speakers (or amplifier, if you’re using one).
- Simplicity: For beginners, a simple 2-channel or 4-channel mixer is usually perfect.
3. Microphones: For Clear Communication
If you have speakers, presenters, or need to make announcements, microphones are essential. Wired microphones are generally reliable and cost-effective for events.
- Type: Dynamic microphones are robust and a great choice for live events as they handle high sound pressure levels without distortion and are less sensitive to feedback.
- Wireless vs. Wired: Wired mics are less prone to interference and don’t require batteries, making them a safer bet for beginners. Wireless mics offer more freedom of movement but can be more complex to set up and require battery management.
4. Cables and Accessories: The Connectors
You can’t connect anything without cables! The right cables are crucial for a clean and reliable audio signal.
- XLR Cables: These are used to connect microphones to the mixer and often to connect the mixer to powered speakers or an amplifier. They are the standard for professional audio.
- Speaker Cables: If you have passive speakers (powered by an external amplifier), you’ll need sturdy speaker cables. If you have active/powered speakers, they usually connect via XLR or TRS cables.
- Audio Source Cables: You’ll need a cable (like a 3.5mm to dual RCA or dual 1/4-inch) to connect your music player (phone, laptop) to the mixer.
- Power: Don’t forget power strips, extension cords, and a reliable power source for all your equipment.
Optional but Recommended:
- Amplifier: If you choose passive speakers (which don’t have built-in amplifiers), you’ll need an external amplifier to power them. Active/powered speakers have the amplifier built-in, simplifying your setup.
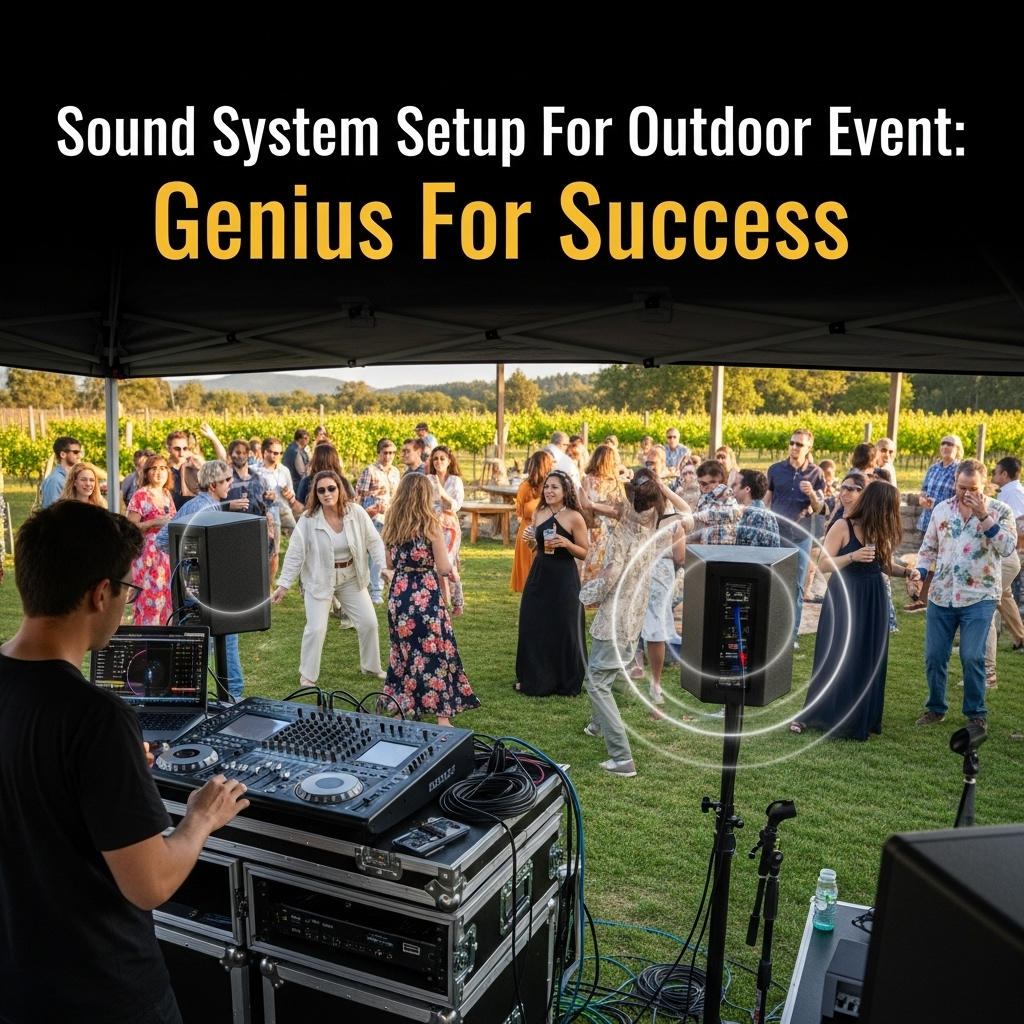
- Speaker Stands: Elevating your speakers on stands is crucial for outdoor sound projection. It gets the sound above the heads of the crowd and helps it travel further.
- Windscreen: For microphones, a foam windscreen can help reduce wind noise if you’re in a breezy area.
Step-by-Step: Setting Up Your Outdoor Sound System
Now that you know the components, let’s get them connected! Following these steps will help ensure a smooth and successful setup for your outdoor sound system.
Step 1: Plan Your Layout and Power Needs
Before you unpack anything, walk around your event space. Consider:
- Where is the main gathering area? This is where your sound needs to be strongest.
- Where will your sound sources be? (e.g., DJ booth, presenter’s podium, a designated spot for music playback).
- Are there noisy areas nearby? (e.g., busy road, playground). You might need to consider speaker placement to minimize distraction.
- Power sources: Locate available electrical outlets. Ensure you have enough extension cords and power strips to reach all your equipment safely. It’s a good idea to use heavy-duty outdoor-rated extension cords. Check out resources from the Electrical Safety Foundation International (https://www.esfi.org/) for safe electrical practices.
Step 2: Position Your Speakers
This is a critical step for outdoor sound dispersion. The goal is to get the sound out to your audience without it becoming too loud for those close by or too quiet for those further away.
- Use Speaker Stands: Absolutely essential! Place speakers on stands at least 5-7 feet high. This lifts the sound above ear level and allows it to travel over the heads of your guests.
- Placement:
- For a single zone: Place speakers at the front of your event area, facing the audience. You can place them slightly angled inwards towards each other for a more focused sound.
- For a wider area: If you have a very wide space, you might consider placing a speaker at each side of the stage or front area, pointing outwards and slightly inwards. For very large or long areas, you might need additional delayed speakers, though this is more advanced.
- Avoid Obstructions: Don’t place speakers behind trees, buildings, or other large objects that can block the sound.
- Distance: Give your speakers some space from walls or fences behind them, as this can sometimes cause unwanted reflections or bass buildup.
Step 3: Connect Your Mixer and Sound Sources
This is where the “brain” of your system starts to come together.
- Place your mixer in a convenient location where you can easily access it during the event.
- Connect your music player (laptop, phone) to the mixer using the appropriate audio cable (e.g., 3.5mm to RCA or 1/4-inch).
- If using microphones, connect them to the mixer’s microphone inputs using XLR cables.
Step 4: Connect the Mixer to Your Speakers
Ensure all equipment is unplugged from power before making these connections to avoid any electrical surges.
- Powered Speakers: Connect the main audio output from your mixer (usually labelled “Main Out” or “Line Out”) to the input on your powered speakers. Use XLR or TRS cables, depending on your mixer and speaker connections.
- Passive Speakers: Connect the main audio output from your mixer to the input of your amplifier using XLR or TRS cables. Then, use proper speaker cables to connect the amplifier’s speaker outputs to your passive speakers. Crucially, ensure your amplifier is rated to match the impedance and power handling of your speakers. Consult your speaker and amplifier manuals for guidance.
Step 5: Power Up and Test
This is the moment of truth!
- Plug in all your equipment, starting with speakers, then the mixer, and finally any other devices.
- Turn on your mixer first.
- Turn on your powered speakers or amplifier.
- Start with all volume controls on the mixer turned down to zero.
- Play some test audio from your music player. Slowly bring up the music volume on the mixer to a low level. Check that sound is coming out of both speakers.
- Test Microphones: If using microphones, slowly bring up the gain/trim for each microphone channel until you see a signal light, then slowly bring up the fader for that channel. Speak into the microphone at a normal volume. Adjust the volume to be heard clearly over the music or background noise.
- Sound Check: Walk around the different listening areas of your event. Listen for clarity, volume, and any unwanted buzzing or distortion. Adjust speaker angles if needed.
Step 6: Fine-Tuning and Troubleshooting
Listen carefully to adjust the sound to perfection.
- Feedback Prevention: If you hear a high-pitched squeal (feedback), it usually means a microphone is too close to a speaker, or the volume is too high. Turn down the offending channel’s volume immediately or adjust mic placement.
- Equalization (EQ): If your mixer has EQ controls (bass, mid, treble), you can use them to subtly adjust the tone. For example, if speech sounds muddy, try slightly reducing the bass. If it sounds tinny, try slightly boosting the treble.
- Volume Levels: Ensure music levels aren’t drowning out important announcements or speeches.
Choosing the Right Gear: A Comparison Table
Deciding between different types of gear can be confusing. Here’s a table to help you understand the basic trade-offs, especially regarding speakers.
| Feature | Powered Speakers (Active) | Passive Speakers with Amplifier |
|---|---|---|
| Description | Amplifier built into the speaker cabinet. | Requires a separate external amplifier to power them. |
| Setup Complexity | Simpler. Plug into mixer, then power. | More complex. Mixer -> Amplifier -> Speakers. Need to match amp to speakers. |
| Portability | Generally easier as it’s one unit per speaker. | Less portable, as you have speakers + a separate amplifier. |
| Sound Quality | Can be excellent. Manufacturers often match amp to speaker. | Can be excellent, giving more flexibility in choosing amp characteristics. |
| Cost | Can be more expensive per speaker, but may save on buying a separate amp. | Can be more cost-effective if you already own an amp or can find a good deal. |
| Beginner Friendliness | Very high. Recommended for most beginners. | Moderate. Requires understanding of power and impedance matching. |
Tips for Success in All Kinds of Weather
Outdoor events mean facing the elements! Here are some tips to ensure your sound system stays functional and sounds great, no matter what Mother Nature throws at you.
- Rain: If rain is a possibility, invest in speaker covers or tarps. Protect your mixer, amplifier, and any other sensitive electronics with a waterproof cover, but ensure there’s still ventilation to prevent overheating. Never expose electronics to direct rain.
- Sun/Heat: Direct sunlight can overheat electronics. Place them in shaded areas if possible. If using outdoor-rated extension cords and power strips, ensure they are rated for the load you’re putting on them, especially in warmer temperatures as heat can affect electrical resistance. The U.S. Consumer Product Safety Commission (https://www.cpsc.gov/) offers valuable safety information on electrical products.
- Wind: Wind can carry away sound, making it harder for your audience to hear. Maximize speaker height using stands, and consider angling speakers slightly downwards towards the audience to combat wind disturbance. Foam windscreens on microphones are a must for windy conditions.
- Dust/Dirt: Outdoor events can be dusty. Keep covers on your equipment when not in use or during breaks. Gently clean speaker grilles and connections if they become clogged.
Common Outdoor Speaker Placement Mistakes to Avoid

Getting speaker placement right is crucial. Here are some common mistakes that beginners (and even some experienced folks) make:
| Mistake | Why it’s a Problem | How to Fix It |
|---|---|---|
| Placing speakers on the ground | Sound is muffled and blocked by people’s heads; it doesn’t travel far. | Always use speaker stands to elevate speakers at least 5-7 feet high. |
| Pointing speakers directly at each other (or straight out) | Creates uneven sound coverage; you might get phase issues or a “hot spot” in the middle. | Angle speakers slightly inwards towards the center of the audience for more uniform coverage. |
| Hiding speakers behind objects | Walls, trees, or other obstructions absorb and block sound waves, creating dead zones. | Ensure a clear line of sight from speakers to the entire audience area. |
| Placing speakers too close to the audience at the front | Creates an unpleasant volume imbalance; those up front are blasted while those further back can’t hear well. | Position speakers at the front edge of the event space, facing the audience, and use stands to direct sound over heads. |
| Using only one speaker for a wide or deep area | Sound coverage will be uneven, with one side or the back of the audience receiving poor audio. | For wider areas, consider a stereo pair or even two pairs of speakers. For deeper areas, consider multiple speaker sets or “delay towers” (more advanced). |
Frequently Asked Questions (FAQs)
Here are some common questions beginners have about setting up sound for outdoor events.
Q1: How powerful do my speakers need to be for an outdoor event?
For a small to medium outdoor event (up to 100 people talking or listening to announcements), two powered speakers with 150-300 watts each are usually a good starting point. For playing music loudly or for larger crowds, you’ll need more powerful speakers or additional speakers.
Q2: Can I just use my portable Bluetooth speaker?
A small Bluetooth speaker is great for a casual backyard gathering with a few people. However, for events with more than 10-15 guests, or where you need clear announcements or music for a larger area, a dedicated PA sound system is necessary. Bluetooth speakers lack the power and dispersion needed for larger outdoor spaces.
Q3: Do I need an amplifier if I have powered speakers?
No, you do not need a separate amplifier if you are using powered (or active) speakers. The amplifier is built directly into the speaker itself. This makes setup much simpler.
Q4: How do I connect my phone or laptop to the sound system?
You’ll typically connect your phone or laptop to the mixer. Common cables include a 3.5mm headphone jack to dual RCA cables, or a 3.5mm to dual 1/4-inch TS cables, depending on the inputs available on your mixer.
Q5: What are speaker stands and why are they so important?
Speaker stands are tripods or poles that elevate your speakers off the ground. They are vital outdoors because they lift the sound above the heads of your audience, allowing it to project further and more clearly. Without them, sound gets absorbed by people and the ground, resulting in poor coverage.
Q6: How do I avoid feedback from my microphone?
Feedback (a loud squeal) happens when a microphone picks up sound from a speaker and amplifies it, creating a loop. To avoid it: keep microphones away from speakers, don’t point mics directly at speakers, and avoid turning microphone volume or gain up too high unnecessarily. If feedback starts, immediately lower the volume of the mic channel.
Q7: My sound is distorted. What could be wrong?
Distortion usually means one of a few things: the volume is turned up too high somewhere in the chain (mixer, amplifier, or speaker itself), the input signal is too “hot” (too strong for the mixer channel), or the equipment is being pushed beyond its capabilities. Start by turning everything down and gradually increasing volume while listening for clarity. Check that your mixer channels aren’t clipping (a light indicating the signal is too strong).
Conclusion

Setting up a sound system for an outdoor event doesn’t have to be a daunting task. By understanding the essential components – speakers, mixer, microphones, and cables – and following these simple, step-by-step instructions, you can ensure your event has the clear, impactful sound it deserves. Remember that speaker placement on stands is key to effective outdoor audio, and a little thoughtfulness about your layout and power needs goes a long way.
Don’t be afraid to test everything thoroughly before your guests arrive. With practice and attention to detail, you’ll gain confidence, and your outdoor gatherings will sound fantastic. Happy hosting, and enjoy the amazing sound you’ll create!