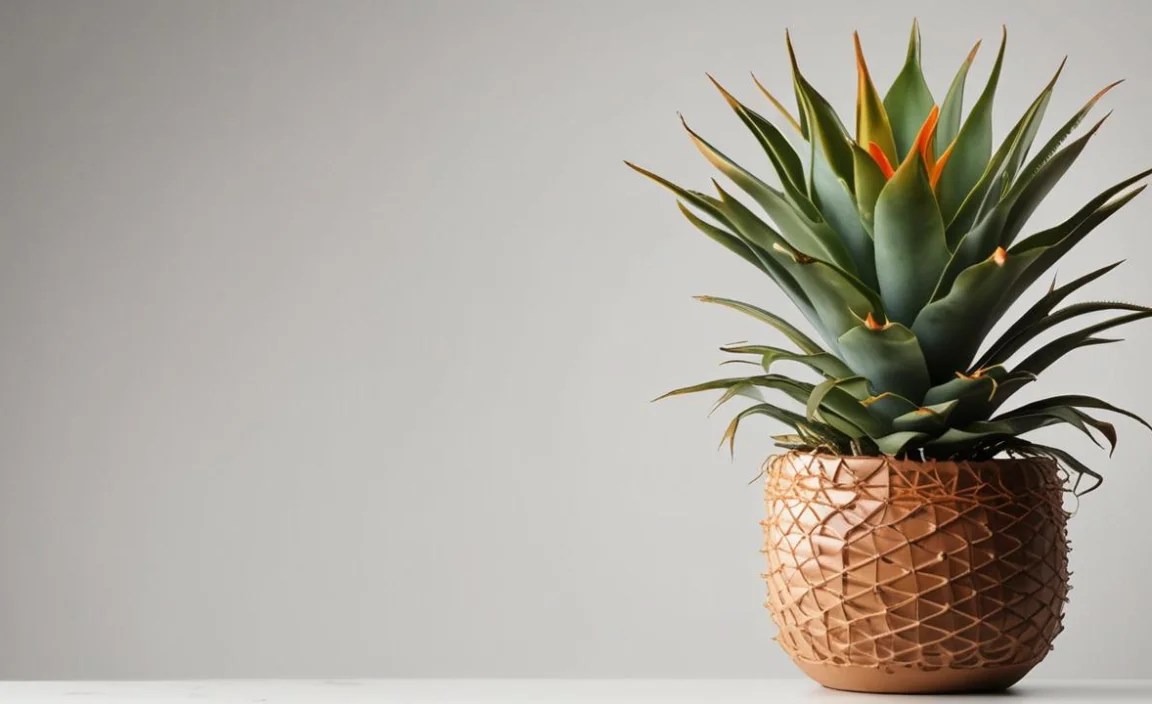
Have you ever seen a plant that looks like it belongs in a jungle? That might be a bromeliad! These cool plants are known for their bright colors and interesting shapes. Did you know you can grow them inside your house? Let’s learn all about how to care bromeliads indoors. It’s easier than you think.
Bromeliads can add a touch of the tropics to your home. They don’t need much to thrive. With the right care bromeliads indoors will bring you joy for years. So, let’s dive in and discover the secrets to keeping these plants happy.
Key Takeaways
- Caring for bromeliads indoors involves providing bright, indirect light.
- Water bromeliads by filling their central cup, not the soil.
- Use well-draining potting mix to prevent root rot.
- Maintain moderate humidity for optimal growth.
- Fertilize sparingly with a diluted bromeliad fertilizer.
Understanding Bromeliad Light Needs Indoors

Bromeliads love light, but not too much direct sun. Imagine them growing under the trees in a rainforest. They get filtered sunlight. When you care bromeliads indoors, think about this. A bright, indirect light is best. An east-facing window is often a good choice. A south-facing window can work, but you might need to filter the light with a sheer curtain. Too much direct sun can burn their leaves. Not enough light, and they might not bloom. Watch your plant to see how it reacts. If the leaves look pale, it might need more light. If they look burned, move it to a shadier spot. Finding the right balance is key to happy bromeliads.
- East-facing windows are often ideal.
- South-facing windows need filtered light.
- North-facing windows might not provide enough light.
- Watch for signs of too much or too little light.
- Rotate the plant to ensure even light exposure.
Light is like food for plants. They use it to make energy. This process is called photosynthesis. Without enough light, they can’t make enough food. That’s why it’s so important to get the light right when you care bromeliads indoors. Remember, every home is different. What works for one person might not work for another. Experiment and see what your plant likes best. You’ll soon become a bromeliad expert.
Fun Fact or Stat: Bromeliads can survive in a wide range of light conditions, but they thrive best with 6–8 hours of bright, indirect sunlight each day.
How to Spot Light Problems
Have you ever seen a plant with sad, droopy leaves? That could be a sign of a light problem! Plants need light to make their own food. If they don’t get enough, they can’t grow strong. When you care bromeliads indoors, watch for these signs. Pale leaves can mean too much light. Dark green leaves can mean not enough. Burnt spots can mean direct sunlight is too strong. Pay attention to your plant’s signals. It’s like learning a secret code. Once you know what to look for, you can help your bromeliad thrive.
Using Grow Lights for Bromeliads
What if you don’t have a sunny window? Don’t worry! You can still care bromeliads indoors. Grow lights are like sunshine in a bulb. They can give your plant the light it needs, even in a dark room. There are many different types of grow lights. Some are small and clip onto a desk. Others are big and hang from the ceiling. Choose one that fits your space and your plant’s needs. Remember to follow the instructions that come with the light. You don’t want to give your plant too much light.
Adjusting Light Seasonally
Did you know that the amount of sunlight changes throughout the year? In the summer, we have long, sunny days. In the winter, the days are shorter and darker. When you care bromeliads indoors, you need to adjust the light. In the summer, you might need to move your plant away from the window. In the winter, you might need to move it closer or add a grow light. Pay attention to how the seasons affect the light in your home. Your bromeliad will thank you.
Watering Your Indoor Bromeliad Correctly

Watering is super important when you care bromeliads indoors. But here’s a secret: you don’t water them like regular plants! Instead of pouring water into the soil, you pour water into the central “cup” of the bromeliad. This cup is formed by the plant’s leaves. It’s like a little reservoir. Use rainwater, distilled water, or tap water that has sat out overnight. This lets the chlorine evaporate. Keep the cup filled with water, but don’t let it get stagnant. Flush it out every few weeks to remove any build-up. Let the soil dry out between waterings. Overwatering can cause root rot.
- Water the central cup, not the soil.
- Use rainwater, distilled water, or dechlorinated tap water.
- Flush the cup every few weeks.
- Let the soil dry out between waterings.
- Avoid overwatering to prevent root rot.
Imagine the bromeliad is like a tiny water tower. The cup stores water for the plant to use. The roots mostly help to anchor the plant. They don’t absorb much water. That’s why it’s so important to keep the cup filled. When you care bromeliads indoors, remember this trick. It’s what makes them so unique. And it’s what makes them so easy to care for! With the right watering, your bromeliad will thrive.
Fun Fact or Stat: Bromeliads can store up to a quart of water in their central cup, which helps them survive in dry conditions.
How Often to Water
How often should you water your bromeliad? It depends! The weather, the humidity, and the size of your plant all play a role. In general, you should water when the top inch of soil is dry. Check the cup every few days. If it’s empty, fill it up. In the winter, you might need to water less often. The air is drier, so the water evaporates more slowly. When you care bromeliads indoors, pay attention to these details. They can make a big difference.
Signs of Overwatering
Overwatering is a common mistake when people care bromeliads indoors. It can lead to root rot, which can kill your plant. So, how do you know if you’re overwatering? Look for these signs: yellowing leaves, soft or mushy roots, and a foul smell coming from the soil. If you see any of these signs, stop watering immediately. Let the soil dry out completely. You might even need to repot the plant in fresh soil.
Using Humidity to Your Advantage
Bromeliads love humidity. Humidity is the amount of moisture in the air. You can increase the humidity around your plant in several ways. You can use a humidifier. You can place the plant on a tray filled with pebbles and water. You can also mist the plant with water every day. When you care bromeliads indoors, remember that humidity is your friend. It will help your plant thrive.
Choosing the Right Soil for Indoor Bromeliads

The right soil is key when you care bromeliads indoors. Bromeliads don’t grow in regular garden soil. They need a special mix that drains well. Think about where they grow in the wild. They often grow on trees! Their roots need air. A good mix includes things like orchid bark, perlite, and peat moss. These ingredients help water drain quickly. They also provide air pockets for the roots. Avoid heavy, clay-based soils. These can hold too much water and cause root rot. You can buy bromeliad potting mix at most garden centers. Or, you can make your own!
- Use a well-draining potting mix.
- Orchid bark, perlite, and peat moss are good ingredients.
- Avoid heavy, clay-based soils.
- Buy bromeliad potting mix or make your own.
- Ensure the mix allows for good air circulation around the roots.
Choosing the right soil is like choosing the right shoes for a race. If you wear the wrong shoes, you won’t run very well. The same is true for plants. If you use the wrong soil, they won’t grow very well. When you care bromeliads indoors, take the time to choose the right soil. It will make a big difference in the health of your plant. A happy plant is a beautiful plant!
Fun Fact or Stat: Many bromeliads are epiphytes, meaning they grow on other plants and don’t need soil to survive in their natural habitat.
Understanding Soil pH
Did you know that soil has a pH level? pH measures how acidic or alkaline the soil is. Bromeliads prefer slightly acidic soil. A pH of around 6.0 is ideal. You can test the pH of your soil with a soil testing kit. These kits are available at most garden centers. If your soil is too alkaline, you can add sulfur to lower the pH. If it’s too acidic, you can add lime to raise the pH. When you care bromeliads indoors, understanding soil pH can help you keep your plant healthy.
Making Your Own Bromeliad Mix
Want to get your hands dirty? You can make your own bromeliad potting mix! It’s easy and fun. Here’s a simple recipe: Mix equal parts orchid bark, perlite, and peat moss. That’s it! You can adjust the recipe to suit your needs. For example, if you live in a humid area, you might want to add more orchid bark. This will help the soil drain even faster. When you care bromeliads indoors, making your own mix gives you more control over the health of your plant.
Repotting Your Bromeliad
Eventually, your bromeliad will need to be repotted. Repotting is like moving your plant to a bigger house. It gives the roots more room to grow. Choose a pot that is only slightly larger than the current pot. Gently remove the plant from its old pot. Loosen the roots and remove any old soil. Place the plant in the new pot and fill it with fresh potting mix. Water the plant thoroughly. When you care bromeliads indoors, repotting is an important part of keeping your plant healthy.
Fertilizing Indoor Bromeliads: A Guide
Bromeliads don’t need a lot of fertilizer. In fact, too much fertilizer can harm them. But a little bit of the right kind can help them grow and bloom. Use a fertilizer that is specifically made for bromeliads. These fertilizers are usually diluted. Follow the instructions on the package carefully. You can also use a general-purpose fertilizer, but dilute it to half strength. Apply the fertilizer to the central cup of the plant, not the soil. Fertilize only during the growing season (spring and summer). Don’t fertilize in the winter.
- Use a bromeliad-specific fertilizer.
- Dilute the fertilizer to half strength.
- Apply the fertilizer to the central cup.
- Fertilize only during the growing season.
- Avoid over-fertilizing.
Think of fertilizer as vitamins for your plant. Just like people, plants need vitamins to stay healthy. But too many vitamins can be harmful. When you care bromeliads indoors, remember to fertilize sparingly. A little bit goes a long way. Your bromeliad will thank you with beautiful blooms!
Fun Fact or Stat: Bromeliads absorb nutrients through their leaves and central cup, not primarily through their roots like most plants.
Choosing the Right Fertilizer
There are many different types of fertilizer available. So, how do you choose the right one for your bromeliad? Look for a fertilizer that is low in nitrogen. Nitrogen promotes leaf growth, but it can inhibit blooming. A fertilizer with a higher phosphorus content is better. Phosphorus promotes blooming. When you care bromeliads indoors, reading the fertilizer label is important. It will help you choose the right product for your plant.
When to Fertilize
When is the best time to fertilize your bromeliad? As mentioned earlier, you should only fertilize during the growing season (spring and summer). During this time, the plant is actively growing and needs more nutrients. In the winter, the plant is dormant and doesn’t need fertilizer. Fertilizing in the winter can actually harm the plant. When you care bromeliads indoors, timing is everything.
Signs of Over-Fertilizing
How do you know if you’re over-fertilizing your bromeliad? Look for these signs: brown leaf tips, stunted growth, and a build-up of salts on the soil surface. If you see any of these signs, stop fertilizing immediately. Flush the soil with water to remove excess fertilizer. In the future, use less fertilizer or fertilize less often. When you care bromeliads indoors, it’s always better to under-fertilize than to over-fertilize.
Maintaining Humidity for Healthy Bromeliads Indoors

Bromeliads love humidity. They come from tropical places. These places have lots of moisture in the air. When you care bromeliads indoors, you need to create a humid environment. Dry air can cause the leaves to turn brown. It can also prevent blooming. There are several ways to increase humidity. You can use a humidifier. You can place the plant on a pebble tray filled with water. You can also mist the plant with water every day. Grouping plants together can also help. Plants release moisture into the air. This creates a more humid microclimate.
- Use a humidifier to increase humidity.
- Place the plant on a pebble tray filled with water.
- Mist the plant with water every day.
- Group plants together to create a humid microclimate.
- Maintain humidity levels between 50% and 70%.
Think of humidity as a spa day for your plant. It helps them relax and thrive. When you care bromeliads indoors, providing enough humidity is like giving your plant a little piece of the tropics. It will help them feel right at home. A happy bromeliad is a beautiful bromeliad!
Fun Fact or Stat: Bromeliads absorb moisture from the air through tiny scales on their leaves, which is why humidity is so important for them.
Using a Humidifier
A humidifier is a great way to increase humidity. It releases moisture into the air. There are many different types of humidifiers. Some are small and portable. Others are large and cover an entire room. Choose one that fits your space and your needs. When you care bromeliads indoors, a humidifier can make a big difference. It will help you create the perfect environment for your plant.
Creating a Pebble Tray
A pebble tray is a simple and effective way to increase humidity. Fill a tray with pebbles. Add water until the water level is just below the top of the pebbles. Place the plant on top of the pebbles. As the water evaporates, it will increase the humidity around the plant. When you care bromeliads indoors, a pebble tray is a low-tech solution that works wonders.
Misting Your Bromeliad
Misting your bromeliad is another way to increase humidity. Use a spray bottle filled with water. Mist the plant lightly every day. Be sure to use distilled water or rainwater. Tap water can leave mineral deposits on the leaves. When you care bromeliads indoors, misting is a quick and easy way to give your plant a boost of humidity.
Dealing with Pests and Diseases on Indoor Bromeliads
Even when you care bromeliads indoors, pests and diseases can sometimes be a problem. Common pests include mealybugs, scale, and aphids. These pests can suck the sap from the plant, causing it to weaken. Diseases are less common, but root rot can be a problem if the plant is overwatered. To prevent pests and diseases, inspect your plant regularly. Look for signs of infestation or disease. If you find any pests, you can remove them by hand. You can also use insecticidal soap or neem oil. If you suspect root rot, repot the plant in fresh soil.
| Pest/Disease | Symptoms | Treatment |
|---|---|---|
| Mealybugs | White, cottony masses on leaves and stems | Wipe off with alcohol or use insecticidal soap |
| Scale | Small, brown, shell-like bumps on leaves and stems | Scrape off or use horticultural oil |
| Aphids | Small, green insects clustered on new growth | Spray with insecticidal soap or neem oil |
| Root Rot | Yellowing leaves, mushy roots, foul smell | Repot in fresh soil, reduce watering |
- Inspect your plant regularly for pests and diseases.
- Remove pests by hand or use insecticidal soap.
- Repot the plant in fresh soil if you suspect root rot.
- Avoid overwatering to prevent root rot.
- Maintain good air circulation to prevent fungal diseases.
Think of pest and disease control as plant hygiene. Just like people, plants need to be kept clean and healthy. When you care bromeliads indoors, taking the time to inspect your plant and address any problems early on can save you a lot of trouble in the long run. A healthy plant is a happy plant!
Fun Fact or Stat: Bromeliads are relatively resistant to pests and diseases compared to other houseplants, making them a great choice for beginners.
Identifying Common Pests
Do you know what mealybugs look like? They are small, white, and cottony. Scale insects look like tiny brown bumps. Aphids are small, green, and often found in clusters. Learning to identify these common pests is the first step in controlling them. When you care bromeliads indoors, knowing your enemy is half the battle.
Using Natural Pest Control Methods
Want to avoid using harsh chemicals? There are many natural pest control methods you can try. Insecticidal soap is a gentle and effective way to kill many common pests. Neem oil is another natural option. You can also try introducing beneficial insects, such as ladybugs, to your home. Ladybugs love to eat aphids! When you care bromeliads indoors, natural pest control methods are a safe and eco-friendly way to keep your plant healthy.
Preventing Root Rot
Root rot is a common problem when people care bromeliads indoors. It’s caused by overwatering. The roots sit in water and begin to rot. The best way to prevent root rot is to avoid overwatering. Let the soil dry out between waterings. Use a well-draining potting mix. Make sure the pot has drainage holes. If you suspect root rot, repot the plant in fresh soil.
Encouraging Blooms on Your Indoor Bromeliad
One of the best things about bromeliads is their beautiful blooms. But sometimes, they can be a bit shy about flowering. So, how do you encourage them to bloom? First, make sure they are getting enough light. Bright, indirect light is essential. Second, ensure they are getting enough water. Keep the central cup filled with water. Third, you can try the ethylene gas trick. Place the plant in a plastic bag with a ripe apple for a week. The apple releases ethylene gas, which can trigger blooming.
- Provide bright, indirect light.
- Keep the central cup filled with water.
- Try the ethylene gas trick with a ripe apple.
- Ensure the plant is mature enough to bloom.
- Maintain consistent temperature and humidity levels.
Think of blooming as a reward for good care. If you care bromeliads indoors and provide them with the right conditions, they will eventually reward you with a beautiful bloom. Be patient. It can take several months for a bromeliad to bloom. But it’s worth the wait!
Fun Fact or Stat: Bromeliads only bloom once in their lifetime, but they produce pups (offshoots) that can be separated and grown into new plants.
The Ethylene Gas Trick
Want to know a secret to encourage blooming? Try the ethylene gas trick! Ripe apples release ethylene gas. This gas can trigger blooming in bromeliads. Place the plant in a plastic bag with a ripe apple for a week. Make sure the bag is sealed tightly. After a week, remove the bag and wait. Hopefully, you will see a bloom soon! When you care bromeliads indoors, this trick can be a game-changer.
Ensuring Maturity
Is your bromeliad old enough to bloom? Bromeliads need to be mature before they can flower. It can take several years for a bromeliad to reach maturity. Be patient. If your plant is still young, it might just need more time. When you care bromeliads indoors, remember that patience is a virtue.
Maintaining Consistent Conditions
Bromeliads like consistent conditions. Sudden changes in temperature or humidity can stress the plant and prevent blooming. Try to maintain a consistent temperature and humidity level. Avoid placing the plant near drafts or heating vents. When you care bromeliads indoors, consistency is key.
Summary
Bromeliads are beautiful and unique plants. You can easily care bromeliads indoors. They need bright, indirect light. Water them by filling their central cup. Use well-draining soil. Fertilize sparingly. Maintain moderate humidity. Watch out for pests and diseases. With a little bit of care, you can enjoy these tropical beauties in your home. Remember to provide the right light, water, and humidity. Fertilize during the growing season. Inspect your plant regularly for any problems.
By following these simple tips, you can successfully care bromeliads indoors and enjoy their vibrant colors and unique shapes for years to come. These plants are relatively low-maintenance, making them a great choice for both beginners and experienced plant enthusiasts. So, go ahead and add a touch of the tropics to your home with a beautiful bromeliad!
Conclusion
Bromeliads are a fantastic addition to any indoor garden. They bring a touch of the exotic to your home. They are also relatively easy to care for. With the right light, water, and humidity, you can keep your bromeliad happy and healthy. Remember to care bromeliads indoors by watering the cup, not the soil. Enjoy the beauty and uniqueness of these wonderful plants.
Frequently Asked Questions
Question No 1: How often should I water my bromeliad indoors?
Answer: You should water your bromeliad by filling its central cup with water. How often depends on the humidity and temperature in your home. Check the cup every few days. If it’s empty, fill it up again. Let the soil dry out between waterings. Overwatering can lead to root rot, so be careful. When you care bromeliads indoors, remember that they store water in their cup, so they don’t need as much watering as other plants. In the winter, you can reduce watering frequency since the plant’s growth slows down.
Question No 2: What kind of light do bromeliads need indoors?
Answer: Bromeliads need bright, indirect light. Avoid direct sunlight, which can burn their leaves. An east-facing window is often a good choice. A south-facing window can work if you filter the light with a sheer curtain. If you don’t have enough natural light, you can use a grow light. When you care bromeliads indoors, make sure they get at least six hours of light per day. Watch your plant to see how it reacts to the light. If the leaves look pale, it might need more light.
Question No 3: How do I fertilize my indoor bromeliad?
Answer: Bromeliads don’t need a lot of fertilizer. Use a fertilizer that is specifically made for bromeliads. Dilute it to half strength. Apply the fertilizer to the central cup of the plant, not the soil. Fertilize only during the growing season (spring and summer). Don’t fertilize in the winter. When you care bromeliads indoors, remember that less is more when it comes to fertilizer. Over-fertilizing can harm your plant.
Question No 4: How do I increase humidity for my bromeliad indoors?
Answer: Bromeliads love humidity. You can increase humidity by using a humidifier. You can also place the plant on a pebble tray filled with water. Misting the plant with water every day is another option. Grouping plants together can also help. When you care bromeliads indoors, aim for humidity levels between 50% and 70%. Dry air can cause the leaves to turn brown.
Question No 5: Why isn’t my bromeliad blooming?
Answer: There are several reasons why your bromeliad might not be blooming. First, make sure it’s getting enough light. Second, ensure it’s mature enough to bloom. It can take several years for a bromeliad to reach maturity. Third, you can try the ethylene gas trick with a ripe apple. When you care bromeliads indoors, patience is key. It can take time for a bromeliad to bloom.
Question No 6: What do I do after my bromeliad blooms?
Answer: Bromeliads only bloom once in their lifetime. After it blooms, the mother plant will start to die. But don’t worry! It will produce pups (offshoots). You can separate these pups from the mother plant and grow them into new plants. Wait until the pups are about one-third the size of the mother plant before separating them. When you care bromeliads indoors, propagating pups is a great way to keep the cycle going.
