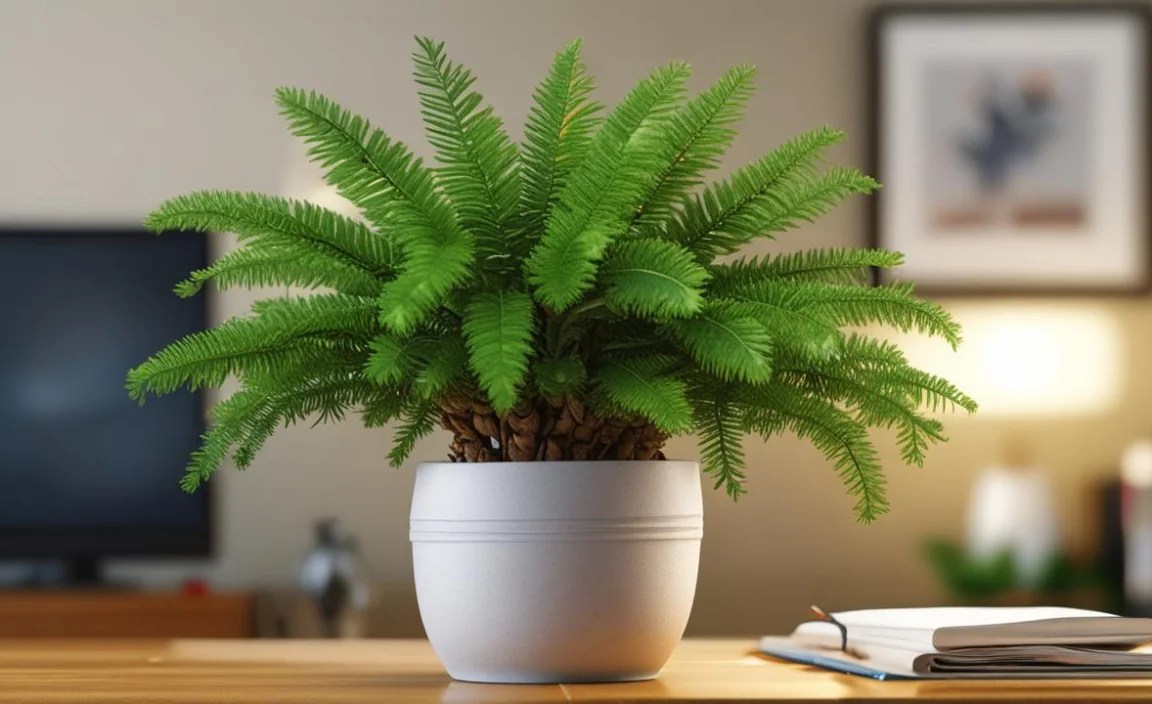
Have you ever seen a tiny Christmas tree that isn’t really a fir? It might be a Norfolk Island pine! These trees are from a small island near Australia. People love them. They look great in homes. But how do you {care norfolk island pine indoors}? It’s not as hard as you think. Let’s learn how to keep these pretty trees happy inside.
Norfolk Island pines aren’t true pines. They are special plants. They need the right light, water, and food to grow well. If you give them what they need, they can live for many years. Are you ready to learn the secrets of {care norfolk island pine indoors}? Let’s start!
Taking {care norfolk island pine indoors} can be fun and easy. These trees add a touch of nature to any room. They are also great for improving the air quality in your home. By following some simple steps, you can enjoy a healthy, beautiful Norfolk Island pine for a long time. So let’s dive in and discover how to make your pine thrive!
Key Takeaways
- Proper light, watering, and feeding are vital for a healthy indoor pine.
- Rotate your Norfolk Island pine regularly to ensure even growth on all sides.
- Use well-draining soil and a pot with drainage holes to prevent root rot.
- {Care norfolk island pine indoors} includes providing adequate humidity, especially in winter.
- Watch for pests and address them quickly to keep your tree strong and healthy.
Light Needs for Norfolk Island Pine Indoors

Light is super important for your Norfolk Island pine. These trees love bright, indirect sunlight. Think of where they grow naturally. They get lots of sunshine, but not too harsh. When you {care norfolk island pine indoors}, try to give it the same kind of light. A spot near an east-facing window is often perfect. It gets gentle morning sun. A south-facing window can work too, but use a sheer curtain. This will soften the light. Too much direct sun can burn the needles. Not enough light makes the tree weak. It might start to lean towards the window. Rotate the tree every week. This helps it grow evenly. It gets light on all sides. If you don’t have enough natural light, use a grow light. Keep it on for about 12-14 hours a day. Your pine will thank you!
- Place near a bright, indirect light source.
- East-facing windows are often best.
- Use sheer curtains for south-facing windows.
- Rotate the tree weekly for even growth.
- Consider a grow light if natural light is limited.
Remember, light is like food for your plant. Without enough light, it can’t make its own food. This process is called photosynthesis. The leaves turn sunlight into energy. If your Norfolk Island pine isn’t getting enough light, you might notice the needles turning yellow or brown. The tree might also grow very slowly. Make sure to check the light levels regularly. Move the tree if needed. During the winter, the days are shorter. Your pine might need extra light. A grow light can be very helpful during these times. By giving your tree the right amount of light, you’re helping it stay strong and healthy. This is a big part of taking {care norfolk island pine indoors}.
How Much Light is Too Much?
Have you ever gotten a sunburn? Plants can too! Too much direct sunlight can scorch the needles of your Norfolk Island pine. This makes them turn brown and crispy. It’s like they’re getting cooked! If you see this happening, move your tree to a spot with less direct light. A good way to tell if the light is too strong is to hold your hand between the window and the plant. If your hand casts a sharp, dark shadow, the light is too intense. Use a sheer curtain to filter the light. You can also move the tree further away from the window. Remember, bright, indirect light is the key. Your pine wants to feel the warmth of the sun, but not get burned. It’s all about balance when you {care norfolk island pine indoors}.
What Happens With Too Little Light?
Imagine trying to run a race without eating breakfast. You’d be tired and weak, right? The same thing happens to your Norfolk Island pine if it doesn’t get enough light. It needs light to make energy. Without enough light, it can’t grow properly. The needles might turn yellow and fall off. The tree might start to lean towards the light source. This is its way of trying to get more sunshine. If you notice these signs, move your tree to a brighter spot. You can also use a grow light to give it extra help. Remember, light is like food for your plant. Make sure it gets enough to stay strong and healthy. Proper light is a key part of {care norfolk island pine indoors}.
Using Artificial Light Effectively
Sometimes, even the sunniest room isn’t bright enough for your Norfolk Island pine. That’s where grow lights come in handy! These special lights give your plant the extra energy it needs. When using a grow light, make sure to position it correctly. It should be about 6-12 inches away from the top of the tree. Keep the light on for about 12-14 hours a day. This gives your pine enough time to make its own food. There are different types of grow lights. LED lights are a good choice. They don’t use much energy and don’t get too hot. This is important because you don’t want to burn your plant. Remember to check the light regularly. Adjust it as needed. With the right artificial light, your Norfolk Island pine can thrive indoors, no matter the weather outside. This is an important part of {care norfolk island pine indoors}.
Fun Fact or Stat: Norfolk Island pines can grow up to 6 feet tall indoors with proper care!
Watering Your Indoor Norfolk Island Pine

Water is essential for all living things, including your Norfolk Island pine. But how much water does it need? It’s a balancing act. Too much water can be as bad as too little. When you {care norfolk island pine indoors}, you need to water it properly. The best way to water is to check the soil. Stick your finger about an inch into the soil. If it feels dry, it’s time to water. If it feels damp, wait a few more days. When you do water, water deeply. Make sure the water reaches all the roots. Let the excess water drain out of the bottom of the pot. Don’t let the pot sit in standing water. This can cause root rot. Root rot is a serious problem. It can kill your tree. In the winter, your pine needs less water. The air is cooler and drier. Check the soil less often. Overwatering is a common mistake. Be careful not to do it!
- Check soil moisture before watering.
- Water deeply when the top inch of soil is dry.
- Allow excess water to drain away.
- Reduce watering frequency in winter.
- Avoid letting the pot sit in water.
- Use room temperature water.
Think of watering like giving your tree a drink. You don’t want to drown it, but you also don’t want it to be thirsty. The right amount of water helps the tree stay healthy and strong. It helps the roots absorb nutrients from the soil. It also helps the leaves stay green and vibrant. If you underwater your pine, the needles might turn brown and crispy. If you overwater it, the needles might turn yellow and mushy. Pay attention to your tree. It will tell you what it needs. With a little practice, you’ll become a watering expert. This is a key part of taking {care norfolk island pine indoors}.
How to Tell if You Are Overwatering
Imagine eating too much candy. You might get a tummy ache! Overwatering can give your Norfolk Island pine a “tummy ache” too. The roots start to rot. This prevents the tree from getting the nutrients it needs. One sign of overwatering is yellowing needles. They might also feel soft and mushy. The soil might also smell bad. It’s like the smell of something rotting. If you see these signs, stop watering right away. Let the soil dry out completely. You might even need to repot the tree with fresh soil. Make sure the new pot has good drainage. Overwatering is a common problem, but you can avoid it by checking the soil before you water. This helps you take good {care norfolk island pine indoors}.
Signs of Underwatering
Have you ever felt really thirsty after playing outside? Your Norfolk Island pine feels the same way when it’s underwatered. The needles might turn brown and crispy. They might also start to fall off. The soil might feel dry and hard. It might even pull away from the sides of the pot. If you see these signs, give your tree a good, deep watering. Make sure the water reaches all the roots. You can also try soaking the pot in a tub of water for a few hours. This helps the soil rehydrate. Remember to check the soil regularly. Water when the top inch feels dry. This will help you avoid underwatering your pine. Proper watering is essential to {care norfolk island pine indoors}.
Best Watering Practices
Watering your Norfolk Island pine is like giving it a refreshing drink. Use room temperature water. Cold water can shock the roots. Water slowly and evenly. Make sure the water reaches all parts of the soil. Let the excess water drain out of the bottom of the pot. Don’t let the pot sit in standing water. This can lead to root rot. Water in the morning. This gives the leaves time to dry out during the day. Wet leaves can attract fungus. Check the humidity levels. If the air is dry, mist the leaves with water. This helps keep them healthy and green. Remember, every tree is different. Pay attention to your pine and adjust your watering schedule as needed. With a little practice, you’ll become a watering expert. This is a key part of {care norfolk island pine indoors}.
Fun Fact or Stat: Norfolk Island pines prefer slightly acidic water, similar to rainwater!
Soil and Potting for Healthy Growth

The right soil and pot are like a cozy home for your Norfolk Island pine’s roots. They need a place to spread out and get the nutrients they need. When you {care norfolk island pine indoors}, choose a well-draining potting mix. This means the soil lets water flow through easily. A mix of peat moss, perlite, and sand works well. Avoid using garden soil. It’s too heavy and doesn’t drain well. The pot should have drainage holes in the bottom. This allows excess water to escape. Choose a pot that’s slightly larger than the root ball. This gives the roots room to grow. When you repot, be gentle with the roots. Don’t damage them. Repot your pine every 1-2 years. This gives it fresh soil and more room to grow. The right soil and pot will help your pine thrive.
- Use a well-draining potting mix.
- Avoid using garden soil.
- Choose a pot with drainage holes.
- Repot every 1-2 years.
- Be gentle with the roots when repotting.
- Select a pot slightly larger than the root ball.
Think of the soil and pot as the foundation of your tree’s health. If the foundation is weak, the tree won’t grow well. The right soil provides the nutrients the tree needs. It also helps the roots breathe. The pot provides support and stability. When you choose the right soil and pot, you’re giving your tree the best possible start. This will help it grow tall and strong. Remember to check the soil regularly. If it becomes compacted or doesn’t drain well, it’s time to repot. This is an important part of taking {care norfolk island pine indoors}.
Choosing the Right Potting Mix
Have you ever tried to build a sandcastle with dry sand? It doesn’t work very well, right? The same thing happens to your Norfolk Island pine if the soil is too dry or compacted. It needs a potting mix that holds moisture but also drains well. A good mix is light and airy. It allows the roots to breathe. Look for a mix that contains peat moss, perlite, and vermiculite. These ingredients help with drainage and aeration. Avoid mixes that are heavy and clay-like. These can suffocate the roots. When you choose the right potting mix, you’re giving your tree the best chance to thrive. The correct soil is a foundation to {care norfolk island pine indoors}.
The Importance of Drainage
Imagine trying to swim in a pool filled with mud. It would be hard to move, right? Your Norfolk Island pine’s roots feel the same way if the soil doesn’t drain well. They can’t get the oxygen they need. This can lead to root rot. Make sure your pot has drainage holes in the bottom. This allows excess water to escape. You can also add a layer of gravel or pebbles to the bottom of the pot. This helps improve drainage. When you water, make sure the water flows freely out of the drainage holes. If it doesn’t, the soil is probably too compacted. It’s time to repot with fresh soil. Proper drainage is essential for a healthy tree. This is an important part of {care norfolk island pine indoors}.
Repotting Techniques
Repotting your Norfolk Island pine is like moving it to a bigger house. It gives the roots more room to grow. Choose a pot that’s slightly larger than the old one. Gently remove the tree from its old pot. Be careful not to damage the roots. Loosen the soil around the roots. Place the tree in the new pot. Fill in around the roots with fresh potting mix. Water the tree thoroughly. Repot in the spring or summer. This is when the tree is actively growing. Avoid repotting during the winter. This is when the tree is dormant. With a little care, you can repot your pine without stressing it too much. This will help it continue to grow and thrive. It’s an important step to {care norfolk island pine indoors}.
Fun Fact or Stat: Norfolk Island pines can live for decades if they are repotted regularly!
Humidity and Temperature Preferences
Norfolk Island pines like warm, humid air. Think of their island home. It’s warm and moist. When you {care norfolk island pine indoors}, try to give them similar conditions. They prefer temperatures between 65°F and 75°F. Avoid placing them near drafts or heating vents. These can dry out the air. Humidity is also important. They like humidity levels around 50%. This can be a challenge indoors, especially in winter. You can increase humidity in several ways. Use a humidifier. Place the pot on a tray filled with pebbles and water. Mist the leaves with water regularly. Group plants together. This creates a more humid microclimate. Keep your pine away from cold drafts. They don’t like sudden temperature changes. With the right humidity and temperature, your pine will be happy and healthy.
- Maintain temperatures between 65°F and 75°F.
- Avoid placing near drafts or heating vents.
- Maintain humidity levels around 50%.
- Use a humidifier to increase humidity.
- Mist the leaves with water regularly.
- Group plants together to create humidity.
Think of humidity as the moisture in the air. It’s like a drink for your plant’s leaves. If the air is too dry, the leaves can dry out and turn brown. Temperature is like the thermostat in your house. You want to keep it comfortable for your plant. If it’s too cold, the plant can get stressed. If it’s too hot, the plant can dry out. By providing the right humidity and temperature, you’re creating a comfortable environment for your tree. This will help it stay healthy and strong. Remember to check the humidity and temperature regularly. Adjust as needed. This is an important part of taking {care norfolk island pine indoors}.
Increasing Humidity Levels
Have you ever taken a steamy shower? The humidity in the bathroom goes up, right? You can create a similar effect for your Norfolk Island pine. Use a humidifier to add moisture to the air. Place it near the tree. You can also put the pot on a tray filled with pebbles and water. As the water evaporates, it increases the humidity around the plant. Mist the leaves with water regularly. This helps keep them hydrated. Group your plants together. Plants release moisture into the air. This creates a more humid microclimate. By using these methods, you can create a more comfortable environment for your pine. Remember that increased humidity is key to {care norfolk island pine indoors}.
Dealing with Temperature Fluctuations
Imagine going outside in a t-shirt on a cold day. You’d get chilly, right? Your Norfolk Island pine feels the same way when it experiences sudden temperature changes. Avoid placing it near drafts from windows or doors. Keep it away from heating vents and air conditioners. These can cause the temperature to fluctuate. Try to keep the temperature consistent. A stable environment is best for your plant. If you need to move the tree, do it gradually. Don’t shock it with a sudden change in temperature. With a little care, you can protect your pine from temperature fluctuations. This will help it stay healthy and happy. Consistent temperatures are a part of {care norfolk island pine indoors}.
Ideal Temperature Range
Your Norfolk Island pine is happiest when the temperature is just right. The ideal range is between 65°F and 75°F. This is similar to the temperature most people keep their homes. Avoid letting the temperature drop below 55°F. This can damage the plant. Also, avoid temperatures above 80°F. This can cause the plant to dry out. Use a thermometer to monitor the temperature. Adjust your thermostat as needed. If you live in a cold climate, make sure your tree is protected from drafts. If you live in a hot climate, make sure it’s not getting too much direct sunlight. By maintaining the ideal temperature range, you’re creating a comfortable environment for your pine. This is a key part of {care norfolk island pine indoors}.
Fun Fact or Stat: Norfolk Island pines thrive in the same temperature range that most humans find comfortable!
Fertilizing Your Norfolk Island Pine

Fertilizer is like vitamins for your Norfolk Island pine. It gives it the extra nutrients it needs to grow strong and healthy. When you {care norfolk island pine indoors}, fertilize during the growing season. This is typically from spring to early fall. Use a balanced liquid fertilizer. Dilute it to half strength. Follow the instructions on the label. Fertilize every 2-4 weeks. Avoid fertilizing in the winter. The tree is dormant during this time. Over-fertilizing can burn the roots. This can damage the tree. Look for a fertilizer that’s specifically designed for houseplants. These fertilizers are gentle and won’t harm your pine. With the right fertilizer, your tree will grow taller and greener.
- Fertilize during the growing season (spring to early fall).
- Use a balanced liquid fertilizer.
- Dilute the fertilizer to half strength.
- Fertilize every 2-4 weeks.
- Avoid fertilizing in the winter.
- Choose a fertilizer designed for houseplants.
Think of fertilizer as a boost for your tree. It helps it grow faster and stronger. It also helps it resist diseases and pests. The right fertilizer provides the essential nutrients that the tree needs. These nutrients include nitrogen, phosphorus, and potassium. Nitrogen helps with leaf growth. Phosphorus helps with root growth. Potassium helps with overall health. By fertilizing regularly, you’re giving your tree the best possible chance to thrive. Remember to follow the instructions on the label. Over-fertilizing can be harmful. This is an important part of taking {care norfolk island pine indoors}.
Choosing the Right Fertilizer
Have you ever tried to bake a cake with the wrong ingredients? It doesn’t turn out very well, right? The same thing happens to your Norfolk Island pine if you use the wrong fertilizer. Look for a balanced liquid fertilizer. This means it contains equal amounts of nitrogen, phosphorus, and potassium. A 20-20-20 fertilizer is a good choice. Avoid fertilizers that are high in nitrogen. These can cause the tree to grow too quickly. This can make it weak and leggy. Choose a fertilizer that’s specifically designed for houseplants. These fertilizers are gentle and won’t harm your pine. When you choose the right fertilizer, you’re giving your tree the nutrients it needs to thrive. It is vital to {care norfolk island pine indoors}.
Avoiding Over-Fertilization
Imagine eating too much sugar. You might get a tummy ache and feel sick, right? Over-fertilizing can have the same effect on your Norfolk Island pine. The roots can get burned. This can damage the tree. One sign of over-fertilization is brown tips on the leaves. The soil might also have a white crust on the surface. If you see these signs, stop fertilizing right away. Flush the soil with water. This helps remove the excess fertilizer. Make sure the water drains out of the bottom of the pot. In the future, use less fertilizer. Dilute it to half strength. Fertilize less often. Over-fertilization is a common mistake, but you can avoid it by following the instructions on the label. Avoid over fertilizing to {care norfolk island pine indoors}.
Fertilizing Schedule
Fertilizing your Norfolk Island pine is like giving it a regular dose of vitamins. Fertilize during the growing season. This is typically from spring to early fall. Fertilize every 2-4 weeks. Avoid fertilizing in the winter. The tree is dormant during this time. Dilute the fertilizer to half strength. This helps prevent over-fertilization. Water the tree before fertilizing. This helps the roots absorb the nutrients. Follow the instructions on the label. Every fertilizer is different. By following a regular fertilizing schedule, you’re giving your tree the nutrients it needs to thrive. Proper fertilizing is essential to {care norfolk island pine indoors}.
Fun Fact or Stat: Norfolk Island pines need less fertilizer than most other houseplants!
Pest and Disease Control
Even with the best care, your Norfolk Island pine can sometimes attract pests or diseases. It’s important to check your tree regularly. Look for signs of trouble. Common pests include spider mites, mealybugs, and scale. Spider mites are tiny and hard to see. They create webs on the leaves. Mealybugs are white and cottony. They cluster on the stems and leaves. Scale are small, brown, and shell-like. They attach themselves to the leaves and stems. If you see pests, act quickly. Wipe them off with a damp cloth. Use insecticidal soap or neem oil. These are natural and safe for your plant. Diseases are less common, but can still occur. Root rot is a serious problem caused by overwatering. Prevent it by using well-draining soil and avoiding overwatering. With regular monitoring and prompt action, you can keep your pine healthy and pest-free. Proper pest control helps you {care norfolk island pine indoors}.
- Check your tree regularly for pests and diseases.
- Common pests include spider mites, mealybugs, and scale.
- Wipe off pests with a damp cloth.
- Use insecticidal soap or neem oil.
- Prevent root rot by using well-draining soil.
- Avoid overwatering.
Think of pest and disease control as protecting your tree from harm. Pests can suck the sap from the leaves. This weakens the tree. Diseases can damage the roots and stems. This can eventually kill the tree. By checking your tree regularly, you can catch problems early. This makes them easier to treat. Remember to use natural and safe methods. Harsh chemicals can harm your plant. By taking these steps, you’re helping your tree stay healthy and strong. This is an important part of taking {care norfolk island pine indoors}.
Identifying Common Pests
Have you ever played detective and looked for clues? You can do the same with your Norfolk Island pine! Look closely at the leaves and stems. Are there any tiny webs? This could be a sign of spider mites. Are there any small, white, cottony bugs? These could be mealybugs. Are there any small, brown, shell-like bumps? These could be scale. These pests can harm your tree. It is important to be able to identify them. Knowing what to look for is the first step in protecting your pine. Check regularly so you {care norfolk island pine indoors} better.
Natural Pest Control Methods
Imagine trying to get rid of ants in your kitchen. You wouldn’t want to use harsh chemicals, right? You can use natural methods to control pests on your Norfolk Island pine too. Wipe the pests off with a damp cloth. This is a simple and effective way to remove them. Use insecticidal soap or neem oil. These are natural and safe for your plant. They kill the pests without harming the tree. You can also try introducing beneficial insects. Ladybugs eat aphids. This can help control their population. By using natural methods, you’re protecting your plant and the environment. These methods are effective ways to {care norfolk island pine indoors}.
Preventing Diseases
Keeping your Norfolk Island pine healthy is like building a strong immune system. You can prevent diseases by providing the right care. Use well-draining soil. This helps prevent root rot. Avoid overwatering. This is another cause of root rot. Provide good air circulation. This helps prevent fungal diseases. Keep the leaves clean. Dust and dirt can attract pests and diseases. By following these tips, you’re creating a healthy environment for your tree. This will help it resist diseases and stay strong. Prevention is a part of {care norfolk island pine indoors}.
Fun Fact or Stat: A healthy Norfolk Island pine is naturally more resistant to pests and diseases!
Pruning and Shaping Your Pine
Pruning is like giving your Norfolk Island pine a haircut. It helps keep it looking neat and tidy. It also encourages healthy growth. When you {care norfolk island pine indoors}, you might need to prune it occasionally. Remove any dead or brown branches. This helps improve air circulation. You can also trim any branches that are growing in the wrong direction. This helps shape the tree. Use sharp, clean pruning shears. This prevents the spread of disease. Prune in the spring or summer. This is when the tree is actively growing. Avoid pruning in the winter. This is when the tree is dormant. Be careful not to over-prune. This can stress the tree. With a little practice, you can prune your pine without harming it.
- Remove dead or brown branches.
- Trim branches growing in the wrong direction.
- Use sharp, clean pruning shears.
- Prune in the spring or summer.
- Avoid pruning in the winter.
- Be careful not to over-prune.
Think of pruning as shaping your tree to your liking. You can create a more balanced and symmetrical shape. You can also remove any unwanted growth. This helps the tree focus its energy on healthy branches. By pruning regularly, you’re helping your tree stay healthy and beautiful. Remember to be gentle and avoid over-pruning. This is an important part of taking {care norfolk island pine indoors}.
When to Prune
Have you ever gotten a haircut at the wrong time of year? Maybe you got it right before a big event! Pruning your Norfolk Island pine at the right time is important too. The best time to prune is in the spring or summer. This is when the tree is actively growing. It can recover quickly from any cuts. Avoid pruning in the winter. The tree is dormant during this time. It won’t be able to heal as quickly. Pruning in the winter can stress the tree. By pruning at the right time, you’re helping your tree stay healthy and strong. It is an important way to {care norfolk island pine indoors}.
How to Prune
Imagine trying to cut paper with dull scissors. It would be hard to get a clean cut, right? The same thing happens when you prune your Norfolk Island pine with dull pruning shears. Use sharp, clean pruning shears. This will make clean cuts. This prevents the spread of disease. Cut the branches at a 45-degree angle. This helps water run off the cut surface. Remove any dead or brown branches. Trim branches that are growing in the wrong direction. Be careful not to over-prune. Remove only what is necessary. Over-pruning can stress the tree. With a little practice, you’ll become a pruning expert. Pruning with care is a part of {care norfolk island pine indoors}.
Shaping Techniques
Shaping your Norfolk Island pine is like sculpting a work of art. You can create a more balanced and symmetrical shape. Start by removing any dead or brown branches. Then, trim any branches that are growing in the wrong direction. You can also pinch off the tips of new growth. This encourages the tree to branch out. Rotate the tree regularly. This helps it grow evenly on all sides. Step back and look at the tree from different angles. This will help you see where it needs shaping. Be patient and take your time. With a little practice, you can shape your pine into a beautiful masterpiece. Proper shaping is essential to {care norfolk island pine indoors}.
| Pruning Step | Description | Reason |
|---|---|---|
| Remove Dead Branches | Cut away any brown or lifeless branches. | Improves air flow and appearance. |
| Shape the Tree | Trim branches to create desired form. | Enhances aesthetic appeal and balance. |
| Clean Cuts | Use sharp tools for precise cuts. | Prevents disease and promotes healing. |
| Regular Rotation | Turn the tree periodically. | Ensures even growth on all sides. |
Fun Fact or Stat: Norfolk Island pines don’t need a lot of pruning, but shaping can improve their appearance!
Summary
Taking {care norfolk island pine indoors} involves several key steps. First, provide bright, indirect sunlight. Rotate the tree regularly for even growth. Water when the top inch of soil is dry. Ensure good drainage to prevent root rot. Maintain a warm, humid environment. Fertilize during the growing season with a diluted liquid fertilizer. Check for pests and diseases regularly. Prune to remove dead branches and shape the tree. By following these steps, you can keep your Norfolk Island pine healthy and beautiful.
These trees need attention to thrive. They love light, water, and the right food. They also need protection from pests and diseases. By paying attention to your tree’s needs, you can enjoy its beauty for many years. Remember to adjust your care routine as the seasons change. With a little love and attention, your Norfolk Island pine will be a happy addition to your home. These simple tips can help you {care norfolk island pine indoors}.
Conclusion
Norfolk Island pines are beautiful and unique houseplants. They bring a touch of the tropics to your home. With the right {care norfolk island pine indoors}, they can thrive for many years. Remember to provide bright, indirect light, proper watering, and a warm, humid environment. Check for pests and diseases regularly. Prune as needed to maintain its shape. By following these simple tips, you can enjoy a healthy and beautiful Norfolk Island pine for a long time.
Frequently Asked Questions
Question No 1: How often should I water my Norfolk Island pine?
Answer: You should water your Norfolk Island pine when the top inch of soil feels dry to the touch. During the growing season (spring and summer), this might be once a week. In the winter, when the plant is dormant, you might only need to water it every two to three weeks. Always check the soil moisture before watering. Overwatering can lead to root rot, which is a common problem with these plants. Make sure the pot has good drainage to prevent water from sitting at the bottom. Proper watering is essential when you {care norfolk island pine indoors}.
Question No 2: What kind of light does my Norfolk Island pine need?
Answer: Norfolk Island pines need bright, indirect light. They thrive in a location where they receive plenty of light but are not exposed to direct sunlight, which can scorch their needles. An east-facing window is often ideal. A south-facing window can also work if you use a sheer curtain to filter the light. If you don’t have enough natural light, you can use a grow light. Rotate the plant regularly to ensure even growth on all sides. Insufficient light can cause the plant to become leggy and lose its lower needles. Light is a large part of how to {care norfolk island pine indoors}.
Question No 3: How can I increase the humidity for my Norfolk Island pine?
Answer: Norfolk Island pines prefer a humid environment, which can be a challenge indoors, especially during the winter months. You can increase humidity by using a humidifier near the plant. Another option is to place the pot on a tray filled with pebbles and water. As the water evaporates, it will increase the humidity around the plant. Misting the foliage regularly can also help. Grouping plants together can also create a more humid microclimate. Aim for a humidity level of around 50% to keep your pine happy and healthy. These levels are important to {care norfolk island pine indoors}.
Question No 4: What kind of fertilizer should I use for my Norfolk Island pine?
Answer: You should use a balanced liquid fertilizer diluted to half strength. A 20-20-20 fertilizer is a good choice. Fertilize during the growing season (spring and summer) every 2-4 weeks. Avoid fertilizing in the winter when the plant is dormant. Over-fertilizing can burn the roots, so it’s important to follow the instructions on the label and dilute the fertilizer properly. A fertilizer that is designed for houseplants is often a safe bet. Proper fertilizing helps you {care norfolk island pine indoors}.
Question No 5: How do I repot my Norfolk Island pine?
Answer: Repot your Norfolk Island pine every 1-2 years, or when it becomes root-bound. Choose a pot that is slightly larger than the current one. Gently remove the plant from its pot, being careful not to damage the roots. Lo
