Do you love flowers? Have you seen a calla lily? These flowers are pretty. They can grow inside your home. Caring calla lily indoors is fun. It is also easy if you know how. Let’s learn how to grow them well.
Calla lilies come in many colors. They can be white, pink, or yellow. Some are even dark purple! They add beauty to any room. Would you like to have these in your home? Keep reading to find out how.
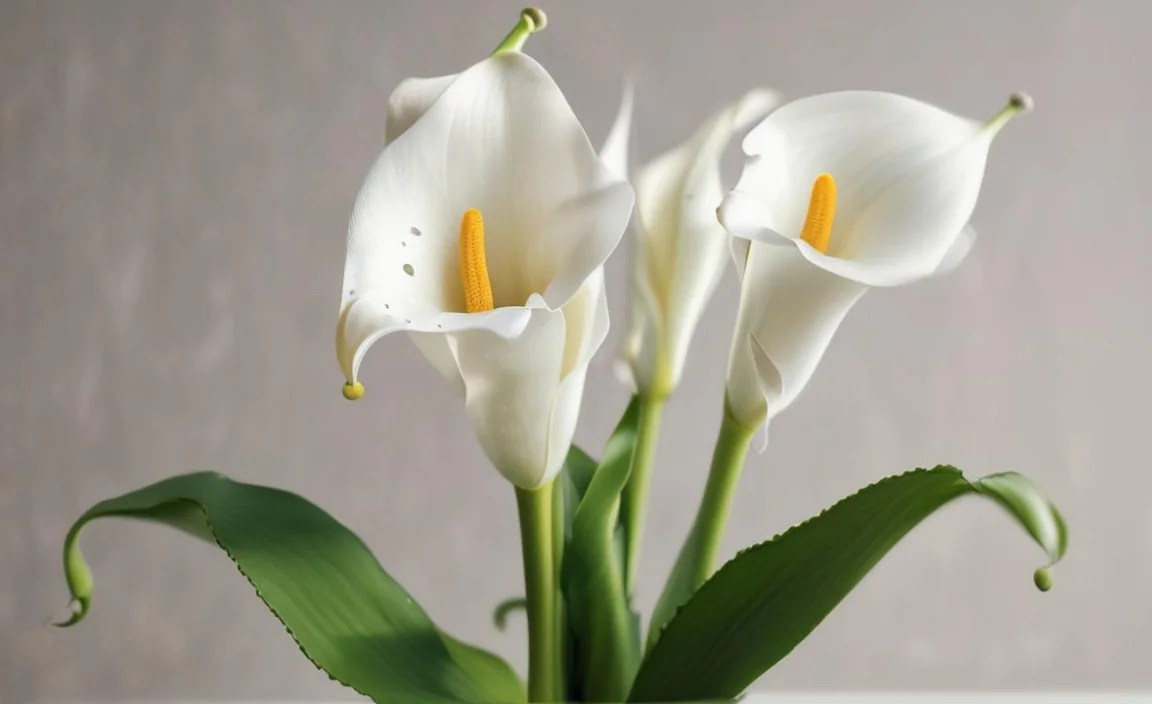
Calla lilies are not true lilies. They are from South Africa. People like them for their simple shape. The big petal is called a spathe. It wraps around a yellow spike. This spike has tiny flowers. Ready to start? Let’s begin!
Key Takeaways
- Proper watering is essential when caring calla lily indoors; avoid overwatering to prevent rot.
- Use well-draining soil and pots with drainage holes for healthy calla lily growth.
- Bright, indirect sunlight helps calla lilies bloom beautifully inside your home.
- Fertilize your calla lily during its growing season for vibrant flowers.
- Provide a period of dormancy by reducing water in the fall to mimic their natural cycle.
Best Soil for Calla Lily Indoors

The right soil is key. Caring calla lily indoors starts with good soil. Calla lilies need soil that drains well. This means water flows through it easily. If the soil holds too much water, the roots can rot. Root rot is bad for the plant. It can even kill it. Use a potting mix made for container plants. These mixes often have peat moss, perlite, and vermiculite. These ingredients help with drainage. You can also add some sand to the mix. Sand helps water flow through the soil faster. Make sure the pot has holes at the bottom. This lets extra water escape. Good soil and a good pot keep your calla lily healthy and happy. It helps the plant to grow strong and bloom beautifully.
- Use well-draining potting mix.
- Add perlite or sand for better drainage.
- Choose pots with drainage holes.
- Avoid heavy clay soils.
- Repot every year for fresh nutrients.
Think of the soil as the calla lily’s food source. Just like you need healthy food, plants need healthy soil. The soil gives the plant nutrients. Nutrients help it grow big and strong. If the soil is poor, the plant will not do well. It might not bloom. It might get sick. So, choosing the right soil is very important. It is one of the most important parts of caring calla lily indoors. You will see your plant thrive with the right care. Healthy soil makes for a happy plant. A happy plant makes for a beautiful home.
Fun Fact or Stat: Calla lilies prefer slightly acidic soil with a pH between 6.0 and 6.5 for optimal nutrient absorption!
Why Does Drainage Matter?
Have you ever left your socks in water for too long? They get soggy and gross, right? The same thing happens to plant roots if they sit in water. Roots need air to breathe. When the soil is too wet, the roots can’t get air. They start to rot. This is called root rot. Root rot can kill your calla lily. That is why drainage is so important. Good drainage lets extra water flow away from the roots. This keeps the roots healthy and happy. So, always use well-draining soil and pots with holes. This will help your calla lily grow strong and beautiful. Taking care of a plant is similar to taking care of yourself. You need the right conditions for both to thrive.
How to Choose the Right Potting Mix
Choosing the right potting mix can feel tricky. Don’t worry, it’s not too hard! Look for mixes that say “well-draining.” These mixes usually have perlite or vermiculite. These ingredients help the water flow through the soil. Avoid mixes that are heavy and clay-like. These hold too much water. You can also make your own mix. Combine potting soil, perlite, and sand. This creates a light and airy mix that calla lilies love. Always check the ingredients before you buy. This way, you know you are giving your plant the best start. Remember, the right potting mix is the foundation for a healthy plant. It makes caring calla lily indoors much easier.
What About Homemade Soil?
Making your own soil mix can be fun! It lets you customize the soil for your plant. A good recipe is equal parts potting soil, perlite, and compost. The potting soil provides nutrients. The perlite helps with drainage. The compost adds extra food for the plant. Mix everything well. Make sure there are no big clumps. You can also add a little bit of sand. This helps even more with drainage. Homemade soil mixes can be cheaper than store-bought ones. Plus, you know exactly what is in them! Just make sure all the ingredients are clean. This will prevent any diseases from harming your plant. Making your own soil is a great way to show you care. It is a fun way to start caring calla lily indoors.
Optimal Light for Indoor Calla Lilies

Light is like food for plants. Caring calla lily indoors requires the right amount of light. Calla lilies need bright, indirect light. This means they like a lot of light, but not direct sunlight. Direct sunlight can burn their leaves. A good spot is near a window that faces east or west. These windows get plenty of light but not too much direct sun. If you only have a south-facing window, use a sheer curtain. The curtain will filter the light and protect the plant. If your plant doesn’t get enough light, it might not bloom. The leaves might also turn yellow. If this happens, try moving it to a brighter spot. Giving your calla lily the right light helps it grow strong and bloom beautifully. It is a simple way to show you care.
- Place near an east or west-facing window.
- Use sheer curtains to filter strong sunlight.
- Rotate the plant regularly for even growth.
- Supplement with grow lights if needed.
- Watch for signs of too much or too little light.
Imagine you are a calla lily. You love to bask in the sun, but not too much! You need just the right amount of light to make your food. Plants use light to make food through a process called photosynthesis. Without enough light, they can’t make food. They get weak and sad. Too much light is also bad. It’s like getting a sunburn. The leaves can get burnt and crispy. So, finding the right balance is key. This is a very important part of caring calla lily indoors. With the right light, your calla lily will thrive. It will bring beauty and joy to your home.
Fun Fact or Stat: Calla lilies need about six hours of indirect sunlight each day to produce vibrant blooms!
What If I Don’t Have Enough Light?
Sometimes, our homes don’t have enough natural light. Don’t worry! You can still grow calla lilies. Use grow lights! Grow lights give plants the light they need. You can buy grow lights at most garden stores. Place the grow light a few inches above the plant. Leave it on for about 12-14 hours a day. This will help your calla lily grow strong. It will also help it bloom. Using grow lights is a great way to overcome low light conditions. It allows you to enjoy beautiful flowers even in dark rooms. Remember, light is essential for plant growth. With a little help from grow lights, anyone can succeed at caring calla lily indoors.
How Can I Tell If My Plant Gets Too Much Light?
Too much light can hurt your calla lily. The leaves might start to turn yellow or brown. They might also look burnt or crispy. These are signs that the plant is getting too much sun. If you see these signs, move the plant to a shadier spot. You can also use a sheer curtain to filter the light. Remember, calla lilies prefer bright, indirect light. Direct sunlight can be too harsh for them. It’s important to watch your plant closely. Look for signs of stress. Adjust the light as needed. This will help your calla lily stay healthy and happy. Learning to read your plant’s signals is key to caring calla lily indoors.
Why Rotate the Plant?
Have you ever noticed plants leaning towards the light? This is because they want to get as much light as possible. To prevent this, rotate your calla lily regularly. Turn the pot a little bit each week. This will help the plant grow evenly. It will also prevent it from leaning to one side. Rotating the plant ensures all parts of the plant get enough light. This keeps it looking its best. It also promotes healthy growth. Rotating is a simple trick. It makes a big difference in how your plant looks. It is a small detail that is important when caring calla lily indoors.
Watering Needs for Healthy Growth

Water is essential for all living things. Caring calla lily indoors means watering correctly. Calla lilies like moist soil, but not soggy soil. Water the plant when the top inch of soil feels dry. Use your finger to check the soil. If it feels dry, it’s time to water. Water the plant until water comes out of the drainage holes. This makes sure the soil is evenly moist. Empty the saucer under the pot. This prevents the plant from sitting in water. Overwatering can cause root rot. Underwatering can cause the leaves to wilt. Finding the right balance is key. Watch your plant closely. Adjust your watering schedule as needed. This will help your calla lily thrive.
- Water when the top inch of soil is dry.
- Water thoroughly until water drains out.
- Empty the saucer to prevent standing water.
- Reduce watering during dormancy.
- Use room-temperature water.
Imagine your calla lily is thirsty. It needs water to grow, just like you need water to live. But it doesn’t want too much water. Too much water can be harmful. It’s like drinking too much juice. You get a tummy ache. Plants can get root rot from too much water. Root rot is a disease that kills the roots. So, give your plant just the right amount of water. Check the soil often. Learn to recognize when it needs a drink. This is an important part of caring calla lily indoors. With proper watering, your calla lily will flourish. It will reward you with beautiful blooms.
Fun Fact or Stat: Calla lilies go dormant in the fall and winter. During this time, they need much less water!
How Often Should I Water?
The watering schedule depends on several things. The size of the pot matters. The amount of light matters. The temperature matters. In general, water once a week. Check the soil before watering. If it’s still wet, wait a few days. During the summer, you might need to water more often. During the winter, you might need to water less often. The best way to know is to check the soil. Use your finger to feel the top inch. Adjust your watering schedule based on what you find. This will help you avoid overwatering or underwatering. Finding the right balance is crucial when caring calla lily indoors.
What Is Dormancy and How Does It Affect Watering?
Dormancy is like a long sleep for plants. In the fall, calla lilies go dormant. This means they stop growing. They need less water during this time. Reduce watering to once a month. The leaves might start to turn yellow and die back. This is normal. Don’t worry! It doesn’t mean your plant is dying. It just means it’s resting. In the spring, start watering more often. The plant will start to grow again. Understanding dormancy is key to caring calla lily indoors. It helps you provide the right care at the right time.
Why Is Room-Temperature Water Important?
Cold water can shock the plant’s roots. This can stress the plant. It can also slow down growth. Always use room-temperature water. This is water that is not too hot or too cold. Let the water sit out for a while before using it. This will help it reach room temperature. Room-temperature water is gentle on the roots. It helps the plant absorb water more easily. It is a small detail, but it makes a big difference. Using room-temperature water shows you care. It contributes to successful caring calla lily indoors.
Fertilizing Your Calla Lily Plant

Fertilizer is plant food. Caring calla lily indoors includes proper feeding. Calla lilies need fertilizer to grow strong and bloom well. Use a balanced liquid fertilizer. Look for a fertilizer with equal parts nitrogen, phosphorus, and potassium. Dilute the fertilizer to half strength. This prevents burning the roots. Fertilize every two weeks during the growing season. The growing season is spring and summer. Stop fertilizing in the fall and winter. This is when the plant goes dormant. Over-fertilizing can harm the plant. Follow the instructions on the fertilizer label. Proper fertilizing helps your calla lily thrive.
- Use a balanced liquid fertilizer.
- Dilute the fertilizer to half strength.
- Fertilize every two weeks during growing season.
- Stop fertilizing during dormancy.
- Flush the soil occasionally to remove salt buildup.
Think of fertilizer as vitamins for your plant. Just like you need vitamins to stay healthy, plants need fertilizer to grow strong. Fertilizer provides the nutrients that the soil might be missing. These nutrients help the plant make food. They also help it grow new leaves and flowers. Without fertilizer, the plant might not bloom. The leaves might turn yellow. It’s important to use the right amount of fertilizer. Too much can be harmful. It’s like taking too many vitamins. It can make you sick. So, follow the instructions carefully. This will ensure your calla lily gets the right amount of food. This is an important aspect of caring calla lily indoors.
Fun Fact or Stat: Calla lilies are heavy feeders and benefit from regular fertilization during their active growth period!
What Does “Balanced” Fertilizer Mean?
Balanced fertilizer means it has equal parts of three main nutrients. These are nitrogen (N), phosphorus (P), and potassium (K). Nitrogen helps with leaf growth. Phosphorus helps with root growth and blooming. Potassium helps with overall plant health. A balanced fertilizer will have numbers like 10-10-10 or 20-20-20. These numbers show the percentage of each nutrient. Using a balanced fertilizer ensures your plant gets all the nutrients it needs. It promotes healthy growth and beautiful blooms. This is a key part of successful caring calla lily indoors.
Why Dilute the Fertilizer?
Diluting the fertilizer means adding water to it. This makes it less concentrated. Concentrated fertilizer can burn the roots. It can also damage the plant. Diluting the fertilizer makes it safer for the plant. It allows the plant to absorb the nutrients slowly. This prevents any harm. Always dilute the fertilizer to half strength. This means using half the amount of fertilizer recommended on the label. Diluting the fertilizer is an important step. It protects your plant from damage. It ensures it gets the nutrients it needs safely. Proper dilution is essential for caring calla lily indoors.
How to Flush the Soil
Over time, fertilizer can build up in the soil. This can create a salty crust on the surface. It can also harm the roots. To prevent this, flush the soil occasionally. Flushing means watering the plant thoroughly. Water until water runs freely out of the drainage holes. This washes away the excess fertilizer. Do this every few months. Flushing the soil keeps the soil healthy. It prevents salt buildup. It promotes healthy root growth. This is an important part of caring calla lily indoors. Healthy soil leads to a healthy plant.
Managing Temperature and Humidity
Temperature and humidity are important for plant health. Caring calla lily indoors requires the right environment. Calla lilies prefer temperatures between 60°F and 75°F. Avoid placing them near drafts or heaters. These can cause temperature fluctuations. Calla lilies also like humidity. Humidity is the amount of moisture in the air. If the air is too dry, the leaves can turn brown. You can increase humidity by using a humidifier. You can also place the plant on a tray of pebbles filled with water. As the water evaporates, it increases the humidity around the plant. Maintaining the right temperature and humidity helps your calla lily thrive.
- Maintain temperatures between 60°F and 75°F.
- Avoid drafts and heaters.
- Increase humidity with a humidifier or pebble tray.
- Group plants together to raise humidity.
- Mist the leaves lightly.
Imagine your calla lily is a person who likes a comfortable room. It doesn’t like being too hot or too cold. It also doesn’t like dry air. It prefers a room with a little moisture. Just like you feel better in a comfortable environment, plants do too. The right temperature and humidity help the plant grow strong. They also help it resist diseases. So, pay attention to the environment around your plant. Make sure it’s comfortable. This will help it thrive. This is a crucial aspect of caring calla lily indoors. A happy plant is a beautiful plant.
Fun Fact or Stat: Calla lilies thrive in humidity levels between 50% and 60%!
How to Use a Pebble Tray
A pebble tray is a simple way to increase humidity. Find a shallow tray. Fill it with pebbles. Add water to the tray. Make sure the water level is below the top of the pebbles. Place the plant on top of the pebbles. As the water evaporates, it increases the humidity around the plant. Refill the water as needed. A pebble tray is an easy and effective way to provide humidity. It is a great addition to your plant care routine when caring calla lily indoors.
Why Avoid Drafts and Heaters?
Drafts and heaters can cause temperature fluctuations. These fluctuations can stress the plant. Drafts can also dry out the leaves. Heaters can create very dry air. Both of these conditions are bad for calla lilies. Avoid placing the plant near windows that let in cold air. Also, avoid placing it near heaters or vents. Choose a spot that has a stable temperature. This will help your calla lily stay healthy. This is an important consideration when caring calla lily indoors.
How Does Grouping Plants Help?
Grouping plants together can increase humidity. Plants release water vapor into the air. This is called transpiration. When plants are grouped together, they create a humid microclimate. This benefits all the plants. Grouping plants is a natural way to increase humidity. It also creates a beautiful display. Place several calla lilies together. You can also group them with other humidity-loving plants. This will help them all thrive. It enhances your experience of caring calla lily indoors.
Dealing with Pests and Diseases
Pests and diseases can harm your calla lily. Caring calla lily indoors means protecting it. Common pests include aphids, spider mites, and mealybugs. These pests suck the sap from the leaves. This can weaken the plant. Check your plant regularly for pests. Look under the leaves. Look along the stems. If you see pests, treat the plant immediately. You can use insecticidal soap or neem oil. These are natural and safe for plants. Diseases can also affect calla lilies. Root rot is a common disease. It is caused by overwatering. Prevent root rot by using well-draining soil and avoiding overwatering.
- Inspect plants regularly for pests.
- Use insecticidal soap or neem oil for pests.
- Prevent root rot with well-draining soil.
- Remove infected leaves promptly.
- Improve air circulation to prevent fungal diseases.
Imagine your calla lily is getting attacked by tiny invaders. These invaders are pests like aphids and spider mites. They are like little vampires sucking the plant’s blood. They can weaken the plant and make it sick. Diseases are like getting a cold or flu. They can also make the plant sick. It’s important to protect your plant from these threats. Check it regularly for signs of trouble. Act quickly if you see anything wrong. This will help your calla lily stay healthy and strong. This is a key component of caring calla lily indoors.
Fun Fact or Stat: Good air circulation can help prevent many common fungal diseases in calla lilies!
How to Identify Common Pests
Aphids are small, soft-bodied insects. They come in various colors. They often cluster on new growth. Spider mites are tiny, spider-like creatures. They create webs on the leaves. Mealybugs are white, cottony insects. They often hide in the crevices of the plant. Learning to identify these pests is important. It allows you to take action quickly. Check your plant regularly. Look for these signs. This will help you protect your calla lily. Early detection is key when caring calla lily indoors.
How to Use Insecticidal Soap and Neem Oil
Insecticidal soap and neem oil are natural pesticides. They are safe for plants and effective against pests. To use insecticidal soap, dilute it with water. Follow the instructions on the label. Spray the plant thoroughly. Make sure to cover all surfaces, including under the leaves. To use neem oil, dilute it with water. Add a few drops of dish soap. This helps the oil stick to the plant. Spray the plant thoroughly. Use these treatments every few days until the pests are gone. These are valuable tools for caring calla lily indoors.
Why Is Air Circulation Important?
Good air circulation helps prevent fungal diseases. Fungal diseases thrive in humid conditions. Good air circulation helps dry out the leaves. This prevents the fungi from growing. You can improve air circulation by spacing plants apart. You can also use a fan to gently circulate the air. Avoid overcrowding plants. This will help prevent fungal diseases. It’s a simple step that contributes to successful caring calla lily indoors.
Repotting Your Indoor Calla Lily
Repotting gives your plant fresh soil. Caring calla lily indoors includes repotting. Calla lilies need to be repotted every year. This provides them with fresh nutrients. Choose a pot that is slightly larger than the current pot. Fill the new pot with well-draining potting mix. Gently remove the plant from the old pot. Loosen the roots. Place the plant in the new pot. Fill in the pot with soil. Water the plant thoroughly. Repotting gives your calla lily a fresh start.
| Aspect | Details |
|---|---|
| Timing | Repot annually in spring. |
| Pot Size | Choose a pot slightly larger than the current one. |
| Soil | Use fresh, well-draining potting mix. |
| Procedure | Gently remove, loosen roots, and replant. |
- Repot annually in the spring.
- Choose a pot slightly larger.
- Use fresh potting mix.
- Gently loosen the roots.
- Water thoroughly after repotting.
Imagine your calla lily is moving to a new house. The new house has fresh paint, new furniture, and plenty of space. Repotting is like giving your plant a new house. It provides fresh soil, which is like new food. It also gives the roots more room to grow. This helps the plant thrive. Repotting is an important part of caring calla lily indoors. It gives your plant the resources it needs to grow strong and beautiful.
Fun Fact or Stat: Repotting your calla lily annually encourages more vigorous growth and abundant blooms!
When Is the Best Time to Repot?
The best time to repot is in the spring. This is when the plant is starting to grow. Repotting in the spring gives the plant time to adjust to its new pot. It also allows it to take advantage of the fresh soil. Avoid repotting during the winter. This is when the plant is dormant. Repotting during dormancy can stress the plant. Spring is the ideal time for repotting when caring calla lily indoors.
How to Choose the Right Pot Size
Choose a pot that is slightly larger than the current pot. A pot that is too large can hold too much water. This can lead to root rot. A pot that is too small can restrict root growth. Choose a pot that is about 2 inches larger in diameter than the current pot. This provides enough room for the roots to grow. It also prevents the soil from staying too wet. Selecting the right pot size is important when caring calla lily indoors.
What If the Roots Are Rootbound?
Rootbound means the roots are tightly packed in the pot. They might be circling around the inside of the pot. If the roots are rootbound, gently loosen them before repotting. Use your fingers to separate the roots. You can also use a knife to cut through the roots. This encourages the roots to grow outward. Rootbound plants can have trouble absorbing water and nutrients. Loosening the roots helps them grow properly. This step is crucial when caring calla lily indoors.
Summary
Caring calla lily indoors involves several key steps. These include choosing the right soil, providing adequate light, and watering properly. Well-draining soil is essential to prevent root rot. Bright, indirect light encourages blooming. Water when the top inch of soil is dry. Fertilize regularly during the growing season. Manage temperature and humidity for optimal growth. Protect against pests and diseases. Repot annually to provide fresh nutrients. These steps will help your calla lily thrive indoors.
Remember to adjust your care based on the plant’s needs. Observe your calla lily closely. Look for signs of stress. Adjust your watering, lighting, and fertilizing as needed. With proper care, your calla lily will bring beauty and joy to your home. It is a rewarding experience to watch a plant grow and bloom. Enjoy the process of caring calla lily indoors.
Conclusion
Caring calla lily indoors can be a fun and rewarding experience. With the right soil, light, and water, you can enjoy these beautiful flowers in your home. Remember to fertilize regularly and protect against pests and diseases. Pay attention to the plant’s needs. Adjust your care as needed. With a little bit of effort, you can have a thriving calla lily that brings beauty to your indoor space.
Frequently Asked Questions
Question No 1: How often should I water my calla lily indoors?
Answer: You should water your calla lily when the top inch of soil feels dry. This usually means watering about once a week. However, the frequency can vary depending on the temperature, humidity, and pot size. Always check the soil before watering. Avoid overwatering, as this can lead to root rot. During the dormant period in the fall and winter, reduce watering to once a month. Remember that proper watering is a crucial aspect of caring calla lily indoors and ensures healthy growth and vibrant blooms.
Question No 2: What kind of light does a calla lily need indoors?
Answer: Calla lilies need bright, indirect light. Direct sunlight can burn their leaves. A good spot is near an east or west-facing window. If you only have a south-facing window, use a sheer curtain to filter the light. If your plant doesn’t get enough light, the leaves might turn yellow, and it may not bloom. You can supplement with grow lights if needed. Providing the right amount of light is essential for caring calla lily indoors and promoting healthy growth and flowering.
Question No 3: How do I fertilize my indoor calla lily?
Answer: Fertilize your calla lily every two weeks during the growing season (spring and summer). Use a balanced liquid fertilizer diluted to half strength. A balanced fertilizer has equal parts nitrogen, phosphorus, and potassium. Stop fertilizing in the fall and winter when the plant goes dormant. Over-fertilizing can harm the plant, so follow the instructions on the fertilizer label carefully. Regular fertilization is a key aspect of caring calla lily indoors and helps ensure your plant gets the nutrients it needs to thrive.
Question No 4: What should I do if my calla lily’s leaves are turning yellow?
Answer: Yellow leaves can indicate several problems. It could be due to overwatering, underwatering, lack of light, or nutrient deficiency. Check the soil to see if it is too wet or too dry. If the soil is too wet, allow it to dry out before watering again. If the soil is too dry, water the plant thoroughly. Move the plant to a brighter location if it is not getting enough light. Fertilize the plant if it is lacking nutrients. Addressing these potential issues is important when caring calla lily indoors to maintain its health and appearance.
Question No 5: How do I repot my calla lily?
Answer: Repot your calla lily every year in the spring. Choose a pot that is slightly larger than the current pot. Fill the new pot with well-draining potting mix. Gently remove the plant from the old pot, loosen the roots, and place it in the new pot. Fill in the pot with soil and water thoroughly. Repotting provides fresh nutrients and gives the roots more room to grow. This is a crucial step in caring calla lily indoors and helps ensure continued healthy growth and blooming.
Question No 6: How do I deal with pests on my calla lily?
Answer: Check your calla lily regularly for pests like aphids, spider mites, and mealybugs. If you see pests, treat the plant immediately with insecticidal soap or neem oil. These are natural and safe options. Spray the plant thoroughly, making sure to cover all surfaces, including under the leaves. Repeat the treatment every few days until the pests are gone. Protecting your plant from pests is an important part of caring calla lily indoors and helps keep it healthy and vibrant.
