Have you ever tried digging a hole with a spoon? It takes forever! Gardening can be hard work. But, what if there was an easier way? A drill attachment for gardening can help. It can make planting flowers much faster. It can even help mix soil.
Gardening should be fun. Using the right tools makes it easier. A drill attachment for gardening might be just what you need. Are you ready to learn more? Let’s dig in!
Key Takeaways
- A drill attachment for gardening can make planting and digging much easier.
- These attachments save time and effort when working in your garden.
- Different types of drill attachments are available for various gardening tasks.
- Using the correct attachment ensures you don’t damage your plants or soil.
- Always follow safety guidelines when using power tools in the garden.
Choosing the Right Drill Attachment for Gardening

Picking the right drill attachment for gardening is important. Think about what you need to do. Are you planting small flowers? Or mixing a big batch of soil? Different attachments work best for different jobs. A small auger is good for planting bulbs. A larger one is better for mixing compost. Check the size of your drill too. Make sure the attachment fits. Read reviews before you buy. This will help you find one that works well and lasts a long time. Think about the soil type you have. Some attachments work better in soft soil. Others are better for hard, rocky soil. Consider these things to make the best choice. This will make your gardening tasks easier and more fun. Remember, the right tool can make all the difference. Take your time to find the perfect fit for your needs.
- Small augers are good for planting bulbs.
- Larger augers mix compost well.
- Check the size of your drill.
- Read reviews before buying.
- Think about your soil type.
Using the wrong attachment can cause problems. It might not work well. Or, it could even damage your plants. Imagine trying to plant tiny seeds with a giant auger. It wouldn’t work very well! Also, consider how often you will use the attachment. If you only garden a little bit, a basic one might be fine. But, if you garden a lot, you might want a more durable one. Pay attention to the materials the attachment is made from. Stronger materials will last longer. By thinking carefully, you can choose the right drill attachment for gardening. This will help you enjoy your time in the garden even more. Plus, it saves you time and effort.
Fun Fact or Stat: Did you know that using a drill attachment can reduce planting time by up to 50%?
What Size Drill Do I Need?
Choosing the right size drill for your drill attachment for gardening is very important. A small, weak drill might not have enough power. It could struggle to turn the attachment, especially in hard soil. A very large, powerful drill might be too much. It could be hard to control. Most garden drill attachments work well with standard-sized drills. These are the ones you probably already have at home. Check the instructions for your attachment. It will tell you the best drill size to use. Using the right size drill will make your work easier. It will also help prevent accidents. Always use the correct drill to keep yourself safe and your plants healthy.
Can I Use Any Drill Attachment for Gardening?
Not all drill attachments are made for gardening. Some are for wood, metal, or other materials. These attachments might not work well in soil. They could even damage your garden. Drill attachments for gardening are designed to work with soil and plants. They are often made of materials that won’t rust easily. They also have shapes that are good for digging or mixing. Using the wrong attachment could break your drill. It could also hurt you. Always check that the attachment is made for gardening. This will help you stay safe and protect your plants. Using the right tools makes gardening more fun and easier.
How Do I Clean My Drill Attachment?
Keeping your drill attachment for gardening clean is important. Soil and dirt can get stuck on it. This can make it harder to use. It can also cause it to rust. After each use, wipe the attachment with a damp cloth. Remove any dirt or debris. For tough spots, use a brush. You can also rinse it with water. Make sure to dry it completely before storing it. This will prevent rust. You can also use a special cleaner for metal tools. This will help keep it in good condition. A clean attachment will work better and last longer. Taking care of your tools is a good way to make gardening easier.
Different Types of Garden Drill Augers

There are many kinds of garden drill augers. Each one does a different job. Some are good for planting small plants. Others are for digging bigger holes. There are even augers for mixing soil. A bulb planter auger is small and pointed. It makes perfect holes for planting bulbs. A post hole digger auger is larger. It digs deep holes for fence posts. A soil mixing auger has a spiral shape. It mixes soil and compost quickly. Think about what you need to do. Then, choose the right type of auger. Using the right auger will save you time and energy. It will also make your gardening tasks much easier. So, explore the different types and find the perfect one for your needs.
- Bulb planter augers are small and pointed.
- Post hole digger augers are larger and deeper.
- Soil mixing augers have a spiral shape.
- Choose the right auger for the job.
- Consider the size and shape of each auger.
- Match the auger to your gardening needs.
Imagine you are planting a lot of tulip bulbs. Using a shovel would take a long time. But, with a bulb planter auger, it is quick and easy. You can plant all your bulbs in no time. Or, picture yourself building a fence. Digging the post holes by hand would be very hard work. A post hole digger auger makes it much easier. It digs the holes quickly and efficiently. This saves you a lot of time and effort. Knowing the different types of garden drill augers helps you choose the best one for each task. This makes gardening more enjoyable and less tiring. So, take the time to learn about the different augers. You will be glad you did!
Fun Fact or Stat: The spiral shape of a soil mixing auger is inspired by the way worms mix soil!
Bulb Planting Augers
Bulb planting augers are great for planting flowers like tulips and daffodils. They are small and easy to use. Do you love spring flowers? These augers make planting them super easy. Just attach the auger to your drill. Then, drill a hole in the ground. Drop in your bulb and cover it with soil. It’s that simple! These augers save time and make planting lots of bulbs a breeze. They are perfect for kids and adults. If you want a beautiful spring garden, a bulb planting auger is a must-have tool. It makes gardening fun and easy for everyone. So, get one and start planting!
Post Hole Digging Augers
Post hole digging augers are for bigger jobs. They help you dig holes for fences and decks. Building a fence can be hard work. Digging the holes is the hardest part. But, with a post hole digging auger, it is much easier. These augers are strong and can dig deep holes quickly. They save you a lot of time and effort. If you are planning to build a fence, get a post hole digging auger. It will make the job much easier. You will be glad you did. It is a great tool for any big gardening project.
Soil Mixing Augers
Soil mixing augers are used to mix soil and compost. Do you want to make your soil better for your plants? These augers can help. They mix everything together quickly and easily. Just put the auger in your drill and mix away! They are great for big pots and garden beds. Soil mixing augers make gardening easier and more fun. They help your plants grow strong and healthy. If you want to improve your soil, get a soil mixing auger. It is a great tool for any gardener. It will save you time and energy.
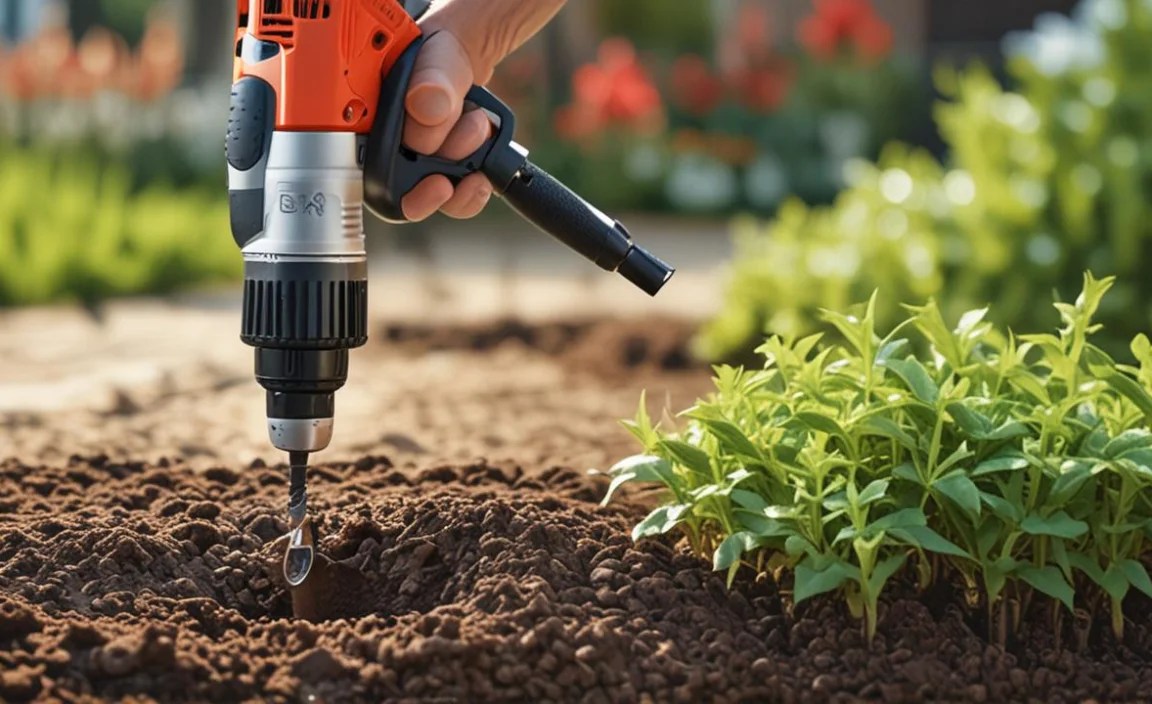
How to Use a Drill Attachment for Planting Bulbs

Using a drill attachment for planting bulbs is easy. First, choose the right bulb planting auger. It should be small and pointed. Attach it to your drill. Find the spot where you want to plant the bulb. Hold the drill straight up and down. Start drilling into the soil. Go down to the depth that is right for your bulb. Take the drill out of the hole. Drop the bulb into the hole. Cover it with soil. That’s it! You have planted a bulb. Repeat this for all your bulbs. Using a drill attachment makes planting bulbs much faster. It also saves you from having to dig each hole by hand. This makes gardening more fun and less tiring. Remember to follow the instructions that come with your attachment. This will help you use it safely and correctly.
- Choose the right bulb planting auger.
- Attach the auger to your drill.
- Drill a hole in the soil.
- Drop the bulb into the hole.
- Cover the bulb with soil.
- Repeat for all your bulbs.
Imagine you have a lot of bulbs to plant. Doing it by hand would take a long time. Your back would hurt from bending over. But, with a drill attachment for planting bulbs, you can plant them quickly and easily. You can even get your kids to help. It’s a fun way to spend time together in the garden. Plus, you’ll have beautiful flowers in the spring. Using the right tools makes gardening more enjoyable. It also makes it easier to get the job done. So, next time you need to plant bulbs, reach for your drill attachment. You’ll be glad you did!
Fun Fact or Stat: Some drill attachments can plant up to 100 bulbs in just one hour!
Choosing the Right Bulb
Choosing the right bulb is as important as having the right tool. Different bulbs bloom at different times. Some bloom in early spring. Others bloom in late spring or summer. Think about when you want your flowers to bloom. Also, consider the color of the flowers. Do you want all the same color? Or a mix of colors? Look for healthy bulbs. They should be firm and not mushy. A good bulb will grow into a beautiful flower. So, take your time and choose the right bulbs for your garden.
Drilling the Perfect Hole
Drilling the perfect hole is key to planting bulbs correctly. The hole should be deep enough for the bulb. But not too deep. Check the instructions on the bulb package. It will tell you how deep to plant the bulb. Hold the drill straight. This will make a straight hole. A straight hole helps the bulb grow properly. If the hole is too shallow, the bulb might not grow well. If it is too deep, the bulb might rot. So, take your time and drill the perfect hole for each bulb.
Covering the Bulb with Soil
After you drop the bulb into the hole, cover it with soil. Use loose soil. Don’t pack it down too hard. The bulb needs room to grow. You can also add some compost to the soil. This will give the bulb extra nutrients. Water the soil after you plant the bulb. This will help it settle. Then, wait for spring! Your bulbs will start to grow into beautiful flowers. Covering the bulb with soil is the last step in planting. Do it carefully and your bulbs will thrive.
Using a Drill Attachment for Weeding
Did you know you can use a drill attachment for weeding? Weeding can be a tough job. It takes a lot of time and effort. But, a drill attachment can make it easier. There are special weeding attachments for drills. They have a spinning head that pulls weeds out of the ground. Attach the weeding attachment to your drill. Then, hold the drill over the weed. Let the spinning head grab the weed. Pull the weed out of the ground. It’s that simple! Using a drill attachment for weeding can save you a lot of time. It can also save your back from hurting. This makes weeding much less of a chore. Remember to wear safety glasses when using a drill for weeding.
| Attachment Type | Best Use | Pros | Cons |
|---|---|---|---|
| Bulb Planter | Planting bulbs | Fast, easy, creates perfect holes | Only for bulbs |
| Soil Auger | Mixing soil, compost | Quick mixing, saves effort | Can be messy |
| Weeding Attachment | Removing weeds | Reduces bending, fast weeding | May damage surrounding plants |
| Post Hole Digger | Digging post holes | Digs deep holes quickly | Can be heavy |
- Attach the weeding attachment to your drill.
- Hold the drill over the weed.
- Let the spinning head grab the weed.
- Pull the weed out of the ground.
- Wear safety glasses.
Imagine you have a garden full of weeds. Pulling them all by hand would take hours. You would have to bend over and strain your back. But, with a drill attachment for weeding, you can do it much faster. You can stand up straight and let the drill do the work. This makes weeding less tiring and more enjoyable. Plus, you’ll have more time to enjoy your beautiful garden. Using the right tools makes all the difference. So, consider using a drill attachment for weeding. It might be just what you need to keep your garden looking great.
Fun Fact or Stat: A drill weeding attachment can remove up to 50 weeds in just 10 minutes!
Choosing the Right Weeding Attachment
Not all weeding attachments are the same. Some are better for certain types of weeds. Others are better for different types of soil. Look for an attachment that is strong and durable. It should be able to handle tough weeds. Also, make sure it is easy to use. You don’t want something that is complicated. Read reviews before you buy. This will help you find the best weeding attachment for your needs. The right attachment will make weeding much easier.
Using the Weeding Attachment Safely
Safety is important when using any power tool. Always wear safety glasses. This will protect your eyes from flying debris. Also, wear gloves to protect your hands. Make sure the area is clear of people and pets. Don’t use the drill in wet conditions. This could be dangerous. Read the instructions carefully before using the drill. Follow all safety guidelines. Using the drill safely will help prevent accidents. It will also make weeding more enjoyable.
Taking Care of Your Weeding Attachment
Like any tool, your weeding attachment needs to be taken care of. After each use, clean it off. Remove any dirt or debris. You can use a brush or a cloth. If the attachment is rusty, use a wire brush to remove the rust. You can also apply a rust preventative. Store the attachment in a dry place. This will help prevent rust. Taking care of your weeding attachment will help it last longer. It will also keep it working properly.
Mixing Soil and Compost with a Drill Attachment

Mixing soil and compost can be hard work. It takes a lot of time and energy. But, a drill attachment for mixing soil can make it easier. There are special attachments for drills that are designed for mixing. They have a spiral shape that helps mix the soil and compost together. Attach the mixing attachment to your drill. Put the drill in a bucket or wheelbarrow with the soil and compost. Turn on the drill and let it mix everything together. It’s that simple! Using a drill attachment for mixing soil can save you a lot of time and effort. It also makes sure everything is mixed well. This helps your plants grow strong and healthy. Make sure the drill is powerful enough to handle the mixing attachment.
- Attach the mixing attachment to your drill.
- Put the drill in a bucket with soil and compost.
- Turn on the drill and let it mix.
- Make sure the drill is powerful enough.
- Mix until everything is well combined.
- Add water if needed.
Imagine you are preparing a garden bed for planting. You need to mix soil, compost, and fertilizer together. Doing it by hand would take a long time and be very tiring. But, with a drill attachment for mixing soil, you can do it quickly and easily. You can mix a large amount of soil in just a few minutes. This saves you time and energy. Plus, the drill attachment mixes everything more thoroughly than you could by hand. This ensures that your plants get the nutrients they need. Using the right tools makes gardening more efficient and enjoyable. So, consider using a drill attachment for mixing soil. It might be just what you need to make your garden thrive.
Fun Fact or Stat: Using a drill attachment can mix soil up to 75% faster than mixing by hand!
Choosing the Right Mixing Attachment
Not all mixing attachments are the same. Some are better for mixing large amounts of soil. Others are better for smaller amounts. Look for an attachment that is made of durable materials. It should be able to withstand repeated use. Also, make sure it is the right size for your drill. A mixing attachment that is too big could damage your drill. Read reviews before you buy. This will help you find the best mixing attachment for your needs. The right attachment will make mixing soil much easier.
Mixing Different Types of Soil
You can use a drill attachment to mix different types of soil. For example, you can mix sandy soil with clay soil. This can improve the texture and drainage of the soil. You can also mix soil with compost or manure. This will add nutrients to the soil. When mixing different types of soil, it is important to mix them thoroughly. This will ensure that the soil is evenly distributed. A drill attachment can help you do this quickly and easily. Mixing different types of soil can improve your garden.
Adding Water While Mixing
Sometimes, the soil can be too dry. In this case, you might need to add water while mixing. Add a little bit of water at a time. Mix it in thoroughly. You don’t want the soil to be too wet. Just moist enough. Adding water can help the soil mix more evenly. It can also help the nutrients dissolve. Be careful not to add too much water. This can make the soil muddy. Adding water while mixing can improve the quality of your soil. It helps create the perfect environment for your plants.
Maintaining Your Garden Drill Attachments
Taking care of your garden drill attachments is important. This will help them last longer. Clean them after each use. Remove any dirt or debris. Use a brush or a cloth. If the attachments are rusty, use a wire brush to remove the rust. You can also apply a rust preventative. Store the attachments in a dry place. This will help prevent rust. Check the attachments regularly for any damage. If you see any cracks or breaks, replace them. Keeping your attachments in good condition will make gardening easier. It will also save you money in the long run. Remember to unplug the drill before cleaning or maintaining the attachments.
- Clean the attachments after each use.
- Remove any dirt or debris.
- Use a wire brush to remove rust.
- Apply a rust preventative.
- Store the attachments in a dry place.
- Check the attachments for damage.
- Unplug the drill before cleaning.
Imagine you have a set of garden drill attachments that you love. They make gardening so much easier. But, you don’t take care of them. You leave them outside in the rain. You don’t clean them after each use. Soon, they become rusty and broken. They are no longer useful. This is why it is important to maintain your garden drill attachments. By taking a few simple steps, you can keep them in good condition for years to come. This will save you money and make gardening more enjoyable. So, take the time to care for your attachments. They will thank you for it!
Fun Fact or Stat: Properly maintained drill attachments can last up to 10 years!
Cleaning After Each Use
Cleaning your garden drill attachments after each use is very important. Soil and dirt can get stuck on the attachments. This can cause them to rust. It can also make them harder to use. Use a brush or a cloth to remove the dirt. You can also rinse them with water. Make sure to dry them completely before storing them. This will help prevent rust. Cleaning your attachments after each use will keep them in good condition.
Storing in a Dry Place
Storing your garden drill attachments in a dry place is also important. Moisture can cause rust. Rust can damage the attachments. Store them in a shed or garage. If you don’t have a shed or garage, store them in a plastic container. Make sure the container is sealed tightly. This will keep out moisture. Storing your attachments in a dry place will help prevent rust. It will also keep them in good condition.
Checking for Damage Regularly
Check your garden drill attachments regularly for any damage. Look for cracks or breaks. If you see any damage, replace the attachments. Using damaged attachments can be dangerous. They could break while you are using them. This could cause injury. Checking for damage regularly will help prevent accidents. It will also keep your attachments in good condition. Replace damaged attachments as soon as possible.
Safety Tips for Using Garden Drill Attachments
Using garden drill attachments can be dangerous if you are not careful. Always wear safety glasses. This will protect your eyes from flying debris. Wear gloves to protect your hands. Make sure the area is clear of people and pets. Don’t use the drill in wet conditions. This could cause electric shock. Read the instructions carefully before using the drill. Follow all safety guidelines. Use the right attachment for the job. Don’t force the drill. Let the attachment do the work. If you are not comfortable using the drill, ask for help. Following these safety tips will help prevent accidents. It will also make gardening more enjoyable. Always unplug the drill when changing attachments.
- Wear safety glasses.
- Wear gloves.
- Clear the area of people and pets.
- Don’t use the drill in wet conditions.
- Read the instructions carefully.
- Use the right attachment for the job.
- Unplug the drill when changing attachments.
Imagine you are using a drill attachment to plant bulbs. You are not wearing safety glasses. A piece of dirt flies up and hits you in the eye. This could cause serious injury. Or, imagine you are using a drill attachment to mix soil. You are not wearing gloves. The drill slips and cuts your hand. This could also cause serious injury. These are just a few examples of why it is important to follow safety tips when using garden drill attachments. By taking a few simple precautions, you can prevent accidents. You can also make gardening more enjoyable. So, always remember to put safety first!
Fun Fact or Stat: Wearing safety glasses can reduce the risk of eye injuries by up to 90%!
Wearing Safety Glasses
Wearing safety glasses is the most important safety tip when using garden drill attachments. Safety glasses will protect your eyes from flying debris. Dirt, rocks, and other materials can fly up when you are using a drill. These materials can cause serious eye injuries. Always wear safety glasses, even if you are only using the drill for a few minutes. It is better to be safe than sorry. Safety glasses are inexpensive and easy to find. They are a must-have for any gardener who uses power tools.
Wearing Gloves
Wearing gloves is also important when using garden drill attachments. Gloves will protect your hands from cuts and scrapes. The drill can slip and cut your hand. The attachments can also be sharp. Wear gloves that fit well. They should not be too loose or too tight. Gloves made of leather or rubber are a good choice. They will provide good protection. Wearing gloves will help prevent injuries to your hands.
Using the Right Attachment
Using the right attachment for the job is also important for safety. Each attachment is designed for a specific task. Using the wrong attachment can be dangerous. It could break while you are using it. This could cause injury. Read the instructions carefully before using any attachment. Make sure you understand how to use it properly. If you are not sure which attachment to use, ask for help. Using the right attachment will make the job safer and easier.
Summary
A drill attachment for gardening can be a great tool. It can help with planting, weeding, and mixing soil. Different attachments work for different jobs. Bulb planters make planting easy. Weeding attachments pull out weeds quickly. Soil mixing attachments blend soil and compost well. It is important to choose the right attachment. Also, using the correct size drill is key. Safety is always important. Wear safety glasses and gloves. Clean and store your attachments properly. This will keep them in good condition. A drill attachment can save you time and effort. It makes gardening more fun.
Conclusion
Gardening can be easier with the right tools. A drill attachment for gardening is a useful addition. It helps with many tasks around the garden. From planting bulbs to mixing soil, it saves time and energy. Remember to choose the right attachment. Follow safety guidelines when using power tools. With the right tools and knowledge, you can enjoy a beautiful and productive garden.
Frequently Asked Questions
Question No 1: What is a drill attachment for gardening?
Answer: A drill attachment for gardening is a special tool that you connect to a power drill. It helps with different gardening tasks. Some attachments help with planting bulbs. Others help with weeding. Some even help with mixing soil and compost. These attachments make gardening easier and faster. They can save you a lot of time and effort. Using a drill attachment can make gardening more fun and less tiring. It’s a great way to get your garden looking its best without all the hard work.
Question No 2: What kind of drill do I need for gardening attachments?
Answer: Most drill attachments for gardening work with standard-sized power drills. These are the drills you probably already have at home. Check the instructions for your specific attachment. It will tell you the best drill size to use. A small, weak drill might not have enough power. A very large, powerful drill might be too hard to control. Using the right size drill will make your work easier and safer. Always follow the manufacturer’s instructions for your drill and attachments. This will help you get the best results and avoid accidents.
Question No 3: How do I clean my drill attachments after using them in the garden?
Answer: Cleaning your drill attachments for gardening is important. Soil and dirt can get stuck on them. This can make them harder to use and cause them to rust. After each use, wipe the attachments with a damp cloth. Remove any dirt or debris. For tough spots, use a brush. You can also rinse them with water. Make sure to dry them completely before storing them. This will prevent rust. You can also use a special cleaner for metal tools. This will help keep them in good condition.
Question No 4: Are drill attachments safe to use around kids and pets?
Answer: Safety is very important when using power tools. This includes drill attachments for gardening. Keep kids and pets away from the area while you are working. Always wear safety glasses to protect your eyes. Wear gloves to protect your hands. Don’t use the drill in wet conditions. Read the instructions carefully before using the drill. Follow all safety guidelines. If you are not comfortable using the drill, ask for help. By following these safety tips, you can prevent accidents and keep everyone safe.
Question No 5: Can I use any drill attachment for any gardening task?
Answer: No, not all drill attachments are made for all gardening tasks. Some are designed for specific jobs. For example, a bulb planter auger is for planting bulbs. A weeding attachment is for removing weeds. A soil mixing attachment is for mixing soil and compost. Using the wrong attachment could damage your plants or your drill. Always choose the right attachment for the task you are doing. Read the instructions carefully to make sure you are using it correctly. This will help you get the best results and avoid problems.
Question No 6: Where can I buy drill attachments for gardening?
Answer: You can buy drill attachments for gardening at many places. Hardware stores often have a selection of attachments. Garden centers also sell them. You can also find them online at websites like Amazon. Before you buy, read reviews to see what other people think of the attachments. Compare prices to find the best deal. Make sure the attachment is compatible with your drill. Choose a reputable brand to ensure quality. With a little research, you can find the perfect drill attachment for your gardening needs.
