Have you ever wanted a cool table outside? One that can handle the weather? Maybe you’re thinking about how to tile a table for outdoors. It’s a fun project. You can make a plain table look amazing.
Tiling a table is like giving it a superpower. It becomes waterproof and super strong. Plus, you get to pick the colors and designs. Imagine a table that shows off your style!
This guide will show you how to tile a table for outdoors. We will go step by step. You’ll learn all the tricks to make it look great. Let’s get started and make something awesome!
Key Takeaways
- How to tile a table for outdoors involves careful selection of weather-resistant materials.
- Grouting and sealing are crucial for protecting your tiled table from outdoor elements.
- Proper surface preparation ensures your tiles adhere well and last longer on the table.
- Choosing the right adhesive is key to preventing tiles from popping off over time.
- Tiling an outdoor table enhances its look and makes it durable for years to come.
Choosing the Right Table for Tiling Outdoors

Picking the right table is the first step. You need a strong, sturdy base. Wood or metal tables work best. Avoid plastic or flimsy tables. They might not hold the tile weight. The table should be able to handle the outdoor weather. Look for tables that are already treated for outdoor use. This will help prevent rot or rust. Think about the size and shape you want. A round or square table can be easier to tile. Measure the table’s surface carefully. This helps you figure out how many tiles you need. Also, consider the table’s purpose. Will it be for eating, games, or just decoration? This helps you choose the right tile design.
- Choose a sturdy table made of wood or metal.
- Make sure the table is weather-resistant.
- Measure the table’s surface for tile calculations.
- Consider the table’s purpose for design ideas.
- Think about the size and shape of the table.
Once you’ve found the perfect table, check it for any damage. Fix any loose parts or cracks. Clean the surface well. Remove any dirt, grease, or old paint. A smooth, clean surface is important for the tiles to stick. You might need to sand the surface to make it even smoother. Use a primer to help the adhesive grip better. This is like glue that helps the tile stick tight. Now you’re ready to start tiling. Remember, a good base makes all the difference. Taking the time to choose the right table is worth it. Your tiled table will look great and last a long time.
Why is a Strong Table Base Important?
Imagine building a house on a shaky foundation. It wouldn’t last very long, right? The same goes for tiling a table. A strong base is super important. It supports the weight of the tiles and grout. If the base is weak, the tiles can crack or come loose. Outdoor tables face tough conditions. Rain, sun, and temperature changes can all affect the table. A sturdy base can handle these changes. It prevents the table from warping or bending. This keeps your tiles looking good for longer. A strong base also makes the tiling process easier. It provides a stable surface to work on. You won’t have to worry about the table wobbling while you’re placing the tiles. So, choosing a solid table base is a smart move. It ensures your hard work pays off with a beautiful, long-lasting tiled table.
What Types of Tables Work Best for Tiling?
Not all tables are created equal, especially when it comes to tiling. Some materials work better than others. Wood tables are a great choice. They are strong and can be easily sanded and primed. Metal tables are also good. They are durable and can withstand outdoor conditions. But you need to make sure the metal is treated to prevent rust. Avoid tables made of plastic or lightweight materials. These tables might not be strong enough to support the weight of the tiles. Also, look for tables with a flat, even surface. This will make tiling much easier. If the table has a textured surface, you might need to sand it down first. Consider the style of the table too. A simple, classic design will work well with most tile patterns. So, think about the material, shape, and style when choosing a table for tiling.
How Do You Prepare the Table Surface for Tiling?
Prepping the table surface is like getting ready for a big race. You need to make sure everything is in top shape. First, clean the table really well. Use soap and water to remove any dirt or grease. If there is old paint or varnish, you might need to sand it off. Sanding creates a smooth surface for the tiles to stick to. After sanding, wipe the table down with a damp cloth. This removes any dust. Next, apply a primer. Primer is like a glue that helps the adhesive stick better. Choose a primer that is made for outdoor use. Let the primer dry completely before you start tiling. This usually takes a few hours. Once the primer is dry, you’re ready to go! A well-prepared surface is key to a successful tiling project. It ensures your tiles will stay in place for years to come.
Fun Fact or Stat: Did you know that tables made from reclaimed wood are a popular choice for tiling projects because they add a unique, rustic charm?
Selecting the Right Tiles for Outdoor Use
Choosing the right tiles is very important. Not all tiles are good for outdoors. You need tiles that can handle the weather. Look for tiles labeled as “outdoor” or “frost-resistant.” These tiles won’t crack in cold weather. Porcelain and ceramic tiles are good choices. They are strong and waterproof. Stone tiles like slate or granite also work well. They add a natural look to your table. Think about the size and shape of the tiles. Smaller tiles are easier to work with on curved surfaces. Larger tiles can make the table look modern. Consider the color and design. Choose colors that won’t fade in the sun. Dark colors can get very hot in the summer. Lighter colors stay cooler. Pick a design that matches your outdoor space. A simple pattern is often the best choice. It won’t clash with your other outdoor furniture.
- Choose tiles labeled “outdoor” or “frost-resistant.”
- Porcelain and ceramic tiles are good options.
- Stone tiles like slate add a natural look.
- Consider the size, shape, and color of the tiles.
- Pick a design that matches your outdoor space.
Before you buy your tiles, measure the table again. Calculate how many tiles you need. Add a few extra tiles for cuts and breaks. It’s always better to have too many than not enough. When you get your tiles, check them for any damage. Make sure they are all the same size and shape. If you’re using different colors or patterns, lay them out on the table first. This helps you see how the final design will look. Now you’re ready to start tiling. Remember, the right tiles will make your table look beautiful and last for years.
What Makes a Tile Suitable for Outdoor Conditions?
Outdoor tiles face tough challenges. They have to withstand rain, sun, and freezing temperatures. So, what makes a tile suitable for these conditions? First, it needs to be frost-resistant. This means it won’t absorb water that can freeze and crack the tile. Porcelain tiles are a great choice because they are very dense and absorb very little water. Second, it needs to be durable. Outdoor tiles should be able to handle heavy use and resist scratches. Stone tiles like granite are very durable. Third, it needs to be slip-resistant. Wet tiles can be slippery, so choose tiles with a textured surface. Finally, it needs to be fade-resistant. The sun can fade the color of some tiles over time. Choose tiles with colors that are baked in, not just painted on. By considering these factors, you can choose tiles that will look great and last for years in your outdoor space.
How Do You Calculate the Number of Tiles Needed?
Calculating the number of tiles you need is like solving a puzzle. First, measure the surface you want to tile. Measure the length and width of the table in inches or centimeters. Then, multiply the length by the width to get the total area. Next, measure the length and width of one tile. Multiply those numbers to get the area of one tile. Now, divide the total area of the table by the area of one tile. This will give you the number of tiles you need. But don’t stop there! Add 10% to that number to account for cuts and breaks. It’s always better to have a few extra tiles than to run out in the middle of your project. Finally, round up to the nearest whole number. That’s the total number of tiles you should buy. With a little math, you can make sure you have enough tiles to complete your project.
What Are the Best Tile Designs for Outdoor Tables?
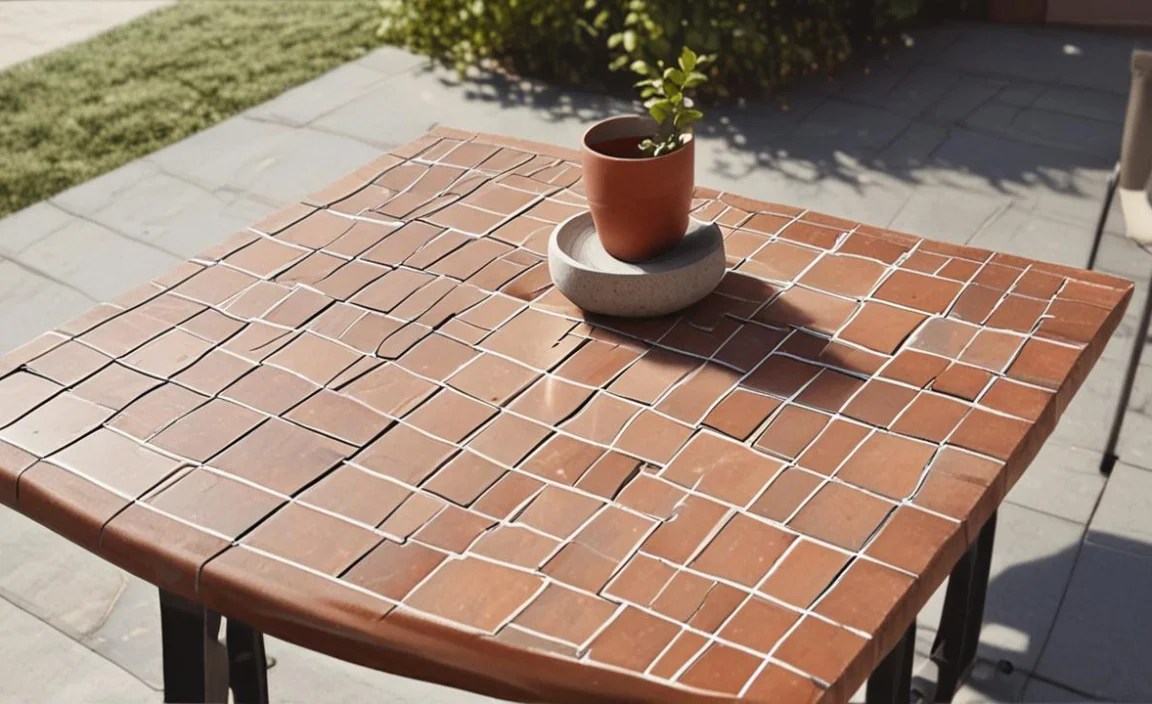
The best tile designs for outdoor tables depend on your personal style and the look you want to create. But there are some designs that work particularly well. Simple, geometric patterns are always a good choice. They are easy to install and look great in any outdoor space. A checkerboard pattern is a classic choice. You can use two different colors of tiles to create a fun, playful look. A mosaic design is another great option. You can use small pieces of different colored tiles to create a unique, artistic look. If you want a more natural look, consider using stone tiles. Slate or granite tiles can add a touch of elegance to your outdoor table. No matter what design you choose, make sure it complements your other outdoor furniture and décor. A well-chosen tile design can transform your outdoor table into a beautiful focal point.
Fun Fact or Stat: Mosaic tile designs date back to ancient Roman times, where they were used to decorate floors and walls with intricate patterns!
Preparing the Table Surface for Tiling

Getting the table ready is a key step. Make sure the surface is clean and smooth. Start by wiping down the table with a damp cloth. This removes any loose dirt or dust. If there is old paint or varnish, you will need to sand it off. Use sandpaper to create a smooth surface. Wipe away the sanding dust with a clean cloth. If the table has any cracks or holes, fill them with wood filler. Let the filler dry completely, then sand it smooth. Next, apply a layer of primer. Primer helps the adhesive stick better to the table. Choose a primer that is designed for outdoor use. Let the primer dry completely before you start tiling. This usually takes a few hours. A well-prepared surface will ensure that your tiles adhere properly and your table looks great for years to come.
- Clean the table surface with a damp cloth.
- Sand off any old paint or varnish.
- Fill any cracks or holes with wood filler.
- Apply a layer of primer for better adhesion.
- Let the primer dry completely before tiling.
Before you start tiling, it’s a good idea to lay out your tiles on the table. This helps you plan the design and make sure you have enough tiles. You can also use spacers to create even gaps between the tiles. This will make the grouting process easier later on. If you need to cut any tiles to fit, use a tile cutter or wet saw. Be careful when cutting tiles, and always wear safety glasses. Once you have all your tiles laid out, you’re ready to start applying the adhesive. Remember, taking the time to prepare the surface properly will make the tiling process much easier and ensure a professional-looking result.
Why is Priming Important Before Tiling?
Think of primer as the secret ingredient for a successful tiling project. It’s a special coating that you apply to the table surface before you start tiling. But why is it so important? Primer helps the adhesive stick better to the table. It creates a strong bond between the table and the tiles. This prevents the tiles from coming loose over time. Primer also seals the table surface. This prevents moisture from getting into the wood and causing damage. Outdoor tables are exposed to rain and humidity, so this is especially important. Primer also helps to create a uniform surface. This ensures that the tiles are all at the same height. Without primer, the adhesive might not stick properly, and your tiles could start to crack or fall off. So, don’t skip the primer! It’s a small step that can make a big difference in the long run.
How Do You Fill Cracks and Holes in the Table Surface?
Cracks and holes in the table surface can cause problems when tiling. They can make the tiles uneven and weaken the bond between the tiles and the table. So, it’s important to fill them before you start tiling. The best way to fill cracks and holes is with wood filler. Wood filler is a special paste that is designed to fill gaps in wood. You can find it at most hardware stores. To use wood filler, first clean the area around the crack or hole. Remove any loose pieces of wood. Then, apply the wood filler with a putty knife. Press the filler firmly into the crack or hole. Make sure it is level with the surrounding surface. Let the filler dry completely, according to the manufacturer’s instructions. This usually takes a few hours. Once the filler is dry, sand it smooth with sandpaper. Now the surface is ready for primer and tiles!
What Tools Do You Need to Prepare the Table Surface?
Getting the right tools together makes the job easier. To prepare the table surface for tiling, you’ll need a few essential tools. First, you’ll need sandpaper. Use different grits of sandpaper, from coarse to fine, to smooth the surface. You’ll also need a sanding block to hold the sandpaper. Next, you’ll need a putty knife for applying wood filler. A damp cloth is essential for cleaning the surface and removing dust. You’ll also need a bucket of water and some soap. A primer brush is needed to apply the primer evenly. Safety glasses are important to protect your eyes from dust and debris. Finally, you might need a scraper to remove any old paint or varnish. With these tools on hand, you’ll be well-equipped to prepare the table surface for tiling. Remember to always wear safety glasses and gloves when working with these tools.
Fun Fact or Stat: The earliest known use of wood filler dates back to ancient Egypt, where it was used to repair furniture and other wooden objects!
Applying Adhesive and Setting the Tiles

Now comes the fun part: sticking the tiles! Choose a good adhesive. It should be made for outdoor use. Thin-set mortar is a popular choice. It’s strong and waterproof. Mix the adhesive according to the directions. It should be like thick peanut butter. Use a notched trowel to spread the adhesive. Hold the trowel at a 45-degree angle. This creates ridges in the adhesive. The ridges help the tiles stick better. Start in one corner of the table. Press each tile firmly into the adhesive. Use tile spacers to keep the tiles evenly spaced. This makes the grout lines look neat. If you need to cut tiles, use a tile cutter. Be careful when cutting. Let the adhesive dry completely. This usually takes 24-48 hours. Don’t walk on the tiles while they are drying. This will help them stay in place.
- Choose an outdoor-rated adhesive.
- Mix the adhesive to a thick consistency.
- Use a notched trowel to spread the adhesive.
- Press each tile firmly into the adhesive.
- Use tile spacers for even grout lines.
After the adhesive is dry, check for any loose tiles. If you find any, carefully remove them. Add more adhesive and replace the tile. Let the adhesive dry again. Now you’re ready to grout. Remember, good adhesive is the key to a long-lasting tiled table. Take your time and do it right. Your beautiful tiled table will be worth the effort. People will be impressed by your hard work and skill. You’ll have a table that you can enjoy for years to come.
How Do You Choose the Right Adhesive for Outdoor Tiles?
Choosing the right adhesive is like picking the perfect glue for a special project. It needs to be strong and reliable. For outdoor tiles, you need an adhesive that can handle the weather. Look for adhesives labeled as “outdoor” or “weatherproof.” These adhesives are designed to withstand rain, sun, and temperature changes. Thin-set mortar is a popular choice for outdoor tile projects. It’s a cement-based adhesive that is very strong and durable. It also resists moisture, which is important for outdoor use. Another option is epoxy mortar. Epoxy mortar is even stronger than thin-set mortar, but it can be more expensive. When choosing an adhesive, read the manufacturer’s instructions carefully. Make sure the adhesive is compatible with the type of tile you are using. Some adhesives are better suited for porcelain tiles, while others are better for stone tiles. By choosing the right adhesive, you can ensure that your outdoor tiles stay in place for years to come.
What is the Best Way to Cut Tiles for a Tabletop?
Cutting tiles can seem scary, but it’s easier than you think with the right tools. The best way to cut tiles for a tabletop is with a tile cutter or a wet saw. A tile cutter is a hand tool that scores the tile and then snaps it in half. It’s good for straight cuts. A wet saw is a power tool that uses a diamond blade to cut the tile. It’s better for curved or intricate cuts. Before you start cutting, measure the area where you need to cut the tile. Mark the cut line on the tile with a pencil. If you’re using a tile cutter, place the tile on the cutter and score it along the cut line. Then, apply pressure to snap the tile in half. If you’re using a wet saw, fill the saw with water and turn it on. Carefully guide the tile through the blade, following the cut line. Always wear safety glasses when cutting tiles. And remember, practice makes perfect! Start with a few scrap tiles to get the hang of it before cutting your good tiles.
How Do You Ensure Even Spacing Between Tiles?
Even spacing between tiles is important for a professional-looking result. It makes the grout lines look neat and uniform. The easiest way to ensure even spacing is to use tile spacers. Tile spacers are small plastic pieces that you place between the tiles as you set them. They come in different sizes, so you can choose the spacing you want. To use tile spacers, simply insert them between the tiles as you press them into the adhesive. Make sure the spacers are flush with the surface of the tiles. You can use multiple spacers on each tile to keep them perfectly aligned. After the adhesive has dried, remove the spacers before you start grouting. Another tip for even spacing is to use a level. Check the tiles with a level as you set them to make sure they are all at the same height. If a tile is too high or too low, gently tap it with a rubber mallet to adjust it. With a little care and attention, you can achieve perfectly even spacing between your tiles.
Fun Fact or Stat: The ancient Romans used lead spacers to ensure even spacing between marble tiles in their elaborate mosaics!
Grouting and Sealing the Tiled Table
Grouting is the next step after the tiles are set. It fills the gaps between the tiles. This makes the table waterproof and strong. Choose a grout that is made for outdoor use. Sanded grout is good for wide grout lines. Unsanded grout is better for narrow lines. Mix the grout according to the directions. It should be like thick mud. Use a grout float to spread the grout. Press the grout into the gaps between the tiles. Hold the float at a 45-degree angle. Remove any extra grout from the tile surfaces. Use a damp sponge to wipe the tiles clean. Rinse the sponge often. Let the grout dry for 24-48 hours. Then, seal the grout with a grout sealer. This protects the grout from stains and water damage. Apply the sealer with a brush or sponge. Let it dry completely.
| Grout Type | Best Use | Pros | Cons |
|---|---|---|---|
| Sanded Grout | Wide grout lines (1/8 inch or more) | Strong, durable, resists cracking | Can scratch delicate tiles |
| Unsanded Grout | Narrow grout lines (less than 1/8 inch) | Smooth finish, won’t scratch tiles | Less durable, more prone to cracking |
| Epoxy Grout | Any grout line width | Very strong, stain-resistant, waterproof | Expensive, difficult to install |
| Acrylic Grout | Indoor use only | Easy to install, comes in many colors | Not waterproof, prone to staining |
Now your tiled table is finished! It will look beautiful and last for years. Remember to clean the table regularly. Use a mild soap and water. Avoid harsh chemicals or abrasive cleaners. They can damage the grout and tiles. With proper care, your tiled table will be a favorite spot for outdoor gatherings. Enjoy your beautiful, durable, and unique table!
Why is Grouting Important for Outdoor Tiled Tables?
Grouting is like the glue that holds everything together. It fills the spaces between the tiles. This makes the table strong and waterproof. Without grout, water can seep in between the tiles. This can cause the tiles to crack or come loose. Grout also prevents dirt and debris from getting trapped between the tiles. This makes the table easier to clean. For outdoor tiled tables, grouting is especially important. Outdoor tables are exposed to rain, sun, and temperature changes. These conditions can damage the tiles if they are not properly grouted. Choose a grout that is made for outdoor use. It should be waterproof and resistant to mold and mildew. Apply the grout carefully, making sure to fill all the spaces between the tiles. With proper grouting, your outdoor tiled table will be beautiful and durable for years to come.
How Do You Apply Grout to a Tiled Tabletop?
Applying grout can be a bit messy, but it’s not difficult. First, mix the grout according to the manufacturer’s instructions. It should be like thick mud. Next, use a grout float to spread the grout over the tiles. A grout float is a special tool with a rubber surface that is designed for applying grout. Hold the float at a 45-degree angle and press the grout into the spaces between the tiles. Work in small sections, making sure to fill all the gaps. After you have applied the grout, use the grout float to remove any excess grout from the surface of the tiles. Hold the float at a 90-degree angle and scrape it across the tiles. Finally, use a damp sponge to wipe the tiles clean. Rinse the sponge frequently and wring it out well. You may need to wipe the tiles several times to remove all the grout residue. Let the grout dry completely before sealing it.
What is the Purpose of Sealing the Grout?
Sealing the grout is like giving it a protective shield. Grout is porous, which means it has tiny holes that allow water and stains to penetrate. Sealing the grout fills these holes and prevents water and stains from soaking in. This makes the grout easier to clean and prevents it from becoming discolored. For outdoor tiled tables, sealing the grout is especially important. Outdoor tables are exposed to rain, dirt, and other elements that can stain or damage the grout. Choose a grout sealer that is made for outdoor use. It should be waterproof and resistant to mold and mildew. Apply the sealer according to the manufacturer’s instructions. You may need to apply several coats to ensure that the grout is fully protected. With proper sealing, your grout will stay clean and beautiful for years to come.
Fun Fact or Stat: Grout sealer was first used in the early 20th century to protect tile installations in bathrooms and kitchens from water damage!
Maintaining Your Outdoor Tiled Table
Keeping your table looking great is easy. Clean it regularly with mild soap and water. Avoid using harsh chemicals or abrasive cleaners. They can damage the tiles and grout. Wipe up spills right away. This prevents stains from setting in. Protect the table from extreme weather. Cover it during heavy rain or snow. This will help prevent cracks and damage. Check the grout regularly for cracks or damage. If you find any, repair them right away. This will prevent water from seeping in and causing more damage. Reseal the grout every year or two. This will keep it protected from stains and water. With a little care, your tiled table will look beautiful for years to come.
- Clean regularly with mild soap and water.
- Wipe up spills immediately to avoid stains.
- Protect from extreme weather with a cover.
- Check grout for cracks and repair promptly.
- Reseal the grout every year or two.
Your tiled table is a special piece of furniture. It adds beauty and style to your outdoor space. By following these simple maintenance tips, you can keep it looking its best. Enjoy your beautiful, durable, and easy-to-care-for tiled table for many years to come. It will be a favorite spot for family and friends to gather and enjoy the outdoors.
How Often Should You Clean Your Tiled Table?
How often you clean your tiled table depends on how often you use it and the conditions it’s exposed to. If you use the table frequently and it’s exposed to a lot of dirt and grime, you should clean it more often. A good rule of thumb is to clean your tiled table at least once a month. This will help prevent dirt and stains from building up. If you spill something on the table, wipe it up immediately. This will prevent the spill from staining the tiles or grout. For regular cleaning, use a mild soap and water. Avoid using harsh chemicals or abrasive cleaners, as these can damage the tiles and grout. Simply wipe the table down with a damp cloth and then dry it with a clean towel. With regular cleaning, your tiled table will stay looking beautiful for years to come.
What is the Best Way to Protect Your Table from Weather?
Protecting your table from the weather is important for keeping it in good condition. Rain, sun, and snow can all damage the tiles and grout over time. The best way to protect your table from the weather is to cover it when it’s not in use. You can buy a special outdoor furniture cover that is designed to fit your table. Make sure the cover is waterproof and breathable. This will prevent moisture from getting trapped under the cover and causing mold or mildew. If you don’t have a cover, you can also store the table indoors during harsh weather. This is especially important during the winter months, when freezing temperatures can cause the tiles to crack. Another tip is to avoid placing the table in direct sunlight. The sun can fade the color of the tiles over time. By taking these simple precautions, you can protect your table from the weather and keep it looking its best for years to come.
How Do You Repair Damaged Grout on a Tiled Table?
Damaged grout can make your tiled table look old and worn. It can also allow water to seep in and damage the tiles. Fortunately, repairing damaged grout is a relatively easy process. First, remove the damaged grout with a grout saw or a utility knife. Be careful not to damage the tiles. Next, clean the area with a damp sponge. Then, mix up a batch of new grout according to the manufacturer’s instructions. Use a grout float to apply the new grout to the area. Press the grout firmly into the spaces between the tiles. Remove any excess grout from the surface of the tiles. Finally, use a damp sponge to wipe the tiles clean. Let the grout dry completely before sealing it. With a little effort, you can repair damaged grout and make your tiled table look like new again.
Fun Fact or Stat: Regular maintenance can extend the life of a tiled table by up to 50%, saving you money on repairs and replacements!
Summary
Learning how to tile a table for outdoors is a rewarding project. First, choose a sturdy, weather-resistant table. Next, pick the right outdoor tiles and calculate how many you need. Prepare the table surface by cleaning, sanding, and priming it. Then, apply adhesive and carefully set the tiles with even spacing. After the adhesive dries, grout the spaces between the tiles and seal the grout. Remember to maintain your table by cleaning it regularly and protecting it from harsh weather. Following these steps, you can create a beautiful, durable, and personalized outdoor table that you can enjoy for years to come. This project adds a unique touch to your outdoor space.
Conclusion
You now know how to tile a table for outdoors. It might seem like a lot of work. But each step is simple when you take your time. You can create a beautiful and useful piece for your yard. Remember to choose the right materials and protect your finished table. Then you’ll have a great outdoor table for years to come. Enjoy your new creation!
Frequently Asked Questions
Question No 1: What kind of tiles should I use for an outdoor table?
Answer: For an outdoor table, you need tiles that can handle the weather. Look for tiles labeled as “outdoor” or “frost-resistant.” Porcelain and ceramic tiles are good choices because they are strong and waterproof. Stone tiles like slate or granite are also great options. Avoid using glass tiles, as they can crack in cold weather. Also, consider the texture of the tiles. Choose tiles with a slightly rough surface to prevent slipping when the table is wet. With the right tiles, your outdoor table will look beautiful and last for years.
Question No 2: How do I prepare a wooden table for tiling?
Answer: Preparing a wooden table for tiling is an important step. First, clean the table thoroughly with soap and water to remove any dirt or grease. If there is old paint or varnish, you will need to sand it off. Use sandpaper to create a smooth surface. Next, fill any cracks or holes with wood filler. Let the filler dry completely and then sand it smooth. Finally, apply a layer of primer to the table. Primer helps the adhesive stick better to the wood. Choose a primer that is designed for outdoor use. Let the primer dry completely before you start tiling. A well-prepared surface will ensure that your tiles adhere properly and your table looks great. Learning how to tile a table for outdoors requires patience and care.
Question No 3: What kind of adhesive should I use for outdoor tiles?
Answer: Choosing the right adhesive is crucial for outdoor tiles. You need an adhesive that is waterproof and can withstand temperature changes. Thin-set mortar is a popular choice for outdoor tile projects. It’s a cement-based adhesive that is very strong and durable. It also resists moisture, which is important for outdoor use. Another option is epoxy mortar. Epoxy mortar is even stronger than thin-set mortar, but it can be more expensive. When choosing an adhesive, read the manufacturer’s instructions carefully. Make sure the adhesive is compatible with the type of tile you are using. With the right adhesive, your outdoor tiles will stay in place for years to come. Proper adhesive application is key in how to tile a table for outdoors.
Question No 4: How do I grout the tiles on an outdoor table?
Answer: Grouting is an important step in tiling an outdoor table. It fills the spaces between the tiles and makes the table waterproof. First, choose a grout that is made for outdoor use. Sanded grout is good for wide grout lines, while unsanded grout is better for narrow lines. Mix the grout according to the directions. It should be like thick mud. Use a grout float to spread the grout over the tiles. Press the grout into the gaps between the tiles. Remove any extra grout from the tile surfaces. Use a damp sponge to wipe the tiles clean. Let the grout dry for 24-48 hours. Then, seal the grout with a grout sealer. How to tile a table for outdoors also involves understanding the importance of proper grouting techniques.
Question No 5: How do I seal the grout on an outdoor table?
Answer: Sealing the grout is like giving it a protective shield. Grout is porous, which means it has tiny holes that allow water and stains to penetrate. Sealing the grout fills these holes and prevents water and stains from soaking in. This makes the grout easier to clean and prevents it from becoming discolored. For outdoor tiled tables, sealing the grout is especially important. Outdoor tables are exposed to rain, dirt, and other elements that can stain or damage the grout. Choose a grout sealer that is made for outdoor use. Apply the sealer according to the manufacturer’s instructions. You may need to apply several coats to ensure that the grout is fully protected.
Question No 6: How do I maintain my outdoor tiled table?
Answer: Maintaining your outdoor tiled table is easy. Clean it regularly with mild soap and water. Avoid using harsh chemicals or abrasive cleaners. They can damage the tiles and grout. Wipe up spills right away to prevent stains. Protect the table from extreme weather by covering it during heavy rain or snow. Check the grout regularly for cracks or damage. If you find any, repair them right away. Reseal the grout every year or two to keep it protected from stains and water. Following these simple maintenance tips will keep your tiled table looking beautiful for years to come. Understanding maintenance is a key part of how to tile a table for outdoors.
