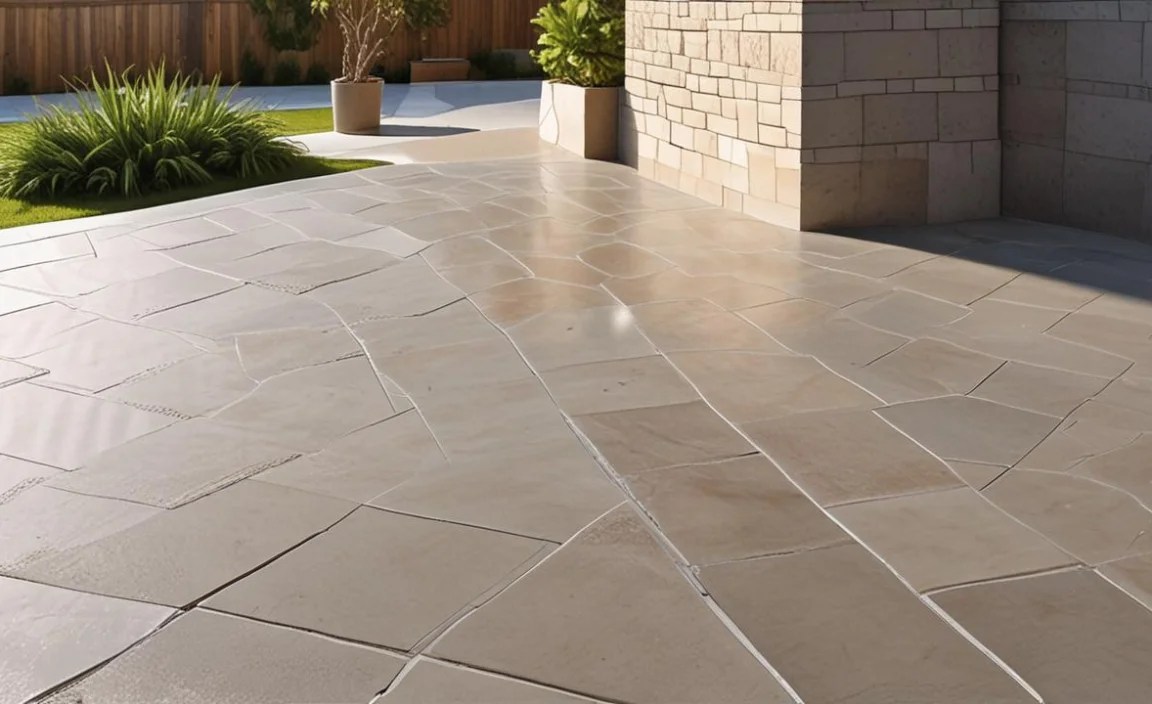
Do you want a cool place to play outside? How about a spot for fun summer dinners? An outdoor tile concrete patio can make your yard amazing. It gives you a nice, flat area. You can use it for many things. Imagine playing games or eating yummy food there!
Having a patio can change your life. But, how do you pick the best one? What kind of tiles should you use? Let’s learn all about outdoor tile concrete patios. We’ll explore how to make your yard super cool!
Tiles make your patio look great. They also help it last a long time. Some tiles are even easy to clean. Outdoor tile concrete patios can be a great choice. Are you ready to learn more? Let’s get started!
Key Takeaways
- Outdoor tile concrete patios provide a durable and attractive surface for outdoor living spaces.
- Choose tiles that are slip-resistant and weather-resistant for safety and longevity.
- Proper installation is key to preventing cracks and ensuring a level surface.
- Regular cleaning and sealing will help maintain the patio’s appearance and protect it from damage.
- Consider the overall design and color scheme to create a cohesive outdoor space.
Choosing the Right Outdoor Tile

Picking the right outdoor tile is very important. You want something that looks good. You also need something that can handle the weather. Rain, sun, and snow can all hurt your patio. Some tiles are better at resisting these things. Concrete tiles are a popular choice. They are strong and can last a long time. Other options include porcelain and stone tiles. Each has its own look and feel. Think about what style you like best. Also, consider how much work it will take to keep them clean. Darker tiles might show dirt more easily. Lighter tiles might fade in the sun. Do you want a tile that is easy to walk on when wet? Some tiles are made to be less slippery. They can help keep you and your family safe. Choosing the right tile makes your patio perfect for your home.
- Consider the climate in your area.
- Think about the style of your home.
- Check the tile’s slip resistance rating.
- Ask about the tile’s durability.
- Look at different colors and patterns.
- Get samples to see how they look in your yard.
Think about how you will use your patio. Will you be grilling and eating there? Will kids be playing on it? Maybe you want a quiet place to read. The way you use your patio can help you choose the right tile. For example, if you will be grilling, you might want a tile that is easy to clean. If kids are playing, you need a tile that is slip-resistant. Some people even use different tiles for different areas of their patio. You could use a pretty tile for the dining area. Then, use a more durable tile for the grilling area. This can make your patio both beautiful and useful. Take your time and make a good choice!
Fun Fact or Stat: Did you know that concrete tiles can last over 50 years with proper care? That’s longer than many roofs!
What About Tile Size and Shape?
Have you ever thought about the shape of your outdoor tile? It’s not just about the color! The size and shape can change how your patio looks. Big tiles can make a small patio seem bigger. Small tiles can add a lot of detail. Square tiles are classic and simple. They work well with any style. Rectangular tiles can make a patio look longer or wider. They can also be arranged in fun patterns. Some people even use different shapes together. This can create a unique and interesting look. Think about what you want your patio to feel like. Do you want it to be modern or traditional? The shape of your tiles can help you achieve that feeling. Don’t be afraid to get creative!
How to Measure Your Patio Space?
Before you buy any outdoor tile, you need to measure your patio. This will help you know how much tile to buy. It will also help you plan your design. Start by measuring the length and width of your patio. Multiply these numbers to get the area in square feet. Add a little extra for cuts and mistakes. It’s always better to have too much than not enough. Think about any curves or angles in your patio. These can make measuring a little trickier. You might need to break the area into smaller shapes. Measure each shape and then add them together. If you are not sure how to do this, ask for help! A professional can measure your patio for you. They can also help you choose the right amount of tile.
What Is the Best Tile Pattern?
Choosing a tile pattern can be fun! It’s like creating art for your patio. A simple grid pattern is easy to install. It looks clean and modern. A running bond pattern is also popular. This is where the tiles are offset from each other. It looks like a brick wall. A herringbone pattern is more complex. It uses rectangular tiles arranged in a zigzag. This pattern can add a lot of interest to your patio. You can also create your own pattern. Mix different colors and shapes to make something unique. Think about the overall style of your yard. Choose a pattern that fits with your landscaping. Don’t be afraid to try something new!
Concrete Patio Base Preparation

Getting your concrete patio base ready is super important. This is the foundation for your whole patio. If the base is not good, your tiles could crack or sink. First, you need to clear the area. Remove any grass, plants, or rocks. Dig down about 4 to 6 inches. This will give you room for the base material. Next, add a layer of gravel. This helps with drainage. It also makes the base more stable. Use a tamper to pack the gravel down tightly. Then, add a layer of sand. This creates a smooth surface for the tiles. Make sure the sand is level. You can use a long board to check. This step is very important. A level base will make your patio look great and last longer. Take your time and do it right!
- Clear all vegetation and debris.
- Excavate the area to the proper depth.
- Add a layer of compacted gravel.
- Level and compact a layer of sand.
- Ensure proper drainage.
- Check for levelness with a long board.
Think about how water will drain from your patio. You don’t want water to pool on the surface. This can damage the tiles and create a slippery surface. Slope the base slightly away from your house. This will help water run off easily. You can also install a drainage system. This could include pipes or French drains. These systems help carry water away from your patio. If you live in an area with a lot of rain, this is especially important. A good drainage system will protect your patio and keep it looking great for years to come. It’s a small investment that can make a big difference.
Fun Fact or Stat: A properly prepared base can extend the life of your patio by up to 20 years!
Why Is a Solid Base Important?
Have you ever built a tower with blocks? What happens if the bottom blocks are wobbly? The whole tower falls down! The same thing can happen with your concrete patio. If the base is not solid, the tiles will shift and crack. A solid base provides support for the tiles. It helps distribute weight evenly. This prevents stress on any one tile. A good base also helps with drainage. It allows water to flow away from the patio. This prevents water damage. Think of the base as the backbone of your patio. It’s what keeps everything strong and stable. Spend the time to build a solid base. It will be worth it in the long run.
What Tools Do I Need?
Getting ready to build a concrete patio? You’ll need some tools! A shovel is important for digging. A wheelbarrow helps you move gravel and sand. A tamper is used to pack down the base material. A level ensures that the surface is flat. A long board can also help with leveling. A measuring tape is needed to measure the area. You might also want a saw to cut tiles. A trowel helps you spread mortar. Safety glasses and gloves are important for protection. Make sure you have all the tools you need before you start. This will make the job easier and safer. You can rent some of these tools if you don’t want to buy them.
How Do I Compact the Base?
Compacting the base is a key step in building a concrete patio. This means packing down the gravel and sand tightly. This creates a solid and stable surface. Use a tamper to compact the base material. A tamper is a heavy tool with a flat bottom. You lift it up and drop it down to pack the material. Work in small sections. Overlap each section as you go. This ensures that the entire base is compacted evenly. You can also use a plate compactor. This is a machine that vibrates to compact the material. It is faster and more effective than a hand tamper. Make sure the base is level after compacting. Add more material if needed and compact again.
Laying Outdoor Concrete Tiles

Now comes the fun part: laying your outdoor concrete tiles! Start by planning your layout. This will help you avoid awkward cuts. Begin in one corner and work your way out. Use spacers to keep the tiles evenly spaced. This will create a clean and professional look. Apply mortar to the back of each tile. Press it firmly into place. Use a rubber mallet to gently tap the tile. This will help it settle into the mortar. Check the level of each tile as you go. Make sure it is even with the surrounding tiles. If a tile is too high or too low, adjust the mortar underneath. Wipe away any excess mortar with a damp sponge. This will keep your patio looking clean.
- Plan your layout carefully.
- Use spacers for even spacing.
- Apply mortar to the back of each tile.
- Press the tile firmly into place.
- Check the level of each tile.
- Wipe away excess mortar.
Cutting tiles can be tricky. You might need to cut tiles to fit around edges or corners. Use a wet saw for clean, accurate cuts. A wet saw uses water to keep the blade cool and prevent dust. Mark the tile where you need to cut. Then, carefully guide the tile through the saw. Wear safety glasses and gloves to protect yourself. If you don’t have a wet saw, you can use a tile nipper. This tool is used to chip away small pieces of tile. It is not as precise as a wet saw, but it can be useful for small cuts. Remember to take your time and be careful. A well-laid patio will last for many years.
Fun Fact or Stat: Professional tile installers can lay up to 100 square feet of tile in a single day!
How to Handle Tile Cuts?
Cutting outdoor concrete tiles can seem scary, but it’s not too hard! You can use a tile cutter for straight cuts. Score the tile with the cutter. Then, snap it along the score line. For curved cuts, use a wet saw. A wet saw uses water to keep the blade cool. This prevents the tile from breaking. Always wear safety glasses when cutting tiles. This protects your eyes from flying pieces. If you are not comfortable cutting tiles, ask for help. A friend or family member might be able to assist. You can also hire a professional tile installer.
What Is the Best Mortar to Use?
Choosing the right mortar is important for your concrete patio. Mortar holds the tiles in place. It also protects them from water damage. Use a mortar that is made for outdoor use. This type of mortar is stronger and more weather-resistant. It can handle the changes in temperature and moisture. Polymer-modified mortar is a good choice. It is flexible and can prevent cracks. Thin-set mortar is another option. It is easy to use and provides a strong bond. Ask your local hardware store for recommendations. They can help you choose the best mortar for your project.
How Long Does Mortar Take to Dry?
After laying your outdoor concrete tiles, you need to let the mortar dry. This is called curing. The curing time depends on the type of mortar you use. It also depends on the weather. Generally, mortar takes 24 to 72 hours to dry. Avoid walking on the patio during this time. This can disturb the tiles and cause them to shift. Keep the patio damp during the curing process. This helps the mortar dry slowly and evenly. You can cover the patio with plastic sheeting. This will keep it moist. Check the mortar manufacturer’s instructions for specific curing times.
Grouting Your Tiled Patio
Grouting is the final step in creating your outdoor tile concrete patio. Grout fills the spaces between the tiles. It helps to keep water and dirt out. Choose a grout that is made for outdoor use. This type of grout is more resistant to weather and stains. Mix the grout according to the manufacturer’s instructions. Apply the grout to the spaces between the tiles. Use a grout float to spread it evenly. Work in small sections. Wipe away excess grout with a damp sponge. Rinse the sponge frequently. Let the grout dry for the recommended time. Then, buff the tiles with a clean cloth. This will remove any remaining grout haze.
- Choose an outdoor-rated grout.
- Mix the grout according to instructions.
- Apply grout evenly with a grout float.
- Wipe away excess grout with a sponge.
- Let the grout dry completely.
- Buff the tiles to remove haze.
The color of your grout can affect the look of your patio. Lighter grout colors can make the tiles stand out. Darker grout colors can create a more uniform look. Consider the color of your tiles and your overall design. You can also choose a grout color that matches your house. This will help to tie everything together. If you are not sure which color to choose, ask for advice. A professional tile installer can help you pick the perfect grout color. They can also help you with the grouting process. This will ensure that your patio looks its best.
Fun Fact or Stat: Grout is made from a mixture of cement, sand, and water. It acts like glue for your tiles!
What Type of Grout Should I Use?
Picking the right grout for your concrete patio is key. You want something that can handle the weather. Epoxy grout is super strong. It resists stains and water. Cement-based grout is more common. It’s cheaper but needs sealing. Sanded grout works for wide spaces. Unsanded grout is best for narrow spaces. Think about how much traffic your patio gets. Choose a grout that can handle the wear and tear. Ask your local hardware store for advice. They can help you find the perfect grout.
How to Apply Grout Correctly?
Applying grout to your outdoor concrete tiles takes patience. First, mix the grout well. It should be like thick paste. Use a grout float to spread it. Press the grout into the spaces between tiles. Work in small areas. Hold the float at an angle. This helps push the grout in. Remove extra grout with the float. Then, use a damp sponge to clean the tiles. Rinse the sponge often. Let the grout dry a bit. Then, buff the tiles with a cloth. This makes them shine!
How Long Before I Can Walk on It?
After grouting your concrete patio, wait before walking on it. Grout needs time to harden. Check the grout package for drying times. Usually, it takes 24 to 72 hours. Keep kids and pets off the patio. This prevents damage to the grout. You can cover the patio with plastic. This protects it from rain. After the grout is dry, it’s time to seal it. Sealing helps protect the grout from stains. Now you can enjoy your new patio!
Sealing Your Outdoor Tile Concrete Patio

Sealing your outdoor tile concrete patio is like giving it a raincoat! It protects the tiles and grout from water, stains, and dirt. Choose a sealer that is made for outdoor use. Clean the patio thoroughly before sealing. Remove any dirt, debris, or mildew. Let the patio dry completely. Apply the sealer according to the manufacturer’s instructions. Use a brush, roller, or sprayer. Apply an even coat. Let the sealer dry for the recommended time. You may need to apply a second coat for extra protection. Sealing your patio regularly will keep it looking great for years to come.
- Choose an outdoor-rated sealer.
- Clean the patio thoroughly.
- Let the patio dry completely.
- Apply the sealer evenly.
- Let the sealer dry completely.
- Apply a second coat if needed.
How often should you seal your patio? It depends on the type of sealer you use. It also depends on the weather conditions in your area. Generally, you should seal your patio every one to three years. If you live in an area with a lot of rain or snow, you may need to seal it more often. Look for signs that your patio needs to be sealed. These include water stains, fading, or crumbling grout. Sealing your patio is a simple way to protect your investment. It will keep your patio looking beautiful and functional for many years.
Fun Fact or Stat: Sealing your patio can prevent up to 90% of stains and water damage!
Why Is Sealing So Important?
Sealing your concrete patio is like magic armor. It protects against the bad stuff. Water can seep into the tiles. This can cause cracks in the winter. Stains from spills can ruin the look. Dirt can get trapped in the grout. Sealer stops all this from happening. It creates a barrier. This barrier keeps the tiles safe. It also makes the patio easier to clean. Sealing is a small step. But it makes a big difference in the long run. It helps your patio last longer and look better.
What Kind of Sealer Should I Use?
There are many kinds of sealer for your outdoor concrete tiles. Penetrating sealers soak into the tile. They protect from the inside out. Topical sealers form a layer on top. They provide a shiny finish. Some sealers are water-based. Others are solvent-based. Water-based sealers are easier to clean up. Solvent-based sealers are stronger. Read the labels carefully. Choose a sealer that is made for your type of tile. Ask your local hardware store for advice. They can help you find the best sealer.
How Often Should I Reseal?
Resealing your concrete patio is important. It keeps the protection strong. How often should you do it? It depends on the sealer. Check the sealer instructions. Some sealers last one year. Others last three years. Look at your patio. Does water soak in quickly? This means it’s time to reseal. Clean the patio well before resealing. This helps the sealer stick better. Resealing is easy. It keeps your patio looking great for years!
Maintaining Your Outdoor Tile Patio
Keeping your outdoor tile concrete patio clean is simple. Sweep it regularly to remove dirt and debris. Hose it down with water to wash away loose dirt. For tougher stains, use a mild soap and water solution. Scrub the tiles with a brush or sponge. Rinse thoroughly with water. Avoid using harsh chemicals or abrasive cleaners. These can damage the tiles and grout. Check for cracks or damage regularly. Repair any problems quickly to prevent further damage. With proper care, your patio will look beautiful for years to come.
- Sweep regularly to remove debris.
- Hose down with water to wash away dirt.
- Use mild soap and water for stains.
- Avoid harsh chemicals or abrasives.
- Check for cracks and damage regularly.
- Repair problems quickly.
What about winter weather? Snow and ice can be tough on your patio. Remove snow promptly to prevent ice from forming. Use a plastic shovel to avoid scratching the tiles. De-icing salts can damage concrete. Use them sparingly or choose a concrete-safe de-icer. Consider covering your patio with a tarp during the winter. This will protect it from the elements. With a little extra care, your patio will survive the winter in good condition. Then, you can enjoy it again in the spring.
Fun Fact or Stat: Regular cleaning can extend the life of your patio by up to 10 years!
How to Clean Stains Effectively?
Stains on your concrete patio are no fun. But don’t worry, you can clean them! For oil stains, use dish soap and water. Scrub with a brush. Then, rinse well. For mildew, use a bleach solution. Mix one part bleach with ten parts water. Apply to the stain. Let it sit for a few minutes. Then, scrub and rinse. For rust stains, try a rust remover. Follow the instructions on the bottle. Always test cleaning solutions in a small area first. This makes sure they don’t damage the tiles.
What About Weeds in the Grout?
Weeds growing in the grout of your outdoor concrete tiles can be annoying. Pull them out by hand. This is the easiest way to get rid of them. You can also use a weed killer. Choose one that is safe for concrete. Apply it carefully to the weeds. Avoid getting it on the tiles. Boiling water can also kill weeds. Pour it on the weeds. Be careful not to burn yourself. Prevent weeds by sealing your grout. This keeps them from growing in the first place.
How to Protect from the Winter?
Winter can be tough on your concrete patio. Protect it with a few simple steps. Remove snow regularly. This prevents ice from forming. Use a plastic shovel. Metal shovels can scratch the tiles. Avoid using salt. Salt can damage concrete. Cover your patio with a tarp. This protects it from snow and ice. Check for cracks in the spring. Repair them quickly. This prevents further damage. Taking these steps will help your patio survive the winter.
Repairing Cracks in Your Concrete Patio
Cracks can happen in any outdoor tile concrete patio. Weather, settling, and heavy use can cause them. But don’t worry, you can usually fix them! Small cracks can be filled with concrete crack filler. Clean the crack thoroughly. Remove any loose debris. Apply the crack filler according to the instructions. Smooth it out with a putty knife. Let it dry completely. For larger cracks, you may need to use a concrete patching compound. This is a stronger material that can fill wider gaps. Follow the instructions carefully. With a little effort, you can repair those cracks and keep your patio looking great.
- Clean the crack thoroughly.
- Remove loose debris.
- Apply concrete crack filler.
- Smooth with a putty knife.
- Let it dry completely.
- Use concrete patching compound for larger cracks.
Sometimes, cracks are a sign of a bigger problem. If your patio is sinking or shifting, you may need to consult a professional. They can assess the situation and recommend the best course of action. This might involve leveling the base or replacing sections of the patio. Ignoring these problems can lead to more serious damage. It’s always best to address them early on. A well-maintained patio will provide years of enjoyment. It’s worth the effort to keep it in good condition.
Fun Fact or Stat: Early crack repair can save you hundreds of dollars in the long run!
When to Call a Professional?
Fixing cracks in your concrete patio can be a DIY job. But sometimes, you need a pro! If the cracks are big and deep, call someone. If the patio is sinking or uneven, call someone. If you don’t feel comfortable doing the work, call someone. A professional has the right tools. They also have the experience. They can fix the problem right. It might cost more. But it’s worth it for a long-lasting repair.
What Causes Cracks in Concrete?
Cracks in your concrete patio can be caused by many things. Weather changes can make concrete expand and contract. This can cause cracks. Heavy weight on the patio can also cause cracks. Tree roots growing underneath can push up the concrete. This can lead to cracks. Poor drainage can also be a problem. Water can weaken the concrete. Knowing the cause can help you prevent future cracks.
How to Prevent Cracks in the Future?
Preventing cracks in your concrete patio is smart. Start with a good base. Make sure it’s compacted well. Use a good quality concrete mix. Add reinforcement like rebar. This makes the concrete stronger. Seal the concrete regularly. This protects it from water. Avoid putting too much weight on the patio. Trim any tree roots that are growing nearby. These steps will help your patio stay crack-free!
Comparing Outdoor Patio Materials
Choosing the right material for your outdoor patio can be tough. There are many options to pick from. Concrete tile is a popular choice. It’s durable and comes in many styles. Brick is another classic option. It has a warm and inviting look. Stone patios can be beautiful and natural. But they can also be expensive. Wood decks are another possibility. They are comfortable and easy to build. But they require more maintenance. Each material has its pros and cons. Consider your budget, style, and maintenance preferences. This will help you choose the best material for your patio.
| Material | Pros | Cons | Cost |
|---|---|---|---|
| Concrete Tile | Durable, versatile, affordable | Can be plain, needs sealing | Moderate |
| Brick | Classic look, durable | Can be slippery when wet, more expensive | Moderate to High |
| Stone | Natural look, long-lasting | Expensive, can be uneven | High |
| Wood | Comfortable, easy to build | Requires maintenance, not as durable | Moderate |
| Gravel | Inexpensive, easy to install | Not as stable, can be messy | Low |
Think about the overall style of your yard. Do you want a modern, sleek look? Or do you prefer a more rustic, natural feel? The material you choose can help create the look you want. Consider the color and texture of the material. Does it complement your house and landscaping? Also, think about how you will use the patio. Will you be grilling and eating there? Will kids be playing on it? Some materials are better suited for certain activities. Take your time and do your research. This will help you choose the perfect material for your outdoor space.
Fun Fact or Stat: The average patio size in the US is around 200 square feet.
Concrete Pavers vs. Poured Concrete?
Concrete pavers and poured concrete are both options for your patio. Pavers are individual tiles. Poured concrete is one solid slab. Pavers are easier to repair. You can replace individual tiles. Poured concrete is harder to fix. Cracks can be a problem. Pavers come in many shapes and colors. Poured concrete can be stamped or stained. Pavers can be more expensive to install. Poured concrete is often cheaper. Think about your budget and style. This will help you choose.
What About Natural Stone Options?
Natural stone can make your patio look amazing. Flagstone is a popular choice. It’s flat and easy to walk on. Slate is another option. It has a unique, layered look. Limestone is soft and comes in light colors. Granite is very durable. It can handle heavy use. Each type of stone has its own look and feel. Consider the color and texture. Choose a stone that fits your style. Natural stone can be expensive. But it can add value to your home.
How Does Cost Compare Between Materials?
The cost of your patio depends on the material you choose. Gravel is the cheapest option. Wood is moderately priced. Concrete tile and brick are in the middle. Natural stone is usually the most expensive. Installation costs also vary. Some materials are easier to install yourself. Others require a professional. Think about your budget. Choose a material that you can afford. Remember to factor in maintenance costs. Some materials require more upkeep than others.
Summary
Choosing the right outdoor tile concrete patio involves many steps. First, consider the type of tile. Think about durability, slip resistance, and style. Next, prepare the base properly. This is crucial for a long-lasting patio. Lay the tiles carefully, using spacers and mortar. Grout the tiles to fill the gaps and prevent water damage. Seal the patio to protect it from stains and weather. Maintain the patio by cleaning it regularly and repairing any cracks. By following these steps, you can create a beautiful and functional outdoor space.
Remember to choose materials that fit your budget and style. Compare different options, such as concrete pavers, natural stone, and wood. Consider the pros and cons of each. With careful planning and execution, you can build a patio that you will enjoy for years to come. A well-designed and maintained patio can enhance your outdoor living space. It can also add value to your home.
Conclusion
Creating a perfect outdoor tile concrete patio is a rewarding project. It takes some planning and effort. You need to pick the right tiles. Proper base preparation is very important. Laying the tiles and grouting them takes skill. Sealing and maintenance are key to longevity. With attention to detail, you can build a patio that will last. It will also enhance your outdoor living space. Enjoy your beautiful new outdoor tile concrete patio!
Frequently Asked Questions
Question No 1: How do I choose the right size tile for my patio?
Answer: Choosing the right size tile depends on the size of your patio and your personal style. Larger tiles can make a small patio feel bigger. They also have fewer grout lines. Smaller tiles can add more detail and texture. Consider the overall look you want to achieve. Also, think about how easy the tiles will be to install. Larger tiles can be harder to handle. If you are not sure, try laying out a few different sizes of tiles. This will help you visualize how they will look on your patio. For an outdoor tile concrete patio, ensure the tiles are durable enough for outdoor use.
Question No 2: Can I install a tile patio myself, or should I hire a professional?
Answer: Installing a tile patio yourself is possible. But it depends on your skills and experience. If you are comfortable with DIY projects, you can save money by doing it yourself. However, it can be time-consuming and physically demanding. You need to be able to prepare the base, lay the tiles, and grout them properly. If you are not confident in your abilities, it is best to hire a professional. A professional can ensure that the job is done correctly. They can also save you time and frustration. They also know how to install an outdoor tile concrete patio for longevity.
Question No 3: How do I prevent my tile patio from becoming slippery when wet?
Answer: Preventing a slippery tile patio is important for safety. Choose tiles that have a textured surface. These tiles provide better traction when wet. You can also apply a non-slip coating to the tiles. This will increase their grip. Make sure to clean your patio regularly. Dirt and debris can make it more slippery. Consider installing a drainage system. This will help water run off the patio quickly. Be extra careful when the patio is wet. Warn others to be cautious as well. When choosing tiles for your outdoor tile concrete patio, look for a high slip-resistance rating.
Question No 4: What is the best way to clean my tile patio?
Answer: The best way to clean your tile patio is with regular sweeping and occasional washing. Sweep the patio regularly to remove dirt and debris. Hose it down with water to wash away loose dirt. For tougher stains, use a mild soap and water solution. Scrub the tiles with a brush or sponge. Rinse thoroughly with water. Avoid using harsh chemicals or abrasive cleaners. These can damage the tiles and grout. You can also use a pressure washer. But be careful not to damage the grout. A clean outdoor tile concrete patio will look great and last longer.
Question No 5: How often should I seal my tile patio?
Answer: How often you should seal your tile patio depends on the type of sealer you use. It also depends on the weather conditions in your area. Generally, you should seal your patio every one to three years. If you live in an area with a lot of rain or snow, you may need to seal it more often. Look for signs that your patio needs to be sealed. These include water stains, fading, or crumbling grout. Sealing your outdoor tile concrete patio is a simple way to protect your investment.
Question No 6: What can I do to protect my tile patio from cracking in the winter?
Answer: Protecting your tile patio from cracking in the winter requires a few key steps. First, remove snow promptly to prevent ice from forming. Use a plastic shovel to avoid scratching the tiles. De-icing salts can damage concrete. Use them sparingly or choose a concrete-safe de-icer. Consider covering your patio with a tarp during the winter. This will protect it from the elements. Check for cracks in the spring and repair them quickly. A well-maintained outdoor tile concrete patio can withstand winter weather.
