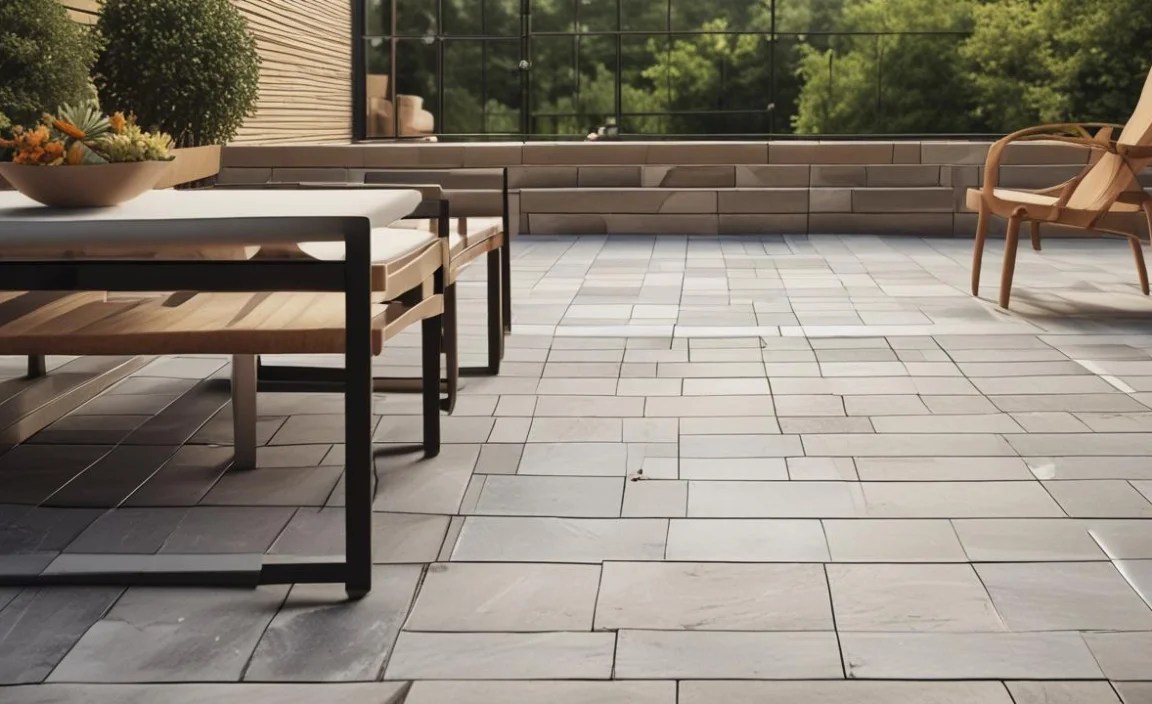
Do you want a cool place to play outside? Imagine a space that is safe and looks great. An outdoor tiles deck might be the perfect answer. It can change your backyard into a fun zone!
Have you ever slipped on a wet wooden deck? Outdoor tiles can help stop that. They offer a grip that is safer for running and playing. Plus, they come in many colors and styles.
Let’s learn all about outdoor tiles deck ideas. We’ll discover how they make outdoor spaces better. Get ready to design your dream deck!
Key Takeaways
- Outdoor tiles deck options offer a safe and stylish upgrade for any backyard.
- Proper installation and maintenance ensure your tile deck lasts for years.
- Many tile materials resist water, stains, and fading from the sun.
- Consider the climate when choosing the right tiles for your deck.
- Outdoor tiles increase your home’s value and add great appeal.
Choosing the Best Outdoor Deck Tiles

Picking the right outdoor deck tiles is important. You want something that looks good and lasts long. Think about the weather where you live. Some tiles do better in cold weather. Others are great for hot, sunny places. Look at different materials like porcelain, stone, and plastic. Porcelain is strong and does not soak up water. Stone looks fancy but can be pricey. Plastic tiles are cheap and easy to put down. Each has its own pluses and minuses. Consider how much work you want to put into keeping them clean. Some tiles need more care than others. Check how slippery the tiles are when wet. Safety is very important, especially if you have kids. Get samples and see how they look in your yard. Think about the style of your home and choose tiles that match. With some planning, you can find the perfect outdoor deck tiles for your family.
- Think about your local weather conditions.
- Consider different tile materials like stone or plastic.
- Check how slippery the tiles are when wet.
- Get samples and see how they look in your yard.
- Think about the style of your home and yard.
When you choose outdoor deck tiles, think about how they will feel. Will they be comfy to walk on with bare feet? Some tiles get very hot in the sun. Dark-colored tiles usually get hotter than light ones. You also need to think about the base under the tiles. A solid, flat base will help the tiles last longer. If the base is not good, the tiles might crack. Talk to a tile expert to get advice. They can help you pick the best tiles for your deck. They can also tell you how to install them properly. A good choice of tiles can make your deck a favorite spot for years to come. You will love spending time outside on your new deck.
Fun Fact or Stat: Did you know that porcelain tiles are one of the most popular choices for outdoor decks because they are very strong and don’t absorb water easily?
What Tile Colors Work Best Outside?
Choosing the right color for your outdoor tiles is fun. Light colors can make a small deck look bigger. They also stay cooler in the sun. Dark colors can look very modern and stylish. But they can get very hot. Think about the colors of your house and yard. Do you want the deck to blend in or stand out? Earthy tones like brown and gray often look natural. Bright colors like blue and green can add a pop of fun. Consider how the color will look in different lights. The color might look different in the morning than in the evening. Get some sample tiles and put them outside. See how they look at different times of the day. This will help you choose a color you will love.
How Do I Measure My Deck for Tiles?
Measuring your deck for tiles is a key step. Accurate measurements ensure you buy the right amount of tiles. First, use a measuring tape to find the length and width of your deck. Write these numbers down. If your deck is not a perfect square, divide it into smaller shapes. Measure each shape separately. Add the areas of all the shapes together to get the total area. It’s smart to buy extra tiles, about 10% more. This covers mistakes when cutting or if tiles break later. When you go to the store, bring your measurements. The tile experts can help you figure out how many boxes you need. With good measurements, your tile project will go smoothly. You will have enough tiles and avoid extra trips to the store.
What Tools Do I Need to Install Tiles?
Installing outdoor tiles needs some special tools. Having the right tools will make the job easier. You will need a tile cutter to cut tiles to fit. A notched trowel helps spread the mortar evenly. Use a rubber mallet to gently set the tiles in place. Spacers keep the tiles evenly spaced apart. A level makes sure the tiles are flat. You will also need safety glasses and gloves. These protect your eyes and hands. A wet saw is great for cutting many tiles quickly. A measuring tape and pencil help you mark where to cut. Clean-up tools like a sponge and bucket are also needed. With these tools, you will be ready to install your outdoor tiles. The right tools can help make your deck look professional.
Preparing Your Deck for Outdoor Tiles

Getting your deck ready for outdoor tiles is super important. A good base makes sure your tiles stay put for a long time. First, check the deck for any damage. Fix any loose boards or weak spots. Clean the deck really well. Get rid of any dirt, leaves, or old paint. If the deck is wood, you might need to add a layer of cement board. This gives the tiles a strong, flat surface to stick to. Make sure the deck slopes slightly away from the house. This helps water drain off. If the deck is concrete, check for cracks. Fill any cracks with a concrete patch. You might also need to clean and prime the concrete. This helps the tiles stick better. Taking the time to prep your deck will pay off. Your new tile deck will look great and last for many years.
- Check the deck for any damage or weak spots.
- Clean the deck really well to remove dirt and debris.
- Add a cement board for a strong, flat surface.
- Ensure the deck slopes slightly for water drainage.
- Fill any cracks in concrete with a concrete patch.
- Clean and prime concrete for better tile adhesion.
Think about how you will attach the outdoor tiles. Some tiles stick with mortar. Mortar is like a strong glue for tiles. Other tiles click together like puzzle pieces. These are called interlocking tiles. Interlocking tiles are easier to install. But they might not be as strong as tiles set with mortar. If you use mortar, make sure it is made for outdoor use. Outdoor mortar can handle rain, snow, and sun. Follow the directions on the mortar bag carefully. Use the right amount of water. Mix the mortar well. A good base and the right way to attach the tiles make a big difference. You will have a beautiful and safe outdoor tiles deck.
Fun Fact or Stat: Prepping your deck correctly can increase the lifespan of your outdoor tile installation by up to 50%!
How Do I Fix a Sagging Deck?
A sagging deck needs fixing before you put down tiles. First, find out why it is sagging. It might be from weak posts or beams. Check the posts that hold up the deck. Are they rotting or cracked? Replace any bad posts with new ones. Add more posts if needed to give more support. Look at the beams that run under the deck. If they are sagging, add support under them. You can use new posts or metal supports. Make sure the new supports are strong enough. Sometimes, the soil under the deck settles. This can make the deck sag. Add more soil and pack it down well. Fixing a sagging deck takes time and effort. But it is important for safety. A strong, level deck is ready for outdoor tiles.
Can I Put Tiles on an Existing Wood Deck?
Yes, you can put tiles on an existing wood deck. But you need to do it the right way. First, make sure the deck is strong and stable. Fix any loose boards or weak spots. Clean the deck very well. Remove any old paint or stain. You will need to add a layer of cement board. This creates a flat, solid surface for the tiles. Screw the cement board to the wood deck. Use special screws that are made for outdoor use. The cement board stops the wood from moving. This prevents the tiles from cracking. Make sure the deck has good drainage. Water should run off easily. With the right prep, your wood deck can be a great base for outdoor tiles.
What Kind of Drainage Do I Need?
Good drainage is key for an outdoor tile deck. Water can damage the tiles and the deck underneath. Make sure the deck slopes slightly. This lets water run off easily. Clean your gutters so they don’t overflow. Think about adding drains to the deck surface. These drains let water escape quickly. If your deck is near the ground, make sure there is good airflow underneath. This helps the deck dry out after rain. Avoid letting water pool in corners. Keep the deck clean so water can flow freely. Proper drainage helps your tile deck last longer. It also prevents slips and falls. A dry deck is a safe and happy deck.
| Prep Step | Why It’s Important | How to Do It |
|---|---|---|
| Inspect Deck | Ensures structural integrity. | Check for rot, loose boards, and damage. |
| Clean Thoroughly | Removes debris that hinders tile adhesion. | Power wash or scrub with soap and water. |
| Add Cement Board | Creates a flat, stable surface. | Screw cement board to the deck surface. |
| Ensure Drainage | Prevents water damage and mold. | Check for proper slope and clear drainage paths. |
Installing Outdoor Tiles on a Deck

Putting down outdoor tiles takes some work. But it is worth it! Start by planning your layout. Decide where each tile will go. This helps you avoid small cuts at the edges. Mix your mortar according to the directions. Spread the mortar on the deck with a notched trowel. Press each tile firmly into the mortar. Use tile spacers to keep the tiles evenly spaced. After the mortar dries, apply grout between the tiles. Grout fills the gaps and makes the deck waterproof. Clean off any extra grout with a sponge. Let the grout dry completely. Then, seal the grout to protect it from stains. With careful installation, your tile deck will look amazing. You will be proud of your hard work.
- Plan your layout before you start tiling.
- Mix the mortar according to the directions.
- Use tile spacers to keep the tiles even.
- Apply grout between the tiles after the mortar dries.
- Seal the grout to protect it from stains.
Think about using a rubber mallet when you install outdoor tiles. A rubber mallet is a hammer with a soft head. Gently tap each tile with the mallet. This helps the tile stick to the mortar. It also makes the tile level with the other tiles. Work in small sections. Spread mortar on a small area at a time. This stops the mortar from drying out. Check your work often. Make sure the tiles are straight and evenly spaced. If a tile is not right, lift it up and add more mortar. Then, put the tile back down and tap it with the mallet. Taking your time and doing it right will make a big difference. Your outdoor tiles deck will look professional and beautiful.
Fun Fact or Stat: Using tile spacers results in a more uniform and professional-looking deck, improving the overall aesthetics!
How Do I Cut Tiles to Fit?
Cutting tiles to fit is a key part of installing an outdoor tiles deck. You can use a tile cutter or a wet saw. A tile cutter scores the tile. Then, you snap the tile along the score line. A wet saw uses a diamond blade and water to cut the tile. Wet saws are great for cutting many tiles. They also make cleaner cuts. Measure the space where the tile needs to go. Mark the tile with a pencil. If you are using a tile cutter, score the tile firmly. Then, press down on the handle to snap the tile. If you are using a wet saw, turn on the saw and slowly push the tile through the blade. Wear safety glasses when cutting tiles. This protects your eyes from flying pieces. Take your time and be careful. Cut tiles fit perfectly in your deck.
What Kind of Mortar Should I Use?
Choosing the right mortar is important for outdoor tiles. You need a mortar that is made for outdoor use. Look for a mortar that is waterproof and can handle freezing weather. Polymer-modified mortar is a good choice. It is strong and flexible. This helps it resist cracking. Thin-set mortar is another option. It is easy to use and works well with most tiles. Read the label on the mortar bag. Make sure it says it is for outdoor use. Follow the directions for mixing the mortar. Use the right amount of water. Mix the mortar until it is smooth and creamy. With the right mortar, your tiles will stay put for years.
How Long Does Mortar Take to Dry?
Mortar drying time is key to a good outdoor tile deck. Mortar usually takes 24 to 72 hours to dry. The drying time depends on the weather. Warm, dry weather makes the mortar dry faster. Cold, wet weather makes it dry slower. Check the directions on the mortar bag. They will tell you how long to wait. Do not walk on the tiles until the mortar is fully dry. This can make the tiles shift. It can also weaken the mortar. After the mortar is dry, you can apply grout. Grout fills the spaces between the tiles. Let the grout dry for another 24 to 72 hours. Then, seal the grout to protect it from stains. Be patient and let everything dry completely. Your tile deck will be strong and beautiful.
Maintaining Your Outdoor Tile Deck
Taking care of your outdoor tile deck will keep it looking great. Clean the tiles regularly. Sweep or vacuum up dirt and leaves. Wash the tiles with soap and water. Use a mild soap. Avoid harsh chemicals that can damage the tiles. Check the grout for cracks. If you see any cracks, repair them right away. Seal the grout every year or two. This protects it from stains. Remove snow and ice in the winter. Use a plastic shovel. Metal shovels can scratch the tiles. Check for any loose tiles. If a tile is loose, re-attach it with mortar. With regular care, your tile deck will last for many years. You will enjoy spending time on it.
- Sweep or vacuum the tiles regularly.
- Wash the tiles with mild soap and water.
- Check the grout for cracks and repair them.
- Seal the grout every year or two.
- Remove snow and ice with a plastic shovel.
- Check for loose tiles and re-attach them.
Think about using a pressure washer to clean your outdoor tiles. A pressure washer can blast away dirt and grime. But be careful! Too much pressure can damage the tiles. Use a wide nozzle and keep the pressure low. Test the pressure washer on a small area first. If the tiles look okay, you can clean the whole deck. Hold the nozzle at an angle. This helps push the dirt away. Rinse the deck with clean water. Let the deck dry completely. A pressure washer can make your tiles look like new. But use it carefully to avoid damage. Regular cleaning will keep your deck beautiful for years to come. Enjoy your clean and inviting outdoor space.
Fun Fact or Stat: Regular maintenance can extend the life of your outdoor tile deck by up to 10 years!
How Do I Clean Stains on Tiles?
Cleaning stains on outdoor tiles can be easy. The method depends on the type of stain. For oil stains, use a degreaser. Apply the degreaser to the stain. Let it sit for a few minutes. Then, scrub with a brush and rinse with water. For rust stains, use a rust remover. Follow the directions on the bottle. For mold and mildew, use a bleach solution. Mix bleach with water. Apply the solution to the stain. Let it sit for a few minutes. Then, scrub with a brush and rinse with water. Always wear gloves and eye protection when using cleaning products. Test the cleaner on a small area first. This ensures it does not damage the tiles. With the right cleaner, you can remove most stains from your tile deck.
How Do I Prevent Mold and Mildew?
Preventing mold and mildew on outdoor tiles is important. Mold and mildew can make your deck look dirty. They can also be slippery. Make sure your deck has good drainage. Water should run off easily. Clean your deck regularly. This removes dirt and grime where mold can grow. Use a cleaner that contains mildewcide. This kills mold and prevents it from coming back. Keep plants trimmed back from the deck. Plants can block sunlight and airflow. This creates a damp environment where mold thrives. Check your deck for leaks. Fix any leaks right away. With a little effort, you can keep your tile deck free of mold and mildew.
Can I Use Salt on My Tile Deck in Winter?
Using salt on your tile deck in winter can be risky. Salt can damage some types of tiles. It can also damage the grout. The salt can cause the tiles to crack or crumble. It is best to avoid using salt if possible. Use a plastic shovel to remove snow and ice. You can also use sand for traction. Sand does not damage the tiles. If you must use salt, use it sparingly. Choose a salt that is made for use on concrete and stone. Rinse the deck with water after the snow melts. This removes any salt residue. With care, you can keep your tile deck safe in winter without causing damage.
The Cost of Outdoor Deck Tiles

The cost of outdoor deck tiles can vary a lot. The price depends on the material, size, and style of the tiles. Stone tiles are usually the most expensive. Porcelain tiles are mid-range. Plastic tiles are the cheapest. Installation costs also vary. If you install the tiles yourself, you will save money. But if you hire a professional, it will cost more. Get quotes from a few different contractors. This helps you find the best price. Think about the long-term cost. Cheaper tiles might not last as long. You might have to replace them sooner. More expensive tiles might last longer and need less maintenance. Consider your budget and your needs. Choose the tiles that are the best value for you. A beautiful and durable tile deck is worth the investment.
- The price depends on the tile material and style.
- Stone tiles are usually the most expensive option.
- Plastic tiles are the least expensive.
- Installation costs vary depending on who does the work.
- Cheaper tiles might need to be replaced sooner.
Consider the cost of preparing the deck for outdoor tiles. You might need to fix the deck or add a cement board. These extra costs can add up. Factor them into your budget. Think about the cost of tools and supplies. You will need mortar, grout, and tile spacers. You might also need a tile cutter or wet saw. These tools can be expensive. But you can often rent them from a tool rental store. Get a detailed estimate of all the costs. This helps you avoid surprises. A well-planned budget will help you create the outdoor tiles deck of your dreams. You will love spending time outside on your beautiful new deck.
Fun Fact or Stat: Investing in high-quality tiles can increase your home’s resale value, making it a worthwhile expense!
Are Expensive Tiles Worth It?
Expensive tiles can be worth it for an outdoor deck. They often last longer than cheaper tiles. They are also more resistant to damage. Expensive tiles can add a touch of luxury to your deck. They come in more unique designs and colors. Think about how long you plan to stay in your home. If you plan to stay for many years, expensive tiles can be a good investment. They will last longer and look better. If you plan to move soon, cheaper tiles might be a better choice. Weigh the costs and benefits carefully. Choose the tiles that are right for you and your budget.
How Can I Save Money on Tiles?
Saving money on outdoor tiles is possible. Shop around and compare prices. Look for sales and discounts. Consider using smaller tiles. Smaller tiles are often cheaper than larger tiles. You can also use different materials. Plastic tiles are cheaper than stone or porcelain. Install the tiles yourself. This saves you money on labor costs. Borrow or rent the tools you need. This is cheaper than buying them. Plan your layout carefully. This helps you avoid wasting tiles. With a little planning, you can save money on your tile project. You can have a beautiful deck without breaking the bank.
What Adds the Most to Tile Costs?
Several things add to the cost of outdoor tiles. The material of the tile is a big factor. Stone and porcelain tiles are more expensive than plastic. The size of the tile also matters. Larger tiles usually cost more. Intricate designs and patterns increase the price. Shipping costs can add up, especially for heavy tiles. Hiring a professional installer adds to the cost. Preparing the deck can also be expensive. Fixing damage or adding a cement board costs money. Choose simpler designs and install the tiles yourself. This can save you money on your tile project. Being smart about your choices can help you stay on budget.
Summary
Outdoor tiles deck projects can transform your backyard. Choosing the right tiles is key. Consider the weather, style, and budget. Proper preparation ensures the tiles last. Installing the tiles takes time and effort. But it is worth it in the end. Regular maintenance keeps the deck looking great. The cost of tiles varies. But with planning, you can find affordable options. Think about the long-term benefits. A tile deck adds value to your home. It also creates a beautiful outdoor space. With careful planning and hard work, you can create a tile deck that you will love for years to come. Enjoy your new outdoor living space!
Conclusion
Creating an outdoor tiles deck is a great way to improve your home. You can choose from many types of tiles. Think about what you like and what fits your budget. Make sure to prepare your deck well before you start. This will help the tiles last longer. Installing the tiles might take some time. But the result is worth it. You will have a beautiful and safe place to relax. Enjoy your new outdoor tiles deck for many years!
Frequently Asked Questions
Question No 1: Are outdoor tiles slippery when wet?
Answer: Some outdoor tiles can be slippery when wet, but there are ways to avoid this. Look for tiles that have a textured surface. These tiles provide better grip. You can also add a non-slip coating to the tiles. This will make them safer to walk on when wet. Clean the tiles regularly to remove dirt and grime. Dirt can make the tiles more slippery. Consider using mats or rugs in high-traffic areas. These can provide extra traction. With the right precautions, you can make your tile deck safe for everyone.
Question No 2: How do I clean outdoor tiles properly?
Answer: Cleaning outdoor tiles properly is easy. Start by sweeping or vacuuming the tiles. This removes loose dirt and debris. Then, wash the tiles with mild soap and water. Use a soft brush or mop to scrub the tiles. Rinse the tiles with clean water. Avoid using harsh chemicals or abrasive cleaners. These can damage the tiles. For tough stains, use a specialized tile cleaner. Follow the directions on the cleaner carefully. Clean the grout between the tiles regularly. Grout can trap dirt and grime. With regular cleaning, your tile deck will look great for years to come. A clean deck is a happy deck!
Question No 3: Can I install outdoor tiles myself?
Answer: Yes, you can install outdoor tiles yourself. But it takes time and effort. First, make sure you have the right tools. You will need a tile cutter, mortar, grout, and tile spacers. Prepare the deck surface carefully. It needs to be clean, flat, and stable. Follow the directions for mixing the mortar. Spread the mortar evenly on the deck. Press each tile firmly into the mortar. Use tile spacers to keep the tiles evenly spaced. After the mortar dries, apply grout between the tiles. Clean off any extra grout. Let the grout dry completely. If you are comfortable with DIY projects, you can save money by installing the tiles yourself.
Question No 4: What are the best outdoor tiles for cold weather?
Answer: Some outdoor tiles hold up better in cold weather. Porcelain tiles are a good choice. They are strong and do not absorb water easily. This helps them resist cracking in freezing temperatures. Stone tiles like slate and granite are also durable. Avoid using tiles that are porous or absorb water. These tiles are more likely to crack in the cold. Make sure your deck has good drainage. This prevents water from pooling and freezing on the tiles. Seal the grout to protect it from water damage. With the right tiles and proper care, your deck can withstand cold weather.
Question No 5: How do I choose the right size of outdoor tiles?
Answer: Choosing the right size of outdoor tiles depends on your deck size and style. Larger tiles can make a small deck look bigger. They also have fewer grout lines. Smaller tiles can create a more intricate design. They are also easier to handle. Consider the shape of your deck. Rectangular tiles work well on rectangular decks. Square tiles work well on square decks. Think about the overall look you want to achieve. Choose the tile size that best fits your vision. You can also mix and match different sizes for a unique look. Have fun and be creative!
Question No 6: How can outdoor tiles increase my home’s value?
Answer: Adding outdoor tiles can increase your home’s value. A beautiful tile deck adds curb appeal. It makes your home look more attractive. A tile deck creates a functional outdoor living space. This is a valuable asset for potential buyers. Buyers will love having a place to relax and entertain. A well-maintained tile deck shows that you care about your home. This can increase its value. Choose high-quality tiles and install them properly. This will ensure your deck looks great for years to come. A tile deck is a smart investment that can pay off when you sell your home.
