Do you want to make your yard super cool? Have you thought about adding some art? Outdoor wall art gardens can make your space amazing. Let’s explore how to decorate your garden walls. We will find some fun and easy ideas together.
Imagine walking into a garden. Colorful art pops out from the walls. Birds chirp and butterflies flutter around. It feels like a magical place. This could be your garden with the right art.
Adding art to your garden is simple. You can use paintings, sculptures, or even plants. These decorations add color and fun. They show off your style. Let’s learn how to create your own outdoor wall art gardens.
Key Takeaways
- Outdoor wall art gardens boost your home’s curb appeal and create a welcoming space.
- Choose weather-resistant materials for your outdoor wall art to ensure durability.
- Consider themes and colors that complement your garden’s natural beauty.
- DIY projects are an affordable and fun way to personalize your garden art.
- Proper installation is key to keeping your wall art secure and looking great.

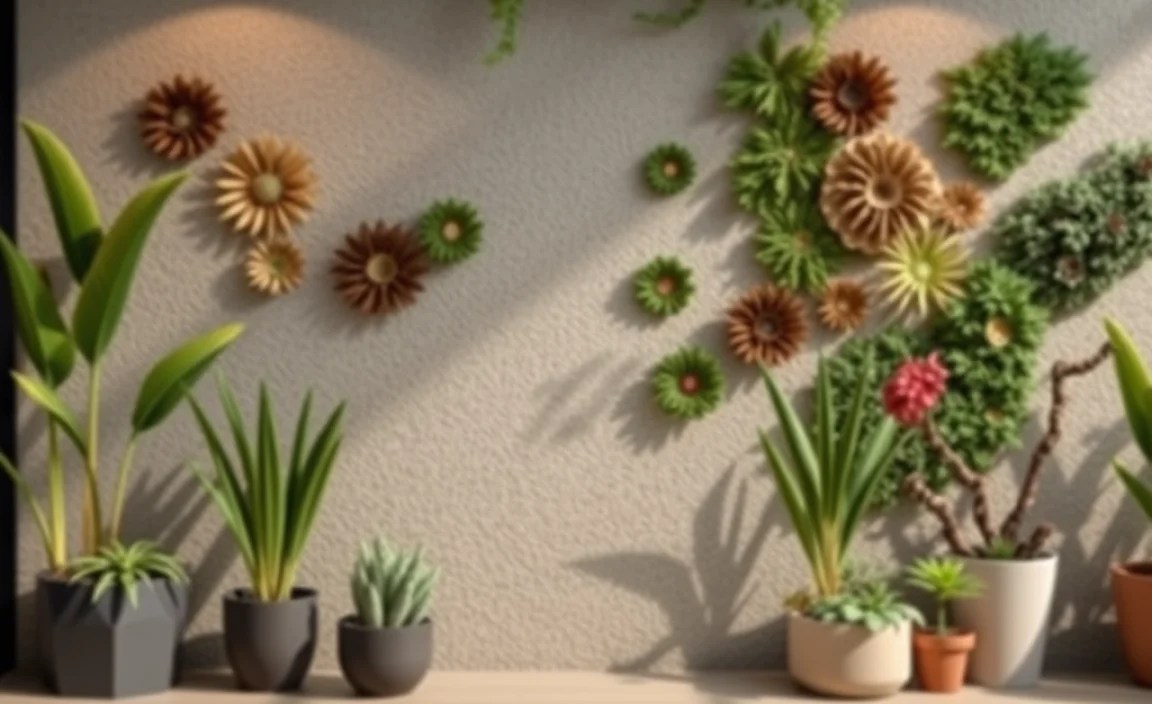
Choosing the Right Art for Outdoor Wall Gardens
Picking the right art is very important. You want pieces that can handle the weather. Rain, sun, and wind can damage some art. Metal, stone, and treated wood are good choices. These materials last a long time outside. Think about the size of your wall. Big walls need bigger art. Small walls look better with smaller pieces. Make sure the art matches your garden’s style. If your garden is colorful, choose bright art. If it is calm, pick softer colors. Look at different styles to see what you like. Some people like modern art. Others prefer classic designs. Have fun choosing the art that fits your garden best. You can mix and match different pieces to create a unique look. Remember to think about how the art will look in different seasons. Summer sun and winter snow can change how the art appears. This is the first step to creating outdoor wall art gardens.
- Pick weather-resistant materials.
- Match art size to wall size.
- Choose art that fits your garden’s style.
- Consider how art looks in different seasons.
- Mix and match different art pieces.
Think about adding a mirror to your garden wall. Mirrors make the space look bigger. They also reflect light. This can brighten up a shady area. You can also use plants as art. Train vines to grow on a trellis. This creates a living wall. Add colorful flowers to the vines for extra beauty. Another idea is to use old garden tools as art. Hang them on the wall in a creative way. This adds a rustic touch. You can also paint rocks and use them as decorations. Get creative and have fun with your outdoor wall art gardens. The most important thing is to choose art that you love. Your garden should be a reflection of your personality. With a little planning, you can create a beautiful and unique outdoor space.
Fun Fact or Stat: Studies show that adding art to gardens can reduce stress and improve mood!
What Kind of Art Should I Choose?
Choosing art for your garden can be exciting. There are so many options. Do you like bright colors or calm colors? Do you prefer metal or wood? A good idea is to start with a theme. Maybe you like nature. You could choose art with birds, flowers, or trees. If you like modern art, look for abstract pieces. These pieces often have interesting shapes and colors. Consider the style of your house. You want the art to match your home’s look. If you have a modern house, choose modern art. If you have a traditional house, choose classic art. It’s also important to think about maintenance. Some art needs more care than others. Metal art might need to be cleaned regularly. Wooden art might need to be treated to protect it from the weather. Make sure you are willing to take care of the art you choose for your outdoor wall art gardens.
How Big Should My Art Be?
The size of your art is very important. You don’t want it to be too big or too small. If the art is too big, it can overwhelm the space. If it is too small, it can get lost. A good rule of thumb is to measure your wall first. Then, choose art that is about two-thirds the size of the wall. This will create a balanced look. You can also use multiple pieces of art. For example, you could hang three small paintings instead of one big one. This can add interest and variety. Remember to consider the distance from where people will be viewing the art. If people will be far away, you can choose bigger pieces. If they will be close, smaller pieces might be better. Think about the overall design of your outdoor wall art gardens. The art should complement the other elements in your garden, such as plants and furniture.
Where Should I Place My Art?
Placement is key when adding art to your garden. You want to choose spots that will show off the art. Think about the light. Some areas might get more sun than others. This can affect how the art looks. Avoid placing art in direct sunlight if it is likely to fade. Consider the background. A plain wall is a good choice. It will make the art stand out. You can also use plants as a background. This can create a natural and beautiful look. Think about the view from inside your house. You want to place the art where you can see it easily. This will bring joy to your everyday life. Don’t be afraid to experiment. Try different placements until you find the perfect spot. Adding outdoor wall art gardens is all about having fun and creating a space that you love.

DIY Outdoor Wall Art for Gardens
Making your own art can be a lot of fun. It’s also a great way to save money. There are many easy DIY projects you can try. You can paint old wooden pallets. These make great backgrounds for plants. You can also create mosaics with broken tiles. These add color and texture to your walls. Another idea is to use stencils to paint designs. You can paint flowers, animals, or abstract patterns. Get your family involved in the project. It’s a fun activity for everyone. Use weather-resistant paint and materials. This will help your art last longer. Look online for inspiration. There are many tutorials and ideas available. Don’t be afraid to get creative and try new things. DIY art is a great way to personalize your outdoor wall art gardens. Your garden will truly reflect your unique style and personality. It is a fun project to do with friends and family.
- Paint old wooden pallets.
- Create mosaics with broken tiles.
- Use stencils to paint designs.
- Get family involved in the project.
- Use weather-resistant materials.
Consider making a succulent wall. This is a living piece of art. You can use a wooden frame and fill it with soil. Then, plant different types of succulents. They come in many colors and shapes. This creates a beautiful and low-maintenance wall. You can also create a painted rock garden. Collect smooth rocks and paint them with bright colors. Arrange them in a decorative way. This is a fun and easy project for kids. Another idea is to make wind chimes. Use old silverware, beads, and shells. Hang them from a branch or hook. The sound of the wind chimes will add a peaceful touch to your garden. Remember to have fun and be creative with your outdoor wall art gardens. The possibilities are endless. Your garden will be a unique and beautiful space.
Fun Fact or Stat: DIY projects can increase your home’s value and make it more appealing to buyers!
How to Prepare Pallets for Painting
Wooden pallets are great for DIY projects. But you need to prepare them first. Start by cleaning the pallet. Use soap and water to remove dirt and grime. Let it dry completely. Next, sand the pallet. This will smooth the surface and help the paint stick better. Use a medium-grit sandpaper. Wear a mask to protect yourself from dust. After sanding, apply a primer. Primer helps the paint adhere to the wood. It also protects the wood from moisture. Let the primer dry according to the instructions. Now you are ready to paint. Use weather-resistant paint. Apply several coats for best results. Let each coat dry before applying the next. Once the paint is dry, you can add decorations. Stencils, stamps, and decals are all great options. Preparing your pallets properly will ensure that your outdoor wall art gardens last for years to come.
What Kind of Paint Should I Use?
Choosing the right paint is important. You need paint that can handle the weather. Look for paints that are labeled “outdoor” or “exterior.” These paints are designed to resist fading, cracking, and peeling. Acrylic paints are a good choice. They are durable and come in many colors. Oil-based paints are also an option. They provide a tough and long-lasting finish. However, they take longer to dry and require special cleaners. Consider using a primer before painting. Primer helps the paint adhere to the surface. It also protects the surface from moisture. Choose a primer that is compatible with your paint. When painting, apply several thin coats instead of one thick coat. This will help prevent drips and runs. Let each coat dry completely before applying the next. With the right paint, your outdoor wall art gardens will look beautiful for years to come.
How to Make a Mosaic
Making a mosaic is a fun and creative project. You can use broken tiles, glass, or stones. Start by gathering your materials. You will need a base, such as a piece of wood or a tile. You will also need adhesive, such as tile adhesive or glue. Break your tiles or glass into small pieces. Be careful when breaking glass. Wear safety glasses and gloves. Arrange the pieces on the base in a design. You can create patterns, pictures, or abstract designs. Once you are happy with the arrangement, glue the pieces to the base. Let the adhesive dry completely. Then, apply grout to fill the spaces between the pieces. Use a rubber float to spread the grout evenly. Wipe off any excess grout with a damp sponge. Let the grout dry according to the instructions. Finally, polish the mosaic with a soft cloth. Your mosaic will add color and texture to your outdoor wall art gardens.

Materials for Long-Lasting Outdoor Wall Art Gardens
Choosing the right materials is key. You want your art to last a long time. Weather-resistant materials are essential. Metal is a great choice. It is strong and durable. Aluminum, stainless steel, and wrought iron are good options. Stone is another excellent material. It is natural and can withstand the elements. Granite, marble, and slate are popular choices. Treated wood is also a good option. Look for wood that has been treated to resist rot and insects. Cedar and redwood are naturally resistant to these things. Plastic and resin are lightweight and durable. They are also easy to clean. Look for UV-resistant materials to prevent fading. When choosing materials, consider the style of your garden. You want the materials to complement the overall look. With the right materials, your outdoor wall art gardens will be beautiful and long-lasting. Also, remember to consider the cost of the materials you choose.
- Use weather-resistant materials.
- Consider metal, stone, or treated wood.
- Look for UV-resistant materials.
- Match materials to your garden’s style.
- Consider the cost of materials.
Think about using recycled materials. This is a great way to be eco-friendly. You can use old tires to create planters. You can also use plastic bottles to make sculptures. Old metal cans can be painted and used as decorations. Get creative and find new ways to reuse materials. This will add a unique touch to your garden. You can also use natural materials. Branches, leaves, and stones can be used to create art. These materials are free and easy to find. Arrange them in interesting ways to create a natural look. Remember to protect your art from the elements. Apply a sealant or varnish to protect it from rain and sun. This will help it last longer. With careful planning and the right materials, your outdoor wall art gardens will be a beautiful and sustainable space.
Fun Fact or Stat: Recycled art reduces waste and helps protect the environment!
How to Protect Metal Art
Metal art can be beautiful, but it needs protection. Rust is a common problem. It can damage the metal and make it look bad. To prevent rust, apply a rust-resistant primer. This will create a barrier between the metal and the elements. You can also use a sealant. Sealants protect the metal from moisture. Apply the sealant according to the instructions. Clean your metal art regularly. Use a soft cloth and mild soap. This will remove dirt and grime. Avoid using harsh chemicals. They can damage the metal. If you notice rust, remove it immediately. Use a wire brush or sandpaper to remove the rust. Then, apply a rust-resistant primer and sealant. With proper care, your metal outdoor wall art gardens will last for years to come.
How to Care for Stone Art
Stone art is durable, but it still needs care. Clean your stone art regularly. Use a soft brush and water to remove dirt. You can also use a mild soap. Avoid using harsh chemicals. They can damage the stone. If you notice stains, try using a stone cleaner. Follow the instructions on the cleaner. Protect your stone art from extreme weather. Freezing temperatures can cause cracks. Cover the art during the winter. You can also apply a sealant. Sealants protect the stone from moisture. This will help prevent cracks and stains. Inspect your stone art regularly. Look for cracks or damage. Repair any damage immediately. With proper care, your stone outdoor wall art gardens will remain beautiful for many years.
How to Treat Wood for Outdoor Use
Wood is a beautiful material, but it needs treatment for outdoor use. Untreated wood can rot and decay. To protect your wood art, apply a wood preservative. This will protect it from rot, insects, and moisture. Choose a preservative that is designed for outdoor use. Apply the preservative according to the instructions. You can also use a sealant. Sealants protect the wood from moisture. Apply the sealant after the preservative has dried. Paint your wood art with weather-resistant paint. This will add color and protect the wood from the sun. Inspect your wood art regularly. Look for signs of rot or damage. Repair any damage immediately. With proper treatment, your wood outdoor wall art gardens will be beautiful and long-lasting.

Incorporating Plants with Outdoor Wall Art Gardens
Plants and art go well together. They create a beautiful and natural look. You can use plants to frame your art. Train vines to grow around the art. This will create a living frame. You can also hang planters on the wall. Fill them with colorful flowers. This will add pops of color to your garden. Consider using vertical gardens. These are gardens that grow up the wall. You can use a variety of plants, such as herbs, vegetables, and flowers. This is a great way to save space and add beauty. Choose plants that complement your art. If your art is colorful, choose plants with green foliage. If your art is simple, choose plants with colorful flowers. Think about the lighting. Some plants need more sun than others. Choose plants that will thrive in the conditions of your garden. With careful planning, you can create a stunning combination of plants and outdoor wall art gardens.
- Use plants to frame your art.
- Hang planters on the wall.
- Consider vertical gardens.
- Choose plants that complement your art.
- Think about the lighting conditions.
Consider adding a water feature to your garden. A fountain or pond will add a peaceful touch. The sound of water can be very relaxing. Place your art near the water feature. This will create a focal point. You can also use lighting to enhance your art. Uplights can highlight the art at night. This will create a dramatic effect. String lights can add a festive touch. Hang them around the art or plants. Remember to have fun and be creative. Your garden should be a reflection of your personality. Experiment with different combinations of plants, art, and water features. With a little planning, you can create a beautiful and unique outdoor space. Adding plants to outdoor wall art gardens is a great way to connect with nature.
Fun Fact or Stat: Gardens with both art and plants are proven to increase property values!
What Plants Grow Well on Walls?
Some plants love to grow on walls. These are called climbing plants. Vines are a popular choice. They can climb up walls and create a beautiful green covering. Ivy is a classic climbing plant. It is easy to grow and provides year-round greenery. Clematis is another good choice. It has beautiful flowers in a variety of colors. Honeysuckle is a fragrant climbing plant. It attracts hummingbirds and butterflies. Creeping fig is a fast-growing vine. It can cover a wall quickly. When choosing climbing plants, consider the size of your wall. Some vines can grow very large. Make sure you have enough space. Also, think about the support system. Vines need something to climb on, such as a trellis or wire. With the right climbing plants, your outdoor wall art gardens will be transformed into a lush and vibrant space.
How to Build a Vertical Garden
A vertical garden is a garden that grows up a wall. It is a great way to save space and add beauty. You can build a vertical garden using a variety of materials. Wooden pallets are a popular choice. They are easy to find and inexpensive. You can also use plastic containers or metal frames. Start by building a frame. The frame will support the plants. Attach the frame to the wall. Make sure it is secure. Then, add soil to the frame. You can use potting soil or a special vertical garden mix. Plant your plants in the soil. Choose plants that are suitable for vertical gardens. Succulents, herbs, and flowers are all good choices. Water your plants regularly. Vertical gardens tend to dry out quickly. Fertilize your plants as needed. With a little effort, you can create a beautiful and thriving vertical garden as part of your outdoor wall art gardens.
How to Use Hanging Planters
Hanging planters are a great way to add plants to your walls. They are easy to install and can be moved around. Choose planters that are made of weather-resistant materials. Plastic, metal, and ceramic are good choices. Hang the planters from hooks or brackets. Make sure the hooks are strong enough to support the weight of the planters. Fill the planters with potting soil. Choose plants that are suitable for hanging planters. Trailing plants, such as petunias and ivy, look great in hanging planters. Water your plants regularly. Hanging planters tend to dry out quickly. Fertilize your plants as needed. With hanging planters, you can easily add color and beauty to your outdoor wall art gardens.
Lighting Ideas for Highlighting Outdoor Wall Art Gardens
Lighting can make a big difference in your garden. It can highlight your art and plants. Uplighting is a popular choice. Place lights at the base of your art. This will shine light up the wall. It creates a dramatic effect. Downlighting is another option. Place lights above your art. This will shine light down on the wall. It creates a soft and subtle effect. String lights are a fun and festive choice. Hang them around your art or plants. This will add a warm and inviting glow. Solar lights are a great way to save energy. They charge during the day and light up at night. Choose lights that are designed for outdoor use. They should be weather-resistant. Think about the color of the light. Warm light creates a cozy atmosphere. Cool light creates a modern look. With the right lighting, your outdoor wall art gardens will be beautiful day and night.
- Use uplighting to create drama.
- Use downlighting for a soft effect.
- Hang string lights for a festive glow.
- Choose weather-resistant lights.
- Consider the color of the light.
Consider using spotlights to highlight specific pieces of art. This will draw attention to your favorite pieces. You can also use path lights to guide people through your garden. Place them along walkways and near steps. This will make your garden safer at night. Remember to use energy-efficient bulbs. LED bulbs are a great choice. They last longer and use less energy. You can also use timers to control your lights. This will save energy and make your garden more convenient. With a little planning, you can create a beautiful and well-lit outdoor space. Good lighting will enhance the beauty of your outdoor wall art gardens and make it a welcoming place for you and your guests.
Fun Fact or Stat: Strategic lighting can increase the perceived size of your garden!
How to Install Uplights
Uplights are a great way to highlight your art. They shine light up the wall, creating a dramatic effect. To install uplights, start by choosing the right lights. Look for lights that are designed for outdoor use. They should be weather-resistant. Choose lights with adjustable heads. This will allow you to aim the light where you want it. Place the lights at the base of your art. Bury the lights in the ground or mount them on a stake. Connect the lights to a power source. You can use a low-voltage transformer or a standard electrical outlet. Be sure to follow all safety precautions. Test the lights to make sure they are working properly. Adjust the angle of the lights to achieve the desired effect. With uplights, your outdoor wall art gardens will be beautiful at night.
How to Use String Lights
String lights are a fun and festive way to light up your garden. They can add a warm and inviting glow. To use string lights, start by choosing the right lights. Look for lights that are designed for outdoor use. They should be weather-resistant. Choose lights with LED bulbs. They last longer and use less energy. Hang the lights around your art or plants. You can use hooks, clips, or zip ties to secure the lights. Connect the lights to a power source. You can use a battery pack or a standard electrical outlet. Be sure to follow all safety precautions. Test the lights to make sure they are working properly. Arrange the lights in a pattern that you like. String lights can transform your outdoor wall art gardens into a magical space.
How to Choose Solar Lights
Solar lights are a great way to save energy. They charge during the day and light up at night. To choose solar lights, start by considering the brightness. Look for lights with a high lumen rating. This will indicate how bright the lights are. Choose lights with a long battery life. This will ensure that the lights stay on all night. Look for lights that are designed for outdoor use. They should be weather-resistant. Consider the style of the lights. Choose lights that complement your garden’s design. Place the lights in a sunny location. This will allow them to charge properly. With solar lights, you can light up your outdoor wall art gardens without using any electricity.
Maintaining Your Outdoor Wall Art Gardens
Taking care of your garden art is important. It will keep it looking beautiful for years. Clean your art regularly. Use a soft cloth and mild soap. This will remove dirt and grime. Inspect your art for damage. Look for cracks, rust, or rot. Repair any damage immediately. Protect your art from the elements. Cover it during the winter or during extreme weather. Apply a sealant or varnish to protect it from moisture and sun. Trim plants that are growing near your art. This will prevent them from damaging the art. Store your art properly when it is not in use. Keep it in a dry and safe place. With proper maintenance, your outdoor wall art gardens will be a source of joy for many years to come. It is also important to check the art regularly.
- Clean your art regularly.
- Inspect your art for damage.
- Protect your art from the elements.
- Trim plants near your art.
- Store art properly when not in use.
Consider using a pressure washer to clean your art. This will remove stubborn dirt and grime. Be careful not to use too much pressure. This can damage the art. You can also use a commercial cleaner. Choose a cleaner that is designed for the material of your art. Follow the instructions on the cleaner. When repairing your art, use the appropriate materials. For example, use rust-resistant paint on metal art. Use wood preservative on wooden art. Remember to have fun and enjoy your garden art. It is a reflection of your personality and style. With a little care and attention, your outdoor wall art gardens will be a beautiful and welcoming space for you and your guests.
Here is a table to help you with maintenance:
| Art Material | Cleaning Method | Protection | Maintenance Frequency |
|---|---|---|---|
| Metal | Soft cloth, mild soap | Rust-resistant sealant | Monthly |
| Stone | Soft brush, water | Stone sealant | Quarterly |
| Wood | Soft cloth, mild soap | Wood preservative | Annually |
| Plastic | Soft cloth, water | UV-resistant spray | Monthly |
Fun Fact or Stat: Regular maintenance can extend the lifespan of your outdoor art by up to 50%!
How to Clean Metal Art
Cleaning metal art is important to prevent rust and corrosion. Start by dusting the art with a soft cloth. This will remove loose dirt and debris. Then, mix a small amount of mild soap with water. Use a soft sponge to wash the art. Rinse the art with clean water. Dry the art with a soft cloth. For stubborn dirt, you can use a commercial metal cleaner. Follow the instructions on the cleaner. Avoid using harsh chemicals or abrasive cleaners. They can damage the metal. After cleaning, apply a rust-resistant sealant. This will protect the metal from moisture. With regular cleaning, your metal outdoor wall art gardens will remain beautiful for years to come.
How to Repair Stone Art
Stone art can crack or chip over time. To repair stone art, start by cleaning the damaged area. Remove any loose debris. Then, apply a stone adhesive. Choose an adhesive that is designed for outdoor use. Follow the instructions on the adhesive. Press the broken pieces together. Hold them in place until the adhesive dries. For small chips, you can use a stone filler. Apply the filler to the chip. Smooth it out with a putty knife. Let the filler dry completely. Then, sand the area smooth. With proper repair, your stone outdoor wall art gardens will look as good as new.
How to Protect Wood Art from Rot
Wood art is susceptible to rot and decay. To protect wood art from rot, start by applying a wood preservative. Choose a preservative that is designed for outdoor use. Follow the instructions on the preservative. Apply several coats for best results. Let each coat dry before applying the next. You can also use a sealant. Sealants protect the wood from moisture. Apply the sealant after the preservative has dried. Keep the wood art dry. Avoid placing it in areas where it will get wet. Inspect the wood art regularly. Look for signs of rot. If you notice rot, remove it immediately. Treat the area with a wood preservative. With proper protection, your wood outdoor wall art gardens will last for many years.
Summary
Adding outdoor wall art gardens can transform your outdoor space. Choosing the right art is important. You need to consider the weather, size, and style. DIY projects are a great way to personalize your garden. You can paint pallets, create mosaics, or build vertical gardens. Using weather-resistant materials is essential. Metal, stone, and treated wood are good choices. Incorporating plants with your art will create a natural and beautiful look. Lighting can enhance your art at night. Uplighting, downlighting, and string lights are all great options. Maintaining your art is important. Clean it regularly, inspect it for damage, and protect it from the elements. With careful planning and maintenance, your garden will be a beautiful and welcoming space.
Conclusion
Outdoor wall art gardens can transform your yard. You can make it a fun and inviting space. Choose art that you love and that fits your style. Use weather-resistant materials for long-lasting beauty. Add plants to create a natural and peaceful setting. With a little creativity, you can make your garden a work of art. Enjoy your beautiful outdoor space with family and friends. It is a fun and easy way to express yourself.
Frequently Asked Questions
Question No 1: What is outdoor wall art?
Answer: Outdoor wall art is art designed to be displayed outside. It can be paintings, sculptures, or other decorative items. The art is made to withstand weather conditions. It adds beauty and personality to gardens, patios, and other outdoor spaces. Choosing the right materials is important to make sure the art will last a long time. Outdoor wall art gardens are a great way to enhance your backyard.
Question No 2: How do I choose the right size art for my wall?
Answer: To choose the right size, measure your wall first. Then, select art that is proportional to the wall. A good rule is to have the art cover about two-thirds of the wall space. For large walls, you can use multiple smaller pieces. This creates a gallery effect. For small walls, one larger piece may be better. Consider the viewing distance. If people will be far away, larger pieces work well. If they will be close, smaller pieces are suitable. Scale is key to making the art look balanced in your outdoor wall art gardens.
Question No 3: What materials are best for outdoor art?
Answer: The best materials for outdoor art are weather-resistant. Metal, such as aluminum and stainless steel, is a great choice. Stone, like granite and marble, is also durable. Treated wood can also withstand the elements. Plastic and resin are lightweight and easy to clean. Look for UV-resistant materials to prevent fading. Avoid materials that can rust, rot, or crack easily. Proper materials will help your outdoor wall art gardens last longer.
Question No 4: How do I protect my outdoor art from the weather?
Answer: To protect your outdoor art, apply a sealant or varnish. This will protect it from moisture and sun. Cover the art during extreme weather conditions. This includes heavy rain, snow, and strong winds. Clean the art regularly to remove dirt and grime. Inspect the art for damage, such as cracks or rust. Repair any damage immediately. Using the right materials and taking these steps will keep your art looking great. It will also keep your outdoor wall art gardens beautiful for years.
Question No 5: Can I make my own outdoor wall art?
Answer: Yes, you can definitely make your own outdoor wall art! DIY projects are a fun and affordable way to personalize your garden. You can paint old wooden pallets, create mosaics with broken tiles, or build vertical gardens. Use weather-resistant paints and materials. Get your family involved in the project. Look online for inspiration and tutorials. DIY art is a great way to express your creativity. It will make your outdoor wall art gardens unique and special.
Question No 6: How do I incorporate plants with my wall art?
Answer: Plants and art can create a beautiful combination. Use plants to frame your art. Train vines to grow around the art. Hang planters on the wall filled with colorful flowers. Consider using vertical gardens. Choose plants that complement your art’s colors and style. Think about the lighting conditions. Some plants need more sun than others. With careful planning, you can create a stunning display. This display brings your outdoor wall art gardens to life.
