Did you ever plant a seed and watch it grow? Imagine growing a plant that gives you amazing buds. Some people grow sativa plants outside. When are sativa outdoor buds ready harvest? It’s an exciting time for growers!
Growing any plant takes time and care. You need to watch for the right signs. Knowing when to harvest is super important. It helps you get the best quality buds.
Let’s learn all about harvesting sativa outdoor buds. We will explore what to look for. We’ll also talk about how to do it the right way. Get ready to become a harvest expert!
Key Takeaways
- Knowing when sativa outdoor buds ready harvest is key for top quality.
- Check the trichomes, tiny glands, for amber color to know when to harvest.
- Harvesting at the right time maximizes potency and desired effects.
- Weather plays a big role; avoid harvesting during or after heavy rain.
- Proper drying and curing are essential after harvesting for the best results.

Spotting When Sativa Outdoor Buds Ready Harvest
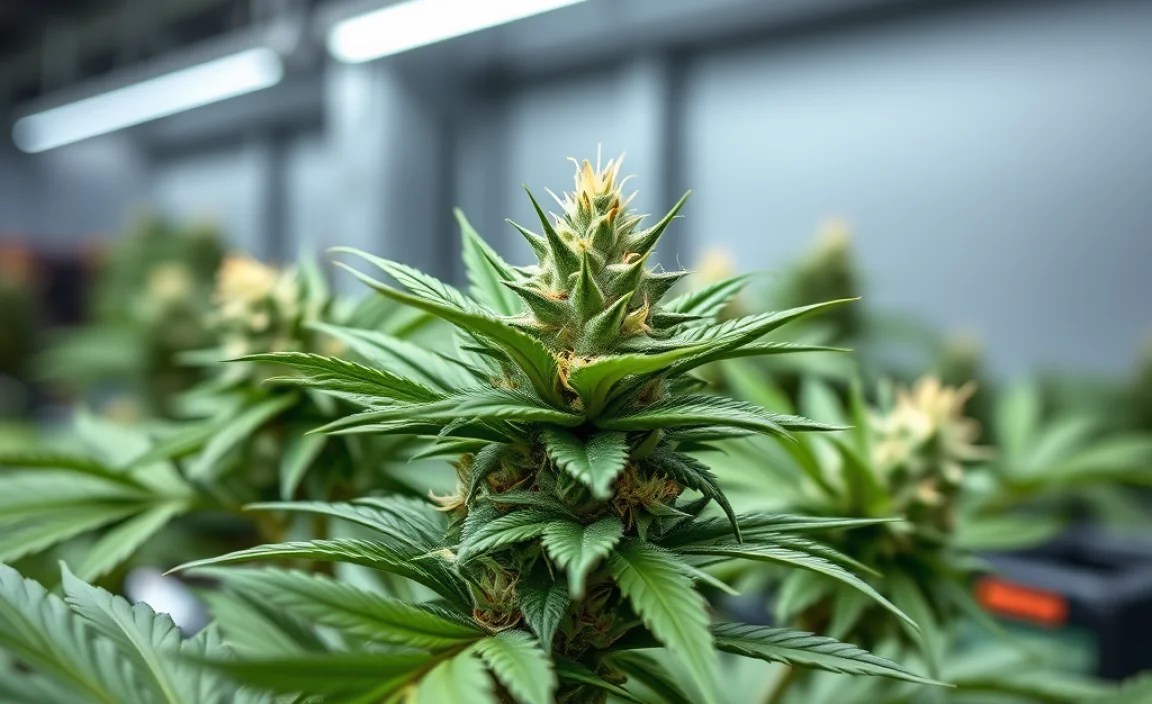
Knowing when your sativa outdoor buds ready harvest is like knowing when to pick the perfect apple. You want it ripe, not too early and not too late. The first thing to look for is the color of the tiny, sparkly things on the buds. These are called trichomes. They start clear, then turn milky white, and finally amber. When most of the trichomes are amber, it’s harvest time! Also, look at the pistils. These are the little hairs on the buds. They will change color from white to orange or brown. This is another sign your buds are getting ready. Don’t rush the process. Waiting a little longer can make your buds even better. But, don’t wait too long, or they might lose some of their special qualities.
- Check the trichomes for amber color.
- Watch the pistils for color change.
- Consider the overall look of the plant.
- Check the weather forecast.
- Be patient and don’t rush.
Timing is everything. Harvesting too early means the buds won’t be as strong. Harvesting too late means they might lose some of their oomph. It’s a balancing act. Think of it like baking cookies. You want them golden brown, not burnt or doughy. The same goes for your buds. The right timing makes all the difference. Also, think about the weather. If it’s going to rain a lot, you might want to harvest a little early. Rain can damage your buds. So, keep an eye on the sky, too. Getting the timing right is key to a successful harvest.
Fun Fact or Stat: Did you know that trichomes are like tiny factories that make all the good stuff in your buds? The more amber trichomes, the more potent your harvest will be!
Why Trichome Color Matters
Have you ever wondered why some fruits are sweeter when they are ripe? It’s because of the changes happening inside. The same thing happens with trichomes on your sativa buds. When trichomes are clear, they are still developing. They haven’t reached their full potential. When they turn milky white, they are getting closer. This is when the magic starts to happen. The best time to harvest is when they are mostly amber. Amber trichomes mean the plant has reached its peak. Harvesting at this stage gives you the best possible result. Think of it like picking a tomato. A green tomato is sour, a red tomato is sweet and juicy.
Pistil Changes as an Indicator
Imagine your plant is talking to you with its colors. The pistils, those tiny hairs, are part of that conversation. When they are white, the plant is saying, “I’m still growing!” As they turn orange or brown, it’s like the plant is saying, “I’m almost ready!” Watching the pistils is like reading a secret code. It helps you know when to harvest. Some growers use a magnifying glass to get a close look. This helps them see the pistils changing color. The color change is another important sign. Combined with the trichome color, it gives you a clear picture. You will know exactly when your sativa outdoor buds ready harvest.
The Impact of Weather Conditions
Think about how rain affects your garden. Too much rain can make your tomatoes split. It can also damage your flowers. The same is true for your sativa plants. Heavy rain can cause mold and mildew on the buds. This can ruin your entire harvest. If you see a big storm coming, it’s best to harvest early. It’s better to harvest a little early than to lose everything to the rain. Keep an eye on the weather forecast. Plan your harvest around the weather. This will help you protect your precious buds. Harvesting before a storm is like putting an umbrella over your plants.

Tools for Harvesting Sativa Outdoor Buds
Harvesting sativa outdoor buds ready harvest is like being a surgeon. You need the right tools to do the job well. The most important tool is a pair of sharp trimming shears. These are like scissors for plants. They need to be clean and sharp. This helps you make clean cuts. Clean cuts are important for the plant’s health. You will also need gloves. Gloves keep your hands clean and protect the buds. Some people like to use a magnifying glass. This helps them get a close look at the trichomes. You will also need containers to hold the harvested buds. Paper bags or glass jars work well. Make sure they are clean and dry. Having the right tools makes harvesting easier and more efficient. It also helps you protect the quality of your buds.
- Sharp trimming shears.
- Gloves to protect your hands.
- Magnifying glass for trichome check.
- Containers for harvested buds.
- Drying racks or lines.
Imagine trying to build a house without the right tools. It would be very hard. The same is true for harvesting. Using dull or dirty shears can damage the plant. It can also introduce bacteria that can ruin your buds. Gloves keep your hands clean and prevent you from transferring oils to the buds. A magnifying glass helps you see the trichomes clearly. This ensures you harvest at the right time. Clean containers prevent mold and mildew. Having the right tools makes the process smoother. It also helps you get the best possible results. Think of it like having a chef’s knife instead of a butter knife. The right tool makes all the difference.
Fun Fact or Stat: Clean trimming shears can prevent up to 80% of potential mold and bacteria contamination during harvest!
Choosing the Right Shears
Have you ever tried cutting paper with dull scissors? It’s frustrating, right? The same goes for trimming your sativa plants. Dull shears can crush the stems and damage the buds. Sharp shears make clean cuts. This helps the plant heal quickly. Look for shears that are designed for trimming plants. They should be comfortable to hold and easy to use. Some shears have non-stick blades. This prevents the sticky resin from building up. Clean your shears regularly with rubbing alcohol. This keeps them sharp and prevents the spread of disease. The right shears are an investment in your harvest.
The Importance of Gloves
Think about all the things your hands touch during the day. They pick up dirt, oil, and bacteria. You don’t want to transfer any of that to your precious buds. Gloves create a barrier between your hands and the plant. This keeps your buds clean and pure. Latex or nitrile gloves work well. They are inexpensive and easy to find. Change your gloves regularly during the harvest. This ensures you are always working with clean hands. Gloves are a simple but important tool. They help you protect the quality of your harvest.
Setting Up Your Drying Area
Imagine you just baked a cake. You wouldn’t leave it out in the rain, would you? You would put it in a safe place to cool. The same is true for your harvested buds. They need a safe place to dry. A cool, dark, and well-ventilated room is ideal. You can hang the branches upside down on clotheslines. You can also use drying racks. Make sure the buds are not touching each other. This allows air to circulate. Keep the humidity level around 50%. This prevents mold and mildew. A proper drying area is essential for a successful harvest. It helps you preserve the quality of your buds.

Step-by-Step Harvesting Sativa Outdoor Buds
Harvesting sativa outdoor buds ready harvest is a careful process. First, gather your tools. You will need your shears, gloves, and containers. Start by cutting the branches that are ready. Look for the ones with the most amber trichomes. Cut the branches close to the main stem. Be gentle and avoid damaging the buds. Place the branches in your containers. Once you have harvested all the ready branches, it’s time to trim. Trim off the large fan leaves. These leaves don’t have many trichomes. Then, trim the sugar leaves. These are the small leaves that grow close to the buds. Some people like to leave some of the sugar leaves on. It’s a matter of personal preference. After trimming, hang the branches to dry. Make sure they are in a cool, dark, and well-ventilated room. This step-by-step process will help you harvest your buds like a pro.
- Gather tools and supplies.
- Cut ready branches carefully.
- Trim fan leaves and sugar leaves.
- Hang branches to dry.
- Monitor drying conditions.
- Cure the buds after drying.
Think of harvesting like a dance. Each step flows into the next. If you rush, you might step on your partner’s toes. If you are too slow, you might miss a beat. The key is to be mindful and deliberate. Take your time and enjoy the process. Harvesting is the culmination of all your hard work. It’s a time to celebrate your success. But remember, the job is not done yet. Drying and curing are just as important as harvesting. These steps will help you bring out the full potential of your buds. So, keep dancing and follow the steps.
Fun Fact or Stat: Proper trimming can increase the potency of your buds by up to 15% by removing unwanted plant material!
Cutting and Handling Branches
Imagine you are carefully picking flowers from a delicate plant. You want to be gentle and avoid damaging the petals. The same is true for cutting and handling your sativa branches. Use sharp shears to make clean cuts. This helps the plant heal quickly. Hold the branches gently and avoid squeezing the buds. Squeezing can damage the trichomes. Place the branches carefully in your containers. Avoid piling them on top of each other. This can crush the buds. Handle the branches with care and respect. They are the fruits of your labor.
Trimming Techniques
Think of trimming as sculpting. You are removing the unwanted parts to reveal the beauty underneath. Start by removing the large fan leaves. These leaves don’t have many trichomes. Then, trim the sugar leaves. These are the small leaves that grow close to the buds. Some people like to leave some of the sugar leaves on. It’s a matter of personal preference. Use small, precise cuts. Avoid tearing the leaves. Keep your shears clean and sharp. This will make the process easier and more efficient. Trimming is an art form. With practice, you will become a master.
The Drying Process
Have you ever dried herbs from your garden? You know that it takes time and patience. The same is true for drying your sativa buds. Hang the branches upside down in a cool, dark, and well-ventilated room. The ideal temperature is around 70 degrees Fahrenheit. The ideal humidity is around 50%. Check the buds regularly for mold or mildew. If you see any, remove them immediately. The drying process can take anywhere from 7 to 14 days. The buds are ready when the small stems snap easily. Be patient and don’t rush the process. Proper drying is essential for preserving the quality of your buds.

Drying Sativa Outdoor Buds Correctly
Drying sativa outdoor buds ready harvest is crucial. It’s like letting bread rise before baking. It develops flavor and texture. Proper drying prevents mold. It also preserves the good stuff in your buds. Hang the branches upside down. Use a cool, dark room. Keep the humidity around 50%. A slow dry is best. It takes about one to two weeks. Check the buds daily. Feel them. They should be slightly crispy on the outside. The stems should snap, not bend. If they dry too fast, they can be harsh. If they dry too slow, mold can grow. Watch closely and adjust as needed. Drying is an art and a science.
- Maintain proper temperature.
- Control humidity levels.
- Ensure good air circulation.
- Monitor for mold.
- Allow for slow, even drying.
Imagine you are a sculptor. You have carefully carved a beautiful statue. Now, you need to let it dry properly. If it dries too fast, it might crack. If it dries too slow, it might get moldy. You need to create the perfect environment for it to dry. The same is true for your sativa buds. You have put in all the hard work to grow them. Now, you need to dry them properly. This will preserve their quality and potency. Think of drying as the final step in the growing process. It’s just as important as planting the seed. So, take your time and do it right.
Fun Fact or Stat: A slow, controlled drying process can increase the terpene content of your buds by up to 20%, enhancing their aroma and flavor!
Temperature and Humidity Control
Have you ever noticed how clothes dry faster on a hot, sunny day? That’s because of temperature and humidity. Temperature and humidity also affect the drying of your sativa buds. The ideal temperature is around 70 degrees Fahrenheit. The ideal humidity is around 50%. Use a thermometer and a hygrometer to monitor the conditions. If the temperature is too high, the buds will dry too fast. This can make them harsh. If the humidity is too high, mold can grow. Use a dehumidifier to lower the humidity. Use a fan to circulate the air. Controlling temperature and humidity is key to a successful drying process.
Air Circulation Techniques
Think about how a gentle breeze feels on a hot day. It helps to cool you down and dry your sweat. Air circulation does the same thing for your drying buds. It helps to remove moisture and prevent mold. Use a small fan to circulate the air in the drying room. Don’t point the fan directly at the buds. This can dry them too fast. Make sure there is plenty of space between the branches. This allows air to circulate freely. Good air circulation is essential for a slow, even dry.
Recognizing Properly Dried Buds
Imagine you are baking cookies. You know they are done when they are golden brown and slightly firm to the touch. The same is true for your dried buds. They should be slightly crispy on the outside. The stems should snap, not bend. If the buds are still wet, they will feel soft and spongy. If they are too dry, they will crumble. The drying process can take anywhere from 7 to 14 days. Be patient and check the buds regularly. With practice, you will learn to recognize properly dried buds.
Curing for Sativa Outdoor Buds After Harvest
Curing is what happens after drying sativa outdoor buds ready harvest. It’s like aging cheese or wine. It makes the buds taste better. It also makes them smoother. Place the dried buds in airtight jars. Fill the jars about three-quarters full. Store the jars in a cool, dark place. Open the jars once a day for about 15 minutes. This is called “burping.” Burping releases moisture and prevents mold. After a few weeks, the buds will be cured. They will be smoother and more flavorful. Curing takes time, but it’s worth it.
| Stage | Temperature | Humidity | Duration | Purpose |
|---|---|---|---|---|
| Drying | 60-70°F | 45-55% | 7-14 days | Reduce moisture to prevent mold |
| Curing (Initial) | 60-70°F | 60-65% | 1-2 weeks | Even out moisture levels |
| Curing (Long-Term) | 60-70°F | 60-65% | 2-8 weeks | Enhance flavor and potency |
| Storage | Below 70°F | Below 60% | Indefinitely | Maintain quality |
Imagine you are making a fine wine. You carefully select the grapes. You ferment them with care. But the wine is not ready yet. It needs to age in a cellar. This allows the flavors to develop. The same is true for your sativa buds. Drying removes most of the moisture. But curing removes the rest. It also allows the flavors to develop. Curing is the final touch. It transforms your buds from good to great. So, be patient and let the curing process work its magic.
Fun Fact or Stat: Curing can reduce the levels of chlorophyll in your buds, resulting in a smoother smoke and better flavor!
Choosing the Right Jars
Have you ever stored food in a container that wasn’t airtight? It probably went stale quickly. The same is true for your curing buds. You need to use airtight jars. Mason jars work well. They are inexpensive and easy to find. Make sure the jars are clean and dry. Fill the jars about three-quarters full. This allows air to circulate. Don’t pack the buds too tightly. This can cause mold. The right jars are essential for a successful curing process.
The “Burping” Process
Think about how you need to open a bottle of soda every now and then to release the pressure. The same is true for your curing buds. They release moisture and gases as they cure. If you don’t “burp” the jars, the moisture can build up and cause mold. Open the jars once a day for about 15 minutes. This allows the moisture and gases to escape. Some people like to sniff the jars during the burping process. This helps them monitor the curing process. The “burping” process is a simple but important step.
Long-Term Storage Tips
Imagine you have a treasure chest full of gold coins. You wouldn’t just leave it out in the open, would you? You would store it in a safe place. The same is true for your cured buds. You want to store them in a cool, dark, and dry place. This will help preserve their quality and potency. Keep the jars away from light and heat. These can degrade the buds. Store the jars in a closet or a cabinet. With proper storage, your buds can last for months or even years.
Common Mistakes When Harvesting Buds
Harvesting sativa outdoor buds ready harvest can be tricky. Many people make mistakes. Harvesting too early is a big one. The buds are not fully developed. They won’t be as strong. Harvesting too late is also a problem. The buds can lose their potency. Drying too fast can make the buds harsh. Drying too slow can cause mold. Not curing the buds is another mistake. Curing improves the flavor and smoothness. Over-trimming the buds can also be a problem. Trim carefully and avoid damaging the trichomes. Learning from these mistakes will help you have a better harvest.
- Harvesting too early.
- Harvesting too late.
- Drying too quickly.
- Not curing properly.
- Over-trimming the buds.
- Ignoring weather conditions.
Imagine you are learning to ride a bike. You are going to fall down a few times. But each time you fall, you learn something. You learn how to balance better. You learn how to steer. The same is true for harvesting. You are going to make mistakes. But each mistake is a learning opportunity. Pay attention to what went wrong. Ask questions and seek advice. With practice, you will become a skilled harvester. Don’t be afraid to make mistakes. Just learn from them.
Fun Fact or Stat: First-time growers who avoid common mistakes can increase their yield by up to 30%!
Harvesting Too Early or Late
Have you ever picked a fruit that wasn’t ripe? It probably tasted sour and hard. The same is true for harvesting your sativa buds. Harvesting too early means the buds haven’t reached their full potential. The trichomes are still clear. They haven’t developed their full potency. Harvesting too late means the trichomes have started to degrade. They have lost some of their potency. The key is to harvest at the right time. When most of the trichomes are amber. This is when the buds are at their peak.
Improper Drying Techniques
Think about how clothes can get musty if you leave them in the washing machine for too long. Improper drying can do the same thing to your buds. Drying too fast can make the buds harsh and brittle. Drying too slow can cause mold and mildew. The key is to dry the buds slowly and evenly. In a cool, dark, and well-ventilated room. Monitor the temperature and humidity. Adjust as needed. Proper drying is essential for preserving the quality of your buds.
Skipping the Curing Process
Imagine you are baking a cake. You take it out of the oven and eat it right away. It’s good, but it could be better. If you let it cool and rest, the flavors will develop. The same is true for your sativa buds. Curing allows the flavors to develop. It also makes the buds smoother. Skipping the curing process is like eating a cake that hasn’t cooled. It’s not as good as it could be. Take the time to cure your buds. It’s worth the effort.
Maximizing Yield of Sativa Outdoor Buds
To maximize your sativa outdoor buds ready harvest, start with good genetics. Choose plants known for high yields. Provide plenty of sunlight. Sativa plants love the sun. Water regularly, but don’t overwater. Use good quality soil. Add nutrients to help the plants grow. Prune the plants to encourage bud growth. Protect them from pests and diseases. Harvest at the right time. Dry and cure properly. These steps will help you get the most out of your harvest.
- Choose high-yielding strains.
- Provide ample sunlight.
- Water and fertilize properly.
- Prune plants for better growth.
- Protect from pests and diseases.
- Harvest at peak ripeness.
Imagine you are a farmer growing corn. You want to get the biggest harvest possible. You would start by choosing the best seeds. You would plant them in fertile soil. You would water them regularly. You would protect them from pests and diseases. You would harvest them at the right time. The same is true for growing sativa plants. You need to provide the right conditions for them to thrive. This will help you get the biggest and best harvest possible. Think of yourself as a plant parent. Give your plants the love and care they need.
Fun Fact or Stat: Growers who implement yield-maximizing techniques can see up to a 50% increase in their harvest!
Selecting High-Yielding Strains
Have you ever noticed that some apple trees produce more apples than others? That’s because of genetics. Some varieties are simply more productive. The same is true for sativa plants. Some strains are known for their high yields. Do your research and choose a strain that is right for you. Look for strains that are well-suited to your climate. Consider the growing conditions in your area. Selecting the right strain is the first step to maximizing your yield.
Optimizing Sunlight Exposure
Think about how a sunflower always turns its face towards the sun. Plants need sunlight to grow. Sativa plants need a lot of sunlight. Choose a location that gets at least six hours of direct sunlight per day. If you don’t have a sunny spot, you can use grow lights. Make sure the plants are not shaded by other trees or buildings. Rotate the plants regularly to ensure even light exposure. Optimizing sunlight exposure is essential for maximizing your yield.
Nutrient Management
Imagine you are feeding a growing child. You would want to give them a healthy diet. With all the vitamins and minerals they need. The same is true for your sativa plants. They need the right nutrients to grow and thrive. Use a good quality soil that is rich in nutrients. Add fertilizer to supplement the soil. Be careful not to over-fertilize. This can damage the plants. Monitor the plants for signs of nutrient deficiencies. Adjust the fertilizer as needed. Proper nutrient management is essential for maximizing your yield.
Summary
Knowing when your sativa outdoor buds ready harvest is key for the best quality. Look for amber trichomes and orange or brown pistils. Use sharp tools and handle the buds carefully. Dry the buds slowly in a cool, dark place. Cure them in airtight jars. Avoid common mistakes like harvesting too early or drying too fast. Maximize your yield by choosing high-yielding strains. Provide plenty of sunlight and nutrients. Following these tips will help you get the most out of your harvest. Growing and harvesting your own buds can be a rewarding experience.
Conclusion
Harvesting sativa outdoor buds is a mix of science and art. Watching the plant, checking trichomes, and feeling the buds become part of the grower’s intuition. Proper drying and curing enhance flavor and potency. Avoiding common mistakes ensures a successful harvest. The journey from seed to harvest is a rewarding experience. Knowing when sativa outdoor buds ready harvest allows growers to enjoy the fruits of their labor.
Frequently Asked Questions
Question No 1: How do I know when my sativa outdoor buds are ready to harvest?
Answer: Knowing when your sativa outdoor buds ready harvest takes careful observation. Look closely at the trichomes, those tiny, crystal-like structures on the buds. When they turn from clear to a milky white color, and then to an amber color, it’s a good sign that harvest time is near. Also, check the pistils, the little hairs on the buds. If they’ve changed from white to a reddish-brown color, that’s another indicator that your buds are ready for harvest. Don’t rush the process. Patience is key to getting the best results.
Question No 2: What tools do I need for harvesting my sativa outdoor buds?
Answer: To harvest your sativa outdoor buds, you’ll need a few essential tools. First, get a pair of sharp trimming shears or scissors to make clean cuts. You’ll also want to have some gloves to protect your hands from the sticky resin and keep your buds clean. A magnifying glass or jeweler’s loupe can help you get a close-up view of the trichomes. Finally, you’ll need containers, like clean jars or paper bags, to store the harvested buds. Having these tools ready will make the harvesting process much smoother.
Question No 3: How should I dry my sativa outdoor buds after harvesting?
Answer: Drying your sativa outdoor buds properly is crucial for preserving their quality. Find a cool, dark, and well-ventilated space with a temperature around 70°F and humidity around 50%. Hang the branches upside down on clotheslines or drying racks. Make sure the buds aren’t touching each other to allow for good air circulation. Check the buds regularly for mold. The drying process usually takes about 7 to 14 days, but the key is to be patient and let them dry slowly.
Question No 4: What is curing, and why is it important for my sativa outdoor buds?
Answer: Curing is a process that happens after drying. It helps to improve the flavor, aroma, and smoothness of your sativa outdoor buds. Place the dried buds in airtight jars, filling them about three-quarters full. Store the jars in a cool, dark place. Open the jars once a day for about 15 minutes to release moisture and prevent mold. This process, called “burping,” should continue for several weeks. Curing can take time, but it’s worth it for the best results.
Question No 5: What are some common mistakes to avoid when harvesting sativa outdoor buds?
Answer: There are several common mistakes you should avoid when harvesting your sativa outdoor buds. Harvesting too early or too late can affect the potency and quality of your buds. Drying the buds too quickly can make them harsh, while drying them too slowly can lead to mold. Skipping the curing process will result in buds that are less flavorful and smooth. Be sure to avoid these mistakes to get the best possible harvest.
Question No 6: How can I maximize the yield of my sativa outdoor buds?
Answer: To get the most out of your sativa outdoor buds ready harvest, start with high-yielding strains. Make sure your plants get plenty of sunlight, at least six hours a day. Water and fertilize them properly, and prune them to encourage bud growth. Protect your plants from pests and diseases. Harvest at the right time and dry and cure your buds carefully. Following these steps will help you maximize your yield and enjoy a bountiful harvest.
