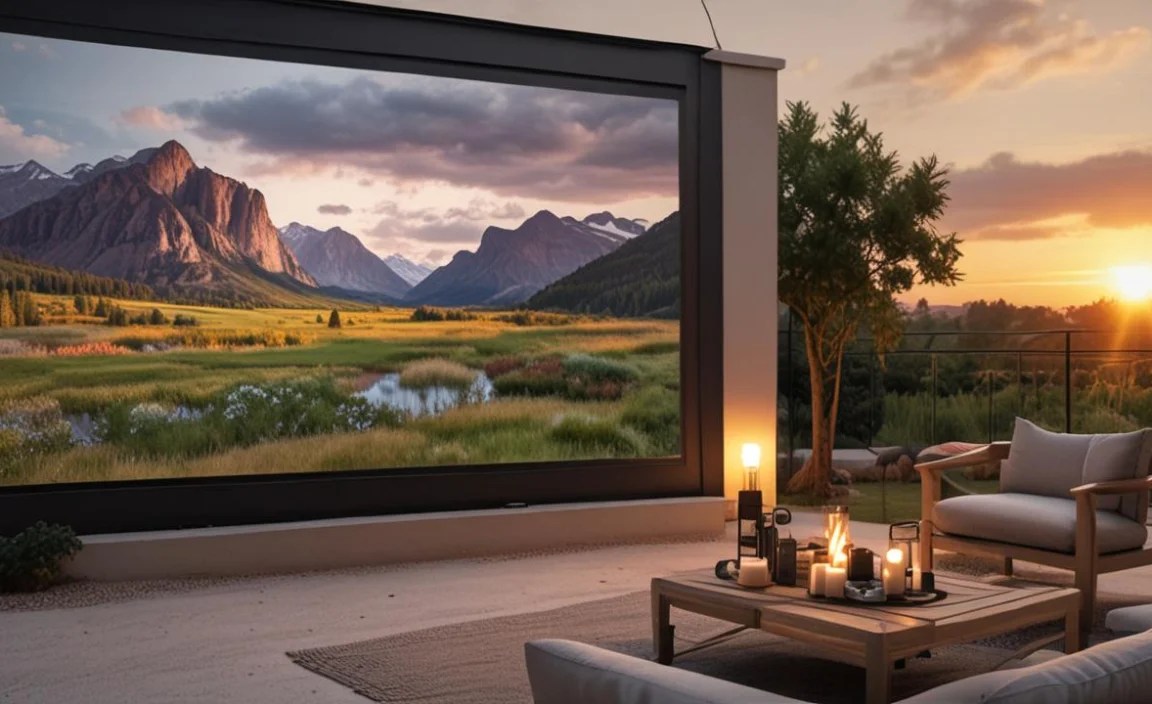
Have you ever wished you could watch movies outside? Imagine seeing your favorite films under the stars. A screen projector outdoor makes this dream possible. It brings the big screen to your backyard.
What if you could play video games on a giant screen outside? Think how much fun that would be with your friends. A screen projector outdoor lets you do just that. It turns any outdoor space into an entertainment center.
Maybe you want to host a special event. A birthday party or a neighborhood gathering. A screen projector outdoor can make it unforgettable. It adds excitement and fun for everyone. Let’s explore how to make this happen.
Key Takeaways
- Using a screen projector outdoor lets you enjoy movies and games outside.
- Consider screen size, brightness, and portability when choosing a projector.
- Setting up your outdoor movie space is easy with the right equipment.
- Proper care and storage will keep your projector working well.
- An outdoor screen projector can create amazing entertainment experiences.
Choosing the Best Screen Projector Outdoor

Selecting the right screen projector outdoor involves many factors. Brightness is very important. You need a projector that is bright enough to see in the dark. Look for high lumens. Lumens measure how much light the projector produces. A higher number means a brighter picture. Screen size also matters. Consider how many people will be watching. A larger screen is better for bigger groups. Resolution is another key factor. Higher resolution means a clearer picture. Look for at least 1080p resolution. Portability is important if you plan to move the projector. A smaller, lighter projector is easier to carry. Finally, think about the sound. Some projectors have built-in speakers. But external speakers usually provide better sound quality. Consider all these things to choose the best screen projector outdoor for your needs. Think about where you will set it up. Check the weather forecast before your outdoor movie night. And most of all, have fun with your new outdoor entertainment system.
- Check the lumens for good brightness.
- Pick the right screen size.
- Consider the projector’s resolution.
- Think about how easy it is to move.
- External speakers improve the sound.
When choosing a screen projector outdoor, read reviews. Reviews can tell you about other people’s experiences. They can help you avoid common problems. Check the projector’s lamp life. The lamp is what makes the picture. A longer lamp life means you won’t have to replace it as often. Some projectors have eco modes. Eco modes can extend the lamp life. They also save energy. Consider the projector’s throw distance. This is how far away the projector needs to be from the screen. Some projectors have a short throw distance. This means you can put them closer to the screen. This is useful if you don’t have much space. Think about the projector’s connectivity. Make sure it has the ports you need. HDMI ports are common for connecting to laptops and Blu-ray players. USB ports are useful for playing media from a flash drive. Finally, check the projector’s warranty. A good warranty can protect you if something goes wrong. Buying the right projector will make your outdoor movie nights amazing.
Fun Fact or Stat: Did you know that the first movie projector was invented in the late 1890s? It was called the Vitascope!
What is Projector Brightness?
Projector brightness is measured in lumens. Lumens tell you how bright the image will be. For outdoor use, you need a projector with high lumens. This is because outdoor environments are often brighter. Ambient light can wash out the image. A projector with 3000 lumens or more is recommended. This will ensure a clear picture even with some ambient light. Lower lumens might work for very dark environments. But it’s better to have more brightness than you need. You can always dim the projector if it’s too bright. Consider the size of your screen. A larger screen needs more lumens. This is because the light is spread over a larger area. Also, think about the color accuracy. Some projectors are brighter but have poor color accuracy. Look for a projector that balances brightness and color. This will give you the best picture quality. Brighter is better for outdoor use. A good projector will make your outdoor movies look amazing.
Do I Need a Special Screen?
Yes, a special screen can make a big difference. Outdoor screens are designed to reflect light. This makes the image brighter and clearer. A white screen is a good choice. It reflects light evenly. You can also use a gray screen. Gray screens can improve contrast. This makes the dark areas of the picture darker. Consider the size of your screen. Choose a size that is appropriate for your viewing area. A larger screen is better for bigger groups. But make sure it’s not too big. It should fit comfortably in your space. You can buy a screen or make one yourself. A DIY screen can save money. But a professionally made screen will usually look better. Think about how you will set up the screen. Some screens are freestanding. Others need to be hung up. Choose a screen that is easy to set up and take down. A good screen will enhance your outdoor movie experience.
What Resolution is Best?
Resolution refers to the number of pixels in the image. More pixels mean a sharper, clearer picture. For a screen projector outdoor, 1080p resolution is a good starting point. This is also known as Full HD. It provides a good balance of quality and price. If you want the best possible picture, consider a 4K projector. 4K projectors have four times the resolution of 1080p. They produce incredibly detailed images. However, 4K projectors are more expensive. They also require a more powerful source. You’ll need a 4K Blu-ray player or streaming device. Consider the size of your screen. A larger screen will benefit more from higher resolution. If you’re projecting onto a small screen, 1080p may be sufficient. Think about your budget. Choose the highest resolution you can afford. A good resolution will make your movies look amazing. High resolution enhances the viewing experience. Choose what is best for your specific needs. Consider the source of the media you plan to watch.
Setting Up Your Outdoor Movie Space

Setting up your screen projector outdoor space is easy and fun. First, choose a location. A flat, open area is best. Make sure there are no trees or other obstructions. Consider the distance between the projector and the screen. You’ll need enough space to project a clear image. Set up your screen. Freestanding screens are easy to move. Inflatable screens are also a good option. Hang your screen securely. You don’t want it to fall down during the movie. Place your projector on a stable surface. A table or stand works well. Connect your projector to your media source. This could be a laptop, Blu-ray player, or streaming device. Use HDMI cables for the best picture quality. Set up your sound system. External speakers will provide better sound than the projector’s built-in speakers. Test everything before the movie starts. Make sure the picture is clear and the sound is working. Provide seating for your guests. Lawn chairs, blankets, or even inflatable couches work well. Add some lighting for safety. String lights or lanterns can create a festive atmosphere. Enjoy your outdoor movie night. Proper preparation makes it fun and easy.
- Pick a flat, open location.
- Set up your screen securely.
- Place the projector on a stable surface.
- Connect your media source.
- Set up your sound system.
- Test everything beforehand.
- Provide comfy seating.
To enhance your outdoor movie experience, consider some extras. Bug spray is a must. Mosquitoes can ruin a good movie night. Provide snacks and drinks for your guests. Popcorn, candy, and soda are always popular. Consider the weather. Check the forecast before your movie night. If it’s going to rain, have a backup plan. You can move the movie indoors or reschedule for another night. Keep the noise level down. Be respectful of your neighbors. Don’t play the movie too loud. Start the movie at a reasonable time. You don’t want to keep your neighbors up too late. Clean up after the movie. Pick up any trash and put away the equipment. Proper planning ensures a fun and enjoyable experience. Invite friends and family to share the fun. Create lasting memories with outdoor movie nights. This is a great way to spend time together. Enjoying movies under the stars is a special experience.
Fun Fact or Stat: The largest outdoor movie screen ever built was over 30,000 square feet. That’s bigger than a basketball court!
What About Sound?
Sound is a very important part of the movie experience. The projector’s built-in speakers may not be enough. External speakers can greatly improve the sound quality. Consider using a portable Bluetooth speaker. These are easy to set up and move. You can also use a home theater system. This will provide even better sound. Make sure the speakers are loud enough. You want to be able to hear the movie over any background noise. Test the sound before the movie starts. Adjust the volume to a comfortable level. Think about your neighbors. Don’t play the movie too loud. Be respectful of their peace and quiet. Consider using headphones. If you want to watch a movie late at night, headphones are a good option. They will allow you to enjoy the movie without disturbing anyone. Good sound enhances the whole experience. Choose the best sound solution for your needs. External speakers can make a big difference. Enjoy clear and immersive audio with your outdoor movies. Adjust the volume to the right level.
How Far Should the Projector Be?
The distance between the projector and the screen is called the throw distance. The ideal throw distance depends on the projector. Some projectors have a short throw distance. This means they can be placed close to the screen. Others have a longer throw distance. Check the projector’s specifications. This will tell you the recommended throw distance. Measure the distance between the projector and the screen. Use a tape measure to get an accurate measurement. Adjust the projector’s position as needed. You want to fill the screen with the image. If the image is too small, move the projector closer. If the image is too big, move the projector further away. Some projectors have zoom features. These allow you to adjust the image size without moving the projector. Consider the size of your screen. A larger screen will require a longer throw distance. Proper throw distance ensures a clear image. Follow the manufacturer’s recommendations for best results. Adjust the projector position accordingly.
What About Power?
You will need a power source for your projector. An extension cord is a simple solution. Make sure the extension cord is rated for outdoor use. This will protect it from the elements. You can also use a portable power station. These are battery-powered and can provide power for several hours. This is a good option if you don’t have access to an outlet. Consider the power consumption of your projector. Some projectors use more power than others. Check the projector’s specifications. This will tell you how much power it uses. Make sure your power source can handle the projector’s power requirements. Avoid overloading circuits. This can be dangerous. Use a surge protector. This will protect your projector from power surges. A stable power source is essential for a successful movie night. Choose the right power solution for your needs. Ensure safety and reliability for your equipment. Keep extension cords out of walkways to prevent trips.
Choosing the Right Screen
Selecting the right screen is crucial for a great viewing experience. Size is the first thing to consider. Think about how many people will be watching. A larger group needs a bigger screen. Measure your space. Make sure the screen fits comfortably in your backyard. Material is also important. White screens are common and reflect light well. Gray screens can improve contrast. This makes the dark areas of the picture darker. Inflatable screens are easy to set up and take down. They are also very portable. Freestanding screens are also a good option. They are easy to move around. DIY screens can save money. You can make a screen out of a white sheet or tarp. However, a professionally made screen will usually look better. Think about the screen’s gain. Gain measures how much light the screen reflects. A higher gain screen will produce a brighter image. Consider the viewing angle. You want to be able to see the image clearly from all angles. Choose a screen that is appropriate for your viewing environment. A good screen enhances the picture quality. Choose the best screen for your needs. It will make your outdoor movie nights more enjoyable.
- Consider the screen size.
- Choose the right material.
- Think about inflatable or freestanding options.
- DIY screens can save money.
- Consider the screen’s gain.
- Check the viewing angle.
When choosing a screen, read reviews. Reviews can tell you about other people’s experiences. They can help you avoid common problems. Check the screen’s durability. You want a screen that will last for many years. Consider the screen’s portability. If you plan to move the screen often, choose a lightweight and easy-to-carry option. Think about how you will store the screen. Some screens can be folded up and stored in a small space. Others require more storage space. Consider the screen’s frame. A sturdy frame will keep the screen taut and prevent wrinkles. Choose a screen that is easy to clean. You want to be able to wipe off any dirt or dust. Finally, check the screen’s warranty. A good warranty can protect you if something goes wrong. Selecting the right screen enhances the viewing experience. Choose the best screen for your needs and budget. Proper care will keep your screen looking great for years.
Fun Fact or Stat: Some outdoor movie screens are so big that they can be seen from miles away!
DIY Screen Ideas
Making your own screen can save money. A white sheet is a simple and affordable option. Stretch the sheet tightly and secure it to a frame. You can use PVC pipes to create a frame. A white tarp is another good option. Tarps are durable and weather-resistant. Paint the tarp with white paint for a brighter image. A smooth wall can also be used as a screen. Just make sure the wall is clean and free of imperfections. You can also use a projector screen paint. This paint is specially designed to reflect light. It will give you a brighter and clearer image. Consider the size of your screen. Measure your space and choose a size that is appropriate for your viewing area. Make sure the screen is smooth and wrinkle-free. Wrinkles can distort the image. Secure the screen tightly to the frame. This will prevent it from flapping in the wind. DIY screens are a great way to save money. Get creative and have fun. A homemade screen can be just as good as a store-bought one. Ensure the surface is smooth and clean.
Screen Size Considerations
Choosing the right screen size is important. Consider the size of your viewing area. A larger space can accommodate a larger screen. Think about how many people will be watching. A larger group needs a bigger screen. Measure the distance between the screen and the seating area. This will help you determine the ideal screen size. A good rule of thumb is to multiply the viewing distance by 0.84. This will give you the diagonal screen size. For example, if the viewing distance is 10 feet, the ideal screen size is 8.4 feet. Consider the resolution of your projector. Higher resolution projectors can handle larger screens without losing image quality. Think about your budget. Larger screens are more expensive than smaller screens. Choose a screen size that is appropriate for your needs and budget. A properly sized screen enhances the viewing experience. It makes the movie more immersive and enjoyable. Ensure that everyone can see the screen clearly. Choose the best screen size for your space and budget.
Screen Material Types
The screen material affects the image quality. White screens are the most common type. They reflect light evenly and produce a bright image. Gray screens can improve contrast. This makes the dark areas of the picture darker. Silver screens are often used for 3D movies. They reflect more light than white or gray screens. Black screens absorb light. This can improve the perceived contrast. However, black screens can also make the image dimmer. Consider the screen’s gain. Gain measures how much light the screen reflects. A higher gain screen will produce a brighter image. Think about the viewing angle. You want to be able to see the image clearly from all angles. Some screen materials have a wider viewing angle than others. Choose a screen material that is appropriate for your viewing environment. Consider the ambient light. If there is a lot of ambient light, choose a screen with higher gain. The right screen material improves image quality. Choose what is best for your specific needs.
Tips for a Great Outdoor Movie Night

Planning is key for a great screen projector outdoor movie night. Check the weather forecast. Make sure it’s not going to rain. Choose a location that is sheltered from the wind. Wind can make it difficult to see the screen. Set up your equipment in advance. This will give you time to troubleshoot any problems. Test the projector and screen before the movie starts. Make sure everything is working properly. Provide comfortable seating for your guests. Lawn chairs, blankets, or inflatable couches work well. Offer snacks and drinks. Popcorn, candy, and soda are always popular. Consider the time of day. Start the movie when it’s dark enough to see the screen. Turn off any outdoor lights. This will improve the picture quality. Provide bug spray for your guests. Mosquitoes can ruin a good movie night. Keep the noise level down. Be respectful of your neighbors. Clean up after the movie. Pick up any trash and put away the equipment. Proper planning ensures a fun and enjoyable experience. Prepare for a night of outdoor fun. Share the joy of movies under the stars.
- Check the weather.
- Choose a sheltered location.
- Set up equipment in advance.
- Test the projector and screen.
- Provide comfy seating.
- Offer snacks and drinks.
- Turn off outdoor lights.
To make your outdoor movie night even more special, consider some extras. Theme your movie night. Choose a movie and decorate your backyard accordingly. Create a concession stand. Offer a variety of snacks and drinks. Set up a photo booth. Let your guests take pictures with movie-themed props. Play some music before the movie starts. This will create a festive atmosphere. Hand out party favors. Give your guests something to take home with them. Consider a projector screen with a stand. This makes it easy to move the screen around. Bring extra blankets. This will keep your guests warm on cool nights. Don’t forget the remote control. You’ll need it to pause, rewind, and fast-forward the movie. Make your movie night unforgettable. Add special touches and personal flair. Enjoy the magic of cinema under the open sky. These extras will enhance the fun and excitement.
Fun Fact or Stat: The most popular movie snack is popcorn. People eat billions of quarts of popcorn every year!
Dealing with Bugs
Bugs can ruin an outdoor movie night. Mosquitoes are especially annoying. Use bug spray to protect yourself and your guests. Citronella candles can also help repel mosquitoes. Place them around the viewing area. Consider using a mosquito repellent device. These devices emit a sound that repels mosquitoes. Wear long sleeves and pants. This will reduce the amount of exposed skin. Avoid wearing dark colors. Mosquitoes are attracted to dark colors. Set up a fan. The breeze from the fan will help keep mosquitoes away. Clean up any standing water. Mosquitoes breed in standing water. Avoid using scented lotions and perfumes. Mosquitoes are attracted to scents. Be prepared to fight off bugs. This will help ensure a comfortable movie night. Protect yourself and your guests from pests. Enjoy your movie without the annoyance of insects. Keep bugs away with these simple strategies.
Keeping the Noise Down
It’s important to be respectful of your neighbors. Keep the volume at a reasonable level. Avoid playing the movie too loud. Consider using headphones. This will allow you to enjoy the movie without disturbing anyone. Place the speakers away from your neighbor’s property. This will reduce the amount of noise that carries over. Talk to your neighbors in advance. Let them know you’re planning a movie night. This will give them a heads-up. Avoid starting the movie too late. Start the movie at a reasonable hour. End the movie at a reasonable hour. Turn off the sound system when the movie is over. Clean up any trash and debris. This will show your neighbors that you care about their property. Being considerate of your neighbors ensures a peaceful movie night. Respect their peace and quiet. Enjoy your movie without causing any disturbance. Keep the volume at a comfortable level.
Food and Drink Ideas
Providing snacks and drinks is a must. Popcorn is a classic movie snack. Offer a variety of toppings. Candy is another popular choice. Chocolate bars, gummy bears, and licorice are all good options. Soda is a refreshing drink. Offer a variety of flavors. Water is also important to have on hand. Keep your guests hydrated. Consider serving themed snacks. If you’re watching a superhero movie, serve superhero-themed snacks. Set up a concession stand. This will make it easy for your guests to grab snacks and drinks. Use disposable cups and plates. This will make cleanup easier. Keep the food and drinks cold. Use coolers to keep drinks cold. Serve ice cream or popsicles. These are perfect for a hot summer night. Offer a variety of options. This will ensure that everyone has something to enjoy. Satisfy your guests’ cravings with tasty treats. Enjoy your movie with delicious food and drinks. Provide a variety of options for everyone.
Taking Care of Your Projector

Proper care is essential for your screen projector outdoor. Clean the lens regularly. Use a soft, lint-free cloth. Dust can accumulate on the lens and affect the image quality. Store the projector in a cool, dry place. Avoid exposing the projector to extreme temperatures. Protect the projector from moisture. Moisture can damage the internal components. Handle the projector gently. Avoid dropping or bumping it. Use a surge protector. This will protect the projector from power surges. Unplug the projector when it’s not in use. This will save energy and prolong the life of the lamp. Replace the lamp when it gets dim. The lamp is the light source for the projector. A dim lamp will produce a poor image. Follow the manufacturer’s instructions. This will help you keep your projector in good condition. Proper care extends the life of your projector. Enjoy years of outdoor movie nights with proper maintenance. Protect your investment with care and attention.
- Clean the lens regularly.
- Store in a cool, dry place.
- Protect from moisture.
- Handle gently.
- Use a surge protector.
- Unplug when not in use.
- Replace the lamp when needed.
To keep your projector working well, consider these tips. Check the air filter regularly. A dirty air filter can cause the projector to overheat. Clean the air filter with a vacuum cleaner. Avoid blocking the air vents. The air vents allow the projector to cool down. Keep the projector away from dust and dirt. Dust and dirt can damage the internal components. Use a carrying case. This will protect the projector when you’re transporting it. Avoid using the projector in direct sunlight. Sunlight can damage the lens. Don’t overload the power outlet. This can cause a fire. Read the owner’s manual carefully. The owner’s manual contains important information about how to care for your projector. These tips will help you keep your projector in good condition. Proper maintenance ensures years of reliable performance. Protect your investment with regular care and attention. Extend the life of your projector with these simple steps.
Fun Fact or Stat: Projector lamps can last for thousands of hours. Some lamps can last for up to 10,000 hours!
Cleaning the Projector Lens
Cleaning the lens is important. Dust and dirt can affect image quality. Turn off the projector. Let it cool down before cleaning. Use a soft, lint-free cloth. Microfiber cloths are a good choice. Gently wipe the lens. Avoid using excessive pressure. If there is stubborn dirt, use a lens cleaning solution. Apply the solution to the cloth, not directly to the lens. Wipe the lens in a circular motion. Avoid using paper towels or tissues. These can scratch the lens. Inspect the lens for streaks or smudges. If there are any streaks or smudges, repeat the cleaning process. Clean the lens regularly. This will help maintain image quality. A clean lens ensures clear and crisp images. Follow these steps for optimal cleaning results. Keep your projector lens clean for the best picture.
Storing Your Projector Properly
Proper storage protects your projector. Store the projector in a cool, dry place. Avoid exposing it to extreme temperatures. Use a carrying case. This will protect the projector from dust and damage. Remove the batteries from the remote control. This will prevent corrosion. Unplug the projector from the power outlet. This will save energy and protect it from power surges. Clean the projector before storing it. This will prevent dust and dirt from accumulating. Wrap the power cord neatly. This will prevent it from getting tangled. Store the projector in a safe place. Avoid storing it where it could be knocked over. Follow these tips for proper storage. This will help keep your projector in good condition. Protect your investment with careful storage. Store your projector safely for long-lasting performance.
Replacing the Projector Lamp
The projector lamp will eventually need to be replaced. When the lamp gets dim, it’s time to replace it. Check the projector’s manual. This will tell you the correct lamp type. Purchase a new lamp from a reputable source. Avoid buying cheap, generic lamps. These may not be compatible with your projector. Turn off the projector. Let it cool down completely before replacing the lamp. Follow the instructions in the projector’s manual. This will guide you through the replacement process. Be careful when handling the lamp. It can be fragile. Dispose of the old lamp properly. Some lamps contain mercury. Recycle the old lamp if possible. Reset the lamp timer. This will tell the projector how much longer the new lamp will last. Replacing the lamp is essential for maintaining image quality. Follow these steps for a successful replacement. Keep your projector working well with a new lamp.
Troubleshooting Common Issues
Sometimes, things go wrong with your screen projector outdoor. No picture? Check the power cord. Make sure it’s plugged in. Check the input source. Make sure it’s set to the correct source. Check the lamp. Make sure it’s working. The picture is blurry? Adjust the focus. Clean the lens. The picture is too dark? Increase the brightness. The picture is distorted? Adjust the keystone correction. There’s no sound? Check the volume. Check the audio cables. Make sure they’re connected properly. The projector is overheating? Clean the air filter. Make sure the air vents are not blocked. The remote control isn’t working? Replace the batteries. Make sure the remote control is pointed at the projector. Consult the owner’s manual for more troubleshooting tips. These tips can help you solve common problems. Troubleshoot issues quickly and easily. Enjoy your outdoor movie night without interruptions.
- Check the power cord.
- Check the input source.
- Adjust the focus.
- Increase the brightness.
- Check the audio cables.
- Clean the air filter.
- Replace the batteries.
If you’re still having problems, contact the manufacturer. They may be able to provide further assistance. Check the warranty. Your projector may be covered under warranty. Don’t attempt to repair the projector yourself. This could void the warranty. Take the projector to a qualified repair technician. They can diagnose and repair the problem. Be patient. Troubleshooting can take time. Don’t give up. With a little effort, you can usually solve the problem. Remember to check all connections. Ensure everything is plugged in correctly. Consult the user manual for specific guidance. These steps will help you resolve common issues. Enjoy a hassle-free movie night with proper troubleshooting. Get your projector working perfectly again. These tips can save you time and frustration.
Fun Fact or Stat: Many projector problems are caused by simple things like loose cables or incorrect settings.
Fixing a Blurry Picture
A blurry picture is a common problem. Adjust the focus. Use the focus ring on the projector. Clean the lens. Dust and dirt can affect image quality. Check the screen. Make sure it’s smooth and wrinkle-free. Adjust the projector’s position. Make sure it’s perpendicular to the screen. Check the resolution. Make sure the projector is set to the correct resolution. Check the input source. Make sure it’s set to the correct source. Use a high-quality video cable. A poor-quality cable can cause a blurry picture. Make sure the projector is not overheating. Overheating can cause the picture to become blurry. Follow these steps to fix a blurry picture. Enjoy a clear and crisp image. Troubleshoot the problem systematically. Adjust settings carefully for optimal results.
Solving Sound Problems
Sound problems can be frustrating. Check the volume. Make sure the volume is turned up. Check the audio cables. Make sure they’re connected properly. Check the input source. Make sure it’s set to the correct source. Check the speakers. Make sure they’re working. Use external speakers. The projector’s built-in speakers may not be adequate. Adjust the audio settings. Make sure the audio settings are correct. Check the mute button. Make sure the mute button is not activated. Use a high-quality audio cable. A poor-quality cable can cause sound problems. Make sure the projector is not overheating. Overheating can cause sound problems. Follow these steps to solve sound problems. Enjoy clear and crisp audio. Troubleshoot the problem methodically. Adjust settings carefully for optimal performance.
Dealing with Overheating
Overheating can damage your projector. Clean the air filter. A dirty air filter can cause the projector to overheat. Make sure the air vents are not blocked. The air vents allow the projector to cool down. Use the projector in a well-ventilated area. Avoid using the projector in direct sunlight. Direct sunlight can cause the projector to overheat. Turn off the projector when it’s not in use. This will allow it to cool down. Use a cooling pad. A cooling pad can help keep the projector cool. Check the fan. Make sure the fan is working properly. Avoid using the projector for extended periods of time. Give it a break every few hours. Follow these steps to deal with overheating. Protect your projector from damage. Ensure proper ventilation for optimal performance.
| Issue | Possible Cause | Solution |
|---|---|---|
| No Picture | Power cord not plugged in | Check the power cord |
| Blurry Picture | Focus needs adjusting | Adjust the focus ring |
| No Sound | Volume is too low | Turn up the volume |
| Overheating | Air filter is dirty | Clean the air filter |
| Remote Not Working | Batteries are dead | Replace the batteries |
Summary
A screen projector outdoor lets you enjoy movies and games outside. Choosing the right projector involves considering brightness, screen size, and resolution. Setting up your outdoor movie space is easy. Pick a location, set up the screen, and connect your media source. Proper care and storage will keep your projector working well. Regular cleaning and maintenance are important. A good screen enhances the viewing experience. Consider size, material, and gain when choosing a screen. Plan your movie night carefully. Check the weather, provide seating, and offer snacks. Troubleshooting common issues can help you solve problems. Check connections, adjust settings, and consult the manual. With proper planning and care, you can create amazing entertainment experiences.
Conclusion
Using a screen projector outdoor can transform your backyard. You can create a fun and exciting space. Enjoy movies, games, and more under the stars. Remember to choose the right equipment. Set it up properly and take good care of it. With a little planning, you can enjoy countless outdoor movie nights. Make lasting memories with friends and family. An outdoor projector can provide entertainment for everyone.
Frequently Asked Questions
Question No 1: What is the best brightness for an outdoor projector?
Answer: For outdoor use, you need a projector with high brightness. Look for at least 3000 lumens. This will ensure a clear picture even with some ambient light. Lower lumens might work for very dark environments. But it’s better to have more brightness than you need. A projector with higher lumens will give you a better viewing experience. You can always dim the projector if it’s too bright. Consider the size of your screen. A larger screen needs more lumens. This is because the light is spread over a larger area. A brighter projector will make your outdoor movies look amazing, especially when using a screen projector outdoor setup.
Question No 2: Do I need a special screen for an outdoor projector?
Answer: Yes, a special screen can make a big difference. Outdoor screens are designed to reflect light. This makes the image brighter and clearer. A white screen is a good choice. It reflects light evenly. You can also use a gray screen. Gray screens can improve contrast. This makes the dark areas of the picture darker. Consider the size of your screen. Choose a size that is appropriate for your viewing area. A larger screen is better for bigger groups. DIY screens are an option. But a professionally made screen will usually look better. Using the right screen with your screen projector outdoor can significantly enhance your viewing experience.
Question No 3: How far should the projector be from the screen?
Answer: The distance between the projector and the screen is called the throw distance. The ideal throw distance depends on the projector. Some projectors have a short throw distance. This means they can be placed close to the screen. Others have a longer throw distance. Check the projector’s specifications. This will tell you the recommended throw distance. Measure the distance between the projector and the screen. Use a tape measure to get an accurate measurement. Adjust the projector’s position as needed. You want to fill the screen with the image. Understanding throw distance is crucial for setting up your screen projector outdoor properly.
Question No 4: What resolution is best for an outdoor projector?
Answer: Resolution refers to the number of pixels in the image. More pixels mean a sharper, clearer picture. For a screen projector outdoor, 1080p resolution is a good starting point. This is also known as Full HD. It provides a good balance of quality and price. If you want the best possible picture, consider a 4K projector. 4K projectors have four times the resolution of 1080p. They produce incredibly detailed images. However, 4K projectors are more expensive. They also require a more powerful source. Choose the highest resolution you can afford for your outdoor viewing needs.
