Have you ever wondered how plants know when to grow? Do you know how farmers know when to water crops? They often use tools. One such tool is a soil moisture sensor. This {soil moisture sensor guide} will help you learn all about them. It will show you how they work and why they are important. Let’s explore the world of sensors!
Sensors help us understand the world. They tell us things we cannot easily see. This {soil moisture sensor guide} will explain how these sensors help plants. It will help farmers grow more food. It may even help you with your garden.
Why is knowing about soil moisture important? Plants need water to live. Too much or too little water can hurt them. Soil moisture sensors help us get it just right. This {soil moisture sensor guide} will teach you how.
Key Takeaways
- Using this {soil moisture sensor guide}, understand how sensors help manage water for plants.
- Soil moisture sensors measure the amount of water in the ground.
- These sensors help farmers use water more wisely and save money.
- Different types of sensors work in various ways to read soil moisture.
- Knowing about sensors can help you grow healthier plants at home.
Understanding the Basics of a Soil Moisture Sensor Guide

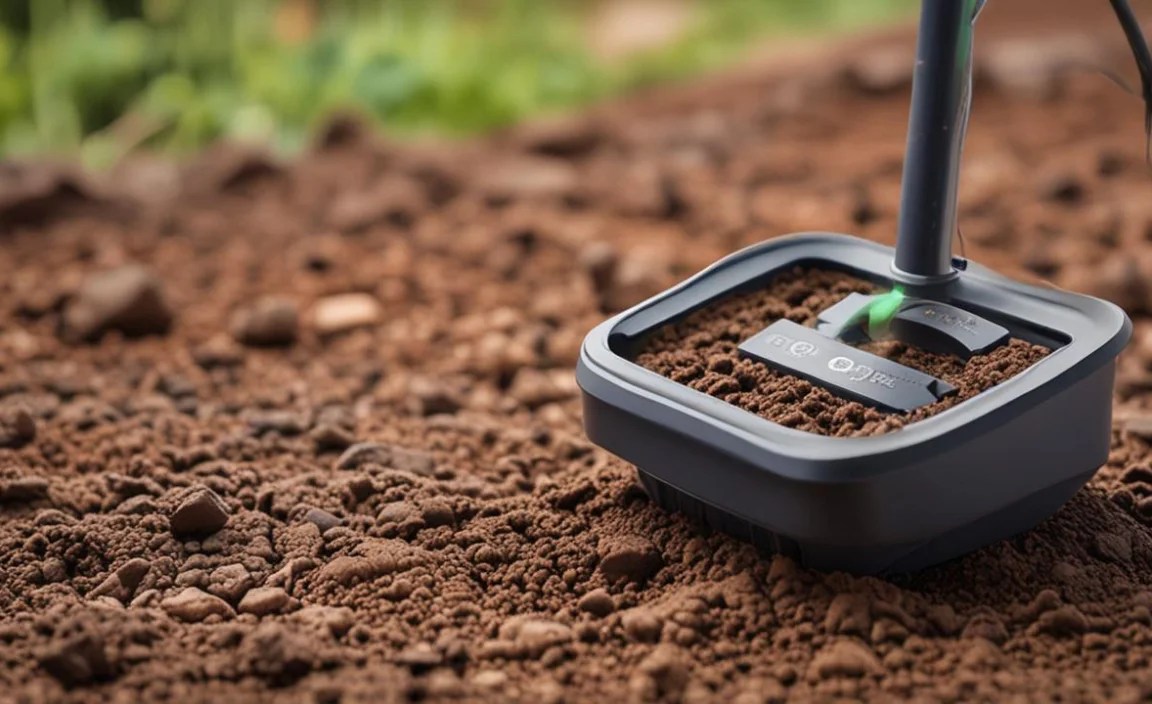
What exactly is a soil moisture sensor? It is a tool that measures the amount of water in the soil. Think of it like a rain gauge, but for the ground. These sensors tell us how wet or dry the soil is. This information is very important for farmers and gardeners. They need to know if their plants have enough water. Too much water can drown the roots. Too little water can cause the plants to dry out. A good {soil moisture sensor guide} will teach you how to avoid these problems. The sensor sends the information to a device. This device shows the reading. People can then decide if they need to water the plants. This helps save water and grow healthy plants.
- Sensors measure the water content in soil.
- They help prevent over or under-watering.
- Farmers use them to improve crop growth.
- Gardeners use them to keep plants healthy.
- Sensors save water by precise irrigation.
Soil moisture sensors are not just for big farms. You can use them in your own garden. Imagine you have a tomato plant. You are not sure if it needs water. You can stick a sensor in the soil. It will tell you if the soil is wet enough. If not, you know to water the plant. This is especially helpful in the summer. The sun can dry out the soil quickly. Sensors help you keep track of the moisture. This {soil moisture sensor guide} is your first step. They also help you learn about your plants’ needs. Over time, you will become a better gardener. You will know exactly when to water.
Why is Soil Moisture Important?
Why do we care about soil moisture anyway? Plants need water to survive. Just like us, they get thirsty. Water helps them grow big and strong. It carries nutrients from the soil to the plant. Without enough water, plants will wilt. They will turn brown and eventually die. Too much water is also bad. It can cause the roots to rot. This means they cannot take up water or nutrients. Soil moisture sensors help us find the perfect balance. They tell us exactly how much water is in the soil. This is very important for growing healthy plants. This {soil moisture sensor guide} explains the Goldilocks principle of plant care: not too much, not too little, but just right!
How Do Sensors Help Plants?
How do soil moisture sensors actually help plants? They give us information. With this information, we can make better decisions about watering. Let’s say a sensor tells you the soil is very dry. You know it is time to water the plants. If the sensor says the soil is already wet, you can wait. This prevents overwatering. This is especially important for young plants. Their roots are sensitive. Overwatering can kill them easily. Sensors also help save water. You only water when needed. This is good for the environment. It also saves you money on your water bill. Following this {soil moisture sensor guide} ensures efficiency and plant health.
What Happens Without Sensors?
What would happen if we didn’t have soil moisture sensors? We would have to guess when to water. This could lead to problems. We might water too much or too little. Farmers have used experience for centuries. They can often tell by feeling the soil. But sensors are more accurate. They give us a precise measurement. This is especially helpful in changing weather conditions. Sometimes it rains a lot. Other times it is very dry. Sensors help us adjust our watering schedule accordingly. This {soil moisture sensor guide} highlights the importance of precision in modern agriculture. Without sensors, we risk wasting water and harming plants.
Fun Fact or Stat: Did you know that using soil moisture sensors can reduce water usage in farming by up to 30%? This helps conserve water and saves farmers money!
Types of Soil Moisture Sensors: Choosing the Right One

There are different types of soil moisture sensors. Each type works in a slightly different way. Some measure the electrical resistance of the soil. Others measure the dielectric constant. Electrical resistance tells us how easily electricity flows through the soil. Water helps electricity flow. So, wetter soil has lower resistance. The dielectric constant measures how well the soil stores electrical energy. Water stores energy well. So, wetter soil has a higher dielectric constant. This {soil moisture sensor guide} will help you understand the options. The best type of sensor depends on your needs. Consider the type of soil you have. Also, think about the size of your garden or farm.
- Capacitive sensors measure dielectric constant.
- Resistive sensors measure electrical resistance.
- Tensiometers measure water tension in soil.
- Time-domain reflectometry (TDR) sensors are accurate.
- Frequency-domain reflectometry (FDR) sensors are efficient.
- Choose based on soil type and area size.
Choosing the right sensor can be confusing. Think about how often you need to take readings. Some sensors are meant to stay in the ground all the time. They send data to a computer. Others are handheld. You stick them in the soil when you want to check the moisture. Handheld sensors are good for small gardens. Permanent sensors are better for large farms. Also, think about the cost. Some sensors are more expensive than others. This {soil moisture sensor guide} helps you weigh the pros and cons. The more expensive sensors are often more accurate. They may also last longer. Read reviews and compare different models. This will help you make the best choice.
| Sensor Type | How It Works | Pros | Cons |
|---|---|---|---|
| Capacitive | Measures dielectric constant | Low cost, durable | Less accurate in some soils |
| Resistive | Measures electrical resistance | Simple, inexpensive | Can corrode over time |
| Tensiometer | Measures water tension | Direct measurement | Requires maintenance |
| TDR/FDR | Measures wave reflection | Highly accurate | More expensive |
What is a Capacitive Sensor?
Have you ever heard of a capacitive sensor? It is a type of soil moisture sensor. It measures the dielectric constant of the soil. This might sound complicated, but it is not. The dielectric constant is how well something stores electrical energy. Water stores electrical energy well. So, wetter soil has a higher dielectric constant. Capacitive sensors are popular. They are relatively inexpensive. They are also durable. This means they can last a long time. They don’t corrode easily. This {soil moisture sensor guide} recommends them for general use. However, they may not be as accurate as other types of sensors in certain soils.
How Do Resistive Sensors Work?
Resistive sensors are another common type. They measure the electrical resistance of the soil. This is how easily electricity flows through the soil. Water helps electricity flow. So, wetter soil has lower resistance. These sensors are simple and inexpensive. They are easy to use. You can find them at most garden stores. This {soil moisture sensor guide} notes their simplicity. However, they can corrode over time. This means they might not last as long as capacitive sensors. The metal parts can rust. This can affect their accuracy. You might need to replace them more often.
What About Tensiometers?
Tensiometers measure the water tension in the soil. Water tension is how tightly the water is held by the soil. Plants have to work harder to get water from soil with high tension. Tensiometers give a direct measurement of this tension. This {soil moisture sensor guide} highlights their accuracy. They are useful for understanding how easily plants can access water. However, they require more maintenance. You need to fill them with water regularly. They can also be more expensive than other types of sensors.
Fun Fact or Stat: The most accurate soil moisture sensors, TDR and FDR types, are used in scientific research and precision agriculture.
Installing Your Soil Moisture Sensor: A Step-by-Step Guide
Now that you know about sensors, how do you install one? Installing a soil moisture sensor is usually easy. First, choose the right location. Pick a spot that is representative of your garden or field. You want the sensor to measure the average moisture level. Avoid spots that are always wet or dry. Next, dig a small hole. The hole should be deep enough to bury the sensor. Follow the instructions that came with your sensor. Some sensors need to be placed at a specific depth. Be careful not to damage the sensor when you bury it. Once the sensor is in place, connect it to a device. This could be a display screen or a computer. This {soil moisture sensor guide} emphasizes careful installation.
- Choose a representative location for the sensor.
- Dig a hole deep enough to bury the sensor.
- Follow the manufacturer’s instructions carefully.
- Connect the sensor to a display or computer.
- Calibrate the sensor for accurate readings.
- Protect the sensor from extreme weather.
After installing the sensor, you may need to calibrate it. Calibration means making sure the sensor is giving accurate readings. Some sensors come pre-calibrated. Others require you to do it yourself. The instructions will tell you how. This usually involves comparing the sensor reading to a known moisture level. You can use a soil sample that you have dried in an oven. Or, you can use a commercially available calibration solution. This {soil moisture sensor guide} stresses the importance of calibration. Accurate readings are essential for making good watering decisions. Finally, protect the sensor from extreme weather. Some sensors are sensitive to direct sunlight or freezing temperatures. You may need to cover them or bring them inside during harsh weather.
Choosing the Right Location
Where should you put your soil moisture sensor? The location is very important. You want to choose a spot that represents the average moisture level. Avoid areas that are always wet, like near a sprinkler. Also, avoid areas that are always dry, like under a tree. A good spot is in the middle of your garden bed. Or, in a typical area of your field. This {soil moisture sensor guide} advises careful selection. Think about the plants you are trying to monitor. Place the sensor near their roots. This will give you the most accurate reading of the moisture they are experiencing.
Burying the Sensor Correctly
How deep should you bury the soil moisture sensor? This depends on the type of plants you are growing. For shallow-rooted plants, like lettuce, bury the sensor shallowly. For deep-rooted plants, like tomatoes, bury it deeper. The sensor should be near the roots. This is where the plants are taking up water. Follow the instructions that came with your sensor. They will tell you the recommended depth. Be careful not to damage the sensor when you bury it. Gently pack the soil around it. This {soil moisture sensor guide} reminds you to be gentle.
Calibrating for Accuracy
Why is calibration so important? Calibration ensures that your soil moisture sensor is giving accurate readings. Over time, sensors can drift. This means their readings become less accurate. Calibration corrects for this drift. It ensures that you are making informed watering decisions. Follow the instructions that came with your sensor. They will tell you how to calibrate it. This {soil moisture sensor guide} considers calibration essential. It may involve comparing the sensor reading to a known moisture level.
Fun Fact or Stat: Proper installation and calibration can increase the accuracy of soil moisture sensors by up to 20%!
Interpreting Soil Moisture Sensor Readings: What Do the Numbers Mean?

What do the numbers on your soil moisture sensor mean? The readings can vary depending on the type of sensor. Some sensors give a reading from 0 to 100. Zero means the soil is completely dry. One hundred means the soil is completely saturated. Other sensors give a reading in millibars or kilopascals. These units measure the water tension in the soil. Higher numbers mean the soil is drier. You need to understand what the readings mean for your specific sensor. This {soil moisture sensor guide} will help you decode the numbers. Also, you need to know what moisture level is ideal for your plants. Different plants have different water needs.
- Understand the sensor’s output scale (0-100, millibars, etc.).
- Know the ideal moisture levels for your plants.
- Consider the soil type when interpreting readings.
- Track readings over time to see trends.
- Adjust watering based on sensor data.
Interpreting the readings takes some practice. Start by tracking the readings over time. See how they change after you water. Also, see how they change during different weather conditions. Pay attention to your plants. Are they wilting? Are their leaves turning yellow? These are signs that they might need more or less water. This {soil moisture sensor guide} advises careful observation. Over time, you will learn to correlate the sensor readings with the health of your plants. You will become a better gardener or farmer. You will be able to make informed decisions about watering.
Understanding the Scale
Does your soil moisture sensor use a scale of 0 to 100? Or does it use millibars? Knowing the scale is the first step. A scale of 0 to 100 is simple. Zero means dry, and 100 means saturated. Millibars measure water tension. Higher millibar readings mean drier soil. This {soil moisture sensor guide} clarifies scale interpretation. Read the sensor’s manual. It will explain the scale it uses. Make sure you understand the units. This will help you interpret the readings correctly.
Matching Readings to Plant Needs
What moisture level do your plants need? Different plants have different needs. Some plants like dry soil. Others like wet soil. Research the water needs of your plants. This {soil moisture sensor guide} encourages research. For example, succulents like dry soil. They store water in their leaves. Overwatering can kill them. Tomatoes, on the other hand, need more water. They like the soil to be consistently moist. Use your sensor to monitor the moisture level. Adjust your watering accordingly.
Considering Soil Type
Does your soil type affect the readings? Yes, it does. Sandy soil drains quickly. It will have lower moisture readings. Clay soil holds water longer. It will have higher moisture readings. This {soil moisture sensor guide} considers soil type important. Even if the moisture reading is the same, the plants might be experiencing different conditions. Sandy soil might feel drier to the plants. Clay soil might feel wetter. Consider your soil type when interpreting the readings.
Fun Fact or Stat: Soil type can affect moisture sensor readings by as much as 15-20%, highlighting the importance of considering soil composition!
Troubleshooting Common Issues with Your Soil Moisture Sensor Guide

Sometimes, things can go wrong with your soil moisture sensor. You might get inaccurate readings. The sensor might stop working altogether. Don’t worry, there are things you can do. First, check the batteries. A low battery can cause inaccurate readings. Replace the batteries if needed. Next, check the wiring. Make sure all the connections are secure. Loose wires can also cause problems. If the sensor is still not working, try cleaning it. Soil and debris can build up on the sensor. This can interfere with its readings. Gently wipe the sensor with a damp cloth. This {soil moisture sensor guide} offers practical troubleshooting tips.
- Check and replace the batteries regularly.
- Ensure all wiring connections are secure.
- Clean the sensor to remove soil and debris.
- Calibrate the sensor periodically for accuracy.
- Check for physical damage to the sensor.
- Consult the manufacturer’s manual for specific issues.
If you have tried all of these things and the sensor is still not working, consult the manufacturer’s manual. The manual may have specific troubleshooting tips for your model. You can also contact the manufacturer’s customer support. They may be able to help you diagnose the problem. Sometimes, the sensor is simply defective. In this case, you may need to replace it. This {soil moisture sensor guide} prepares you for common issues. Regular maintenance can help prevent problems. Clean the sensor regularly. Check the batteries and wiring. Store the sensor properly when not in use.
Checking the Batteries and Wiring
Are the batteries fresh? Are the wires connected? These are the first things to check. Low batteries can cause all sorts of problems. They can lead to inaccurate readings. They can even cause the sensor to stop working. Replace the batteries with fresh ones. Make sure you are using the correct type of battery. This {soil moisture sensor guide} emphasizes basic checks. Check the wiring connections. Make sure they are secure. Loose wires can also cause problems.
Cleaning the Sensor
Is your soil moisture sensor dirty? Soil and debris can build up on the sensor. This can interfere with its readings. Clean the sensor regularly. Gently wipe it with a damp cloth. Be careful not to damage the sensor. Do not use harsh chemicals or abrasive cleaners. This {soil moisture sensor guide} advises gentle cleaning. Regular cleaning can help ensure accurate readings.
When to Replace the Sensor
When is it time to replace your soil moisture sensor? If you have tried everything and the sensor is still not working, it might be time to replace it. Sensors can wear out over time. They can become less accurate. If the sensor is giving consistently inaccurate readings, even after calibration, it is probably time to replace it. This {soil moisture sensor guide} helps you decide. Also, if the sensor is physically damaged, it might be time to replace it. Cracks or breaks can affect its accuracy.
Fun Fact or Stat: Regularly cleaning your soil moisture sensor can extend its lifespan by up to 25%, saving you money in the long run!
Advanced Uses: Integrating Soil Moisture Sensors With Smart Systems
Soil moisture sensors can be integrated with smart systems. This means they can be connected to computers and other devices. This allows for automated irrigation. The sensor monitors the soil moisture. When the soil gets too dry, the system automatically turns on the water. When the soil is wet enough, the system turns off the water. This is a very efficient way to water plants. It saves water and ensures that plants always have the right amount of moisture. This {soil moisture sensor guide} explores advanced applications. Smart systems can also send you alerts. You can receive a text message or email when the soil is too dry. This allows you to take action even when you are not at home.
- Automate irrigation based on sensor readings.
- Receive alerts when soil moisture levels change.
- Integrate sensors with weather forecasts.
- Use data to optimize watering schedules.
- Control irrigation remotely via smartphone.
Integrating sensors with weather forecasts is another advanced use. The system can use weather data to predict when the soil will dry out. It can then adjust the watering schedule accordingly. For example, if the forecast calls for rain, the system might delay watering. This prevents overwatering. This {soil moisture sensor guide} encourages smart integration. Smart systems can also track data over time. This allows you to see trends in soil moisture. You can use this information to optimize your watering schedule. You can also identify areas that need more or less water.
Automated Irrigation Systems
What is an automated irrigation system? It is a system that automatically waters your plants. It uses soil moisture sensors to determine when to water. When the soil gets too dry, the system turns on the water. When the soil is wet enough, it turns off the water. This {soil moisture sensor guide} introduces automation. This is a very efficient way to water plants. It saves water and ensures that your plants always have the right amount of moisture.
Remote Monitoring and Control
Can you control your watering system from your phone? Yes, you can. Many smart systems allow for remote monitoring and control. You can check the soil moisture level from anywhere. You can also turn the water on or off remotely. This is very convenient. It allows you to manage your garden or farm from anywhere in the world. This {soil moisture sensor guide} highlights remote capabilities.
Data Analysis and Optimization
How can you use data to improve your watering schedule? Smart systems track data over time. They record the soil moisture level at different times. You can use this data to see trends. You can identify areas that need more or less water. This {soil moisture sensor guide} emphasizes data use. You can also optimize your watering schedule based on the data. You can adjust the timing and duration of watering. This will help you save water and grow healthier plants.
Fun Fact or Stat: Integrating soil moisture sensors with smart irrigation systems can reduce water consumption by up to 50%!
Summary
This {soil moisture sensor guide} has shown you the importance of soil moisture sensors. They help us measure the amount of water in the soil. This is important for growing healthy plants. Too much or too little water can harm plants. Sensors help us find the perfect balance. There are different types of sensors. Each type works in a slightly different way. You need to choose the right sensor for your needs. You also need to install and calibrate it correctly. Interpreting the sensor readings takes some practice. You need to understand the scale and know the water needs of your plants.
Sensors can also be integrated with smart systems. This allows for automated irrigation. The system automatically waters your plants when they need it. This is a very efficient way to water. It saves water and ensures that your plants always have the right amount of moisture. Remember to troubleshoot any issues that arise. Check the batteries, wiring, and cleanliness of the sensor. Regular maintenance can extend the life of your sensor.
Conclusion
Soil moisture sensors are valuable tools for anyone who grows plants. They help us understand the water needs of our plants. They also help us save water. By using sensors, we can make informed decisions about watering. We can grow healthier plants and protect the environment. This {soil moisture sensor guide} has provided you with the information you need to get started. So, go out and explore the world of soil moisture sensors! You will be amazed at what you can learn.
Frequently Asked Questions
Question No 1: What is a soil moisture sensor?
Answer: A soil moisture sensor is a device that measures the amount of water in the soil. It helps farmers, gardeners, and homeowners understand how much water is available to plants. This information is used to determine when and how much to water, ensuring plants get the right amount of moisture. Using this {soil moisture sensor guide}, you can learn how to properly use a soil moisture sensor. Proper use prevents overwatering and underwatering. Ultimately, soil moisture sensors help conserve water and promote healthier plant growth. This leads to more efficient use of resources and better yields.
Question No 2: How does a soil moisture sensor work?
Answer: Soil moisture sensors work by measuring the dielectric constant or the electrical resistance of the soil. Capacitive sensors measure the dielectric constant, which is the ability of a material to store electrical energy. Water has a high dielectric constant, so wetter soil stores more energy. Resistive sensors measure the electrical resistance. Water conducts electricity, so wetter soil has lower resistance. The {soil moisture sensor guide} explains different sensor types. The sensor sends a signal to a device that displays the moisture level. This reading helps users decide if the soil needs more water. Knowing how they work allows for better interpretation of the data.
Question No 3: Why should I use a soil moisture sensor?
Answer: Using a soil moisture sensor offers several benefits. First, it helps you avoid overwatering and underwatering, which are common mistakes that can harm plants. Overwatering can lead to root rot, while underwatering can cause plants to wilt and die. Second, it saves water by ensuring you only water when necessary. This is good for the environment and can lower your water bill. Third, it promotes healthier plant growth by providing the optimal amount of moisture. The {soil moisture sensor guide} helps you achieve better results. Finally, it saves time by automating the watering process. You can monitor soil moisture remotely and adjust watering schedules accordingly.
Question No 4: How do I choose the right soil moisture sensor?
Answer: Choosing the right soil moisture sensor depends on your specific needs. Consider the size of your garden or farm. For small gardens, a simple handheld sensor may suffice. For larger areas, consider a more advanced sensor with data logging capabilities. Think about the type of soil you have. Some sensors work better in certain soil types than others. Also, consider your budget. Sensors range in price from inexpensive to very expensive. This {soil moisture sensor guide} helps you evaluate your options. Read reviews and compare different models before making a decision. Look for sensors that are durable, accurate, and easy to use.
Question No 5: How do I install a soil moisture sensor?
Answer: Installing a soil moisture sensor is usually straightforward. First, choose a location that is representative of the area you want to monitor. Avoid spots that are always wet or dry. Dig a small hole deep enough to bury the sensor. Follow the manufacturer’s instructions for the recommended depth. Gently insert the sensor into the soil and pack the soil around it. This {soil moisture sensor guide} advises careful installation. Connect the sensor to a display device or a data logger. Calibrate the sensor according to the manufacturer’s instructions. This ensures accurate readings. Regularly check the sensor to make sure it is functioning properly.
Question No 6: How do I interpret the readings from a soil moisture sensor?
Answer: Interpreting the readings from a soil moisture sensor requires understanding the scale used by the sensor. Some sensors use a scale of 0 to 100, where 0 is completely dry and 100 is completely saturated. Others use millibars or kilopascals, which measure water tension. Higher numbers indicate drier soil. This {soil moisture sensor guide} teaches you how to decode the readings. Know the ideal moisture levels for your plants. Different plants have different water needs. Consider the type of soil you have. Sandy soil drains quickly, while clay soil holds water longer. Track readings over time to see trends. Adjust your watering schedule based on the sensor data.
